How to Get Rid of /wordpress/ From your WordPress Site URL
-
by cobra_admin
- 189
Are you trying to remove /wordpress/ from your website’s URL?
Sometimes beginners install WordPress in a subdirectory, and this causes /wordpress/ to appear in their website URL, such as http://example.com/wordpress/.
In this article, we will show you how to get rid of /wordpress/ from your WordPress site URL.
Note: The method shown in this tutorial also works for other subdirectories.
Why Does My Website Have /wordpress/ in Its URL?
WordPress is quite easy to install, and most WordPress hosting companies offer quick WordPress installers in their hosting control panels.
However, some beginners who install their WordPress website manually may end up accidentally installing it in a subdirectory. Most often, this subdirectory is named ‘wordpress’.
This usually happens because users end up uploading the wordpress folder they find inside the official WordPress.org download.
Let’s take a look at how to easily fix this and get rid of /wordpress/ from your site’s URL. We will cover three methods, and you can use these links to jump to the one you want to use:
- Simply Start Over With a New WordPress Install
- Change Your WordPress Site Address
- Move WordPress to the Root Directory
Method 1: Simply Start Over With a New WordPress Install
If you have just installed WordPress and there is no content on your website, then you can just go ahead and start over.
Simply delete the current installation, and follow the instructions in our WordPress installation tutorial to properly reinstall WordPress.
If you have already added content to your website, then there are two easy ways to remove the /wordpress/ from your site’s URL. We will cover them in Methods 2 and 3.
Method 2: Change Your WordPress Site Address
If you have an established WordPress site, then this method is easier and quicker. The downside of this method is that your media files, such as images, will still use /wordpress/ in their URL.
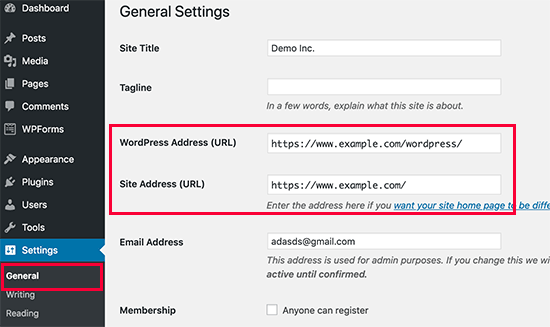
First, you need to log in to your WordPress admin area and go to Settings » General. You will notice the ‘WordPress Address’ and ‘Site Address’ fields both will have the same URL.
You need to change the ‘Site Address’ option and point it to your root domain, e.g. http://www.example.com and leave the ‘WordPress Address’ option as it is.
Once you do that, click on the ‘Save Changes’ button to store your settings.
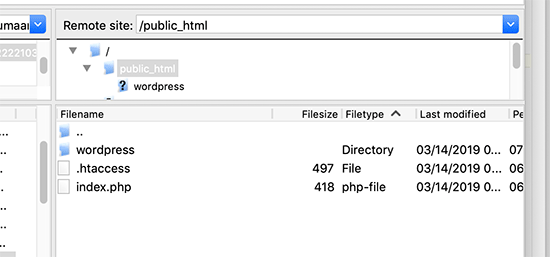
Next, you need to connect to your website using an FTP client. Once there, go to the /wordpress/ directory and download the .htaccess and index.php files to your computer.
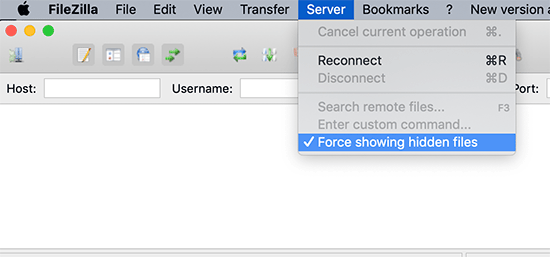
If you are unable to locate the .htaccess file, then you may need to force your FTP client to show hidden files. If you are using Filezilla, then you need to click on Server from the menu bar and select the ‘Force showing hidden files’ option.
Once you have downloaded both files to your computer, you need to open the index.php file in a text editor like Notepad. In this file, you will find a line like this:
require( dirname( __FILE__) . '/wp-blog-header.php'); |
Hosted with ❤️ by WPCode
This line loads the wp-blog-header.php file, which is required to load your WordPress site.
What you need to do now is enter the correct location of the file by replacing the existing line with this one:
require( dirname( __FILE__) . '/wordpress/wp-blog-header.php'); |
Hosted with ❤️ by WPCode
Save your changes and upload both index.php and .htaccess files from your desktop computer to the root of your domain using FTP.
The root folder is the parent folder with the ‘wordpress’ folder inside it, and it is usually called /www/ or /public_html/.
That’s all. You can now visit your website using the root domain, and everything will work fine.
http://example.com |
However, if you need to log in to your WordPress admin, then you will still need to go to the wp-admin inside the ‘wordpress’ directory like this:
http://www.example.com/wordpress/wp-admin |
Method 3: Move WordPress to the Root Directory
This method is more comprehensive and will permanently move your WordPress site from the subdirectory to the root folder of your website.
Step 1: Create a Duplicator Package
First, you need to install and activate the Duplicator plugin on your website. For more details, see our step-by-step guide on how to install a WordPress plugin.
Upon activation, you need to visit the Duplicator » Settings page and then click on the ‘Create New’ button.
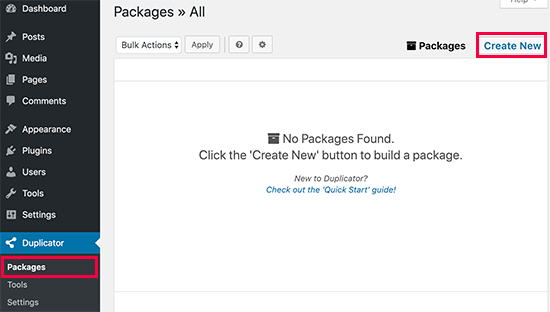
This will launch the Duplicator wizard, which will create an installer package of your complete website. Click on the next button to continue.
Next, the plugin will run some scans. If everything looks good, then you can click on the ‘Build’ button at the bottom.
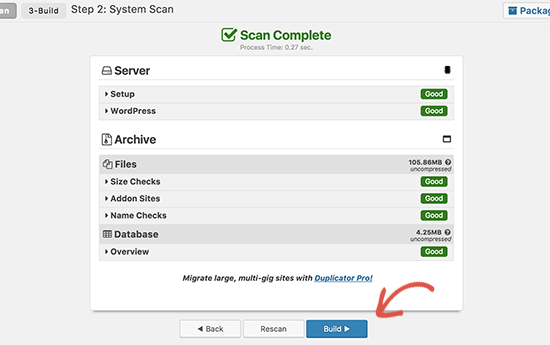
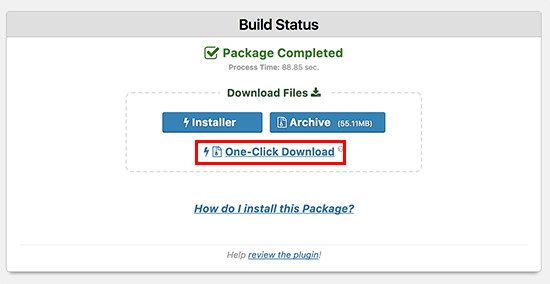
Duplicator will now create a package and prompt you to download it along with the installer script. Go ahead and download both files to your computer.
Step 2: Create a New Database for a Fresh WordPress Install
You can use the existing WordPress database, but it is better to create a new one so that your old database is safe and unchanged. This way, you can revert back to your site without much fuss if something goes wrong.
You need to visit your hosting account’s cPanel dashboard, scroll down to the ‘Databases’ section, and then click on the ‘MySQL Databases’ icon.

After that, simply provide a name for your database and click on the ‘Create Database’ button.

cPanel will now create a new database for you. After that, you need to scroll down to the ‘MySQL Users’ section.
From here, you need to provide a username and password for your new database user and click on the ‘Create a User’ button.
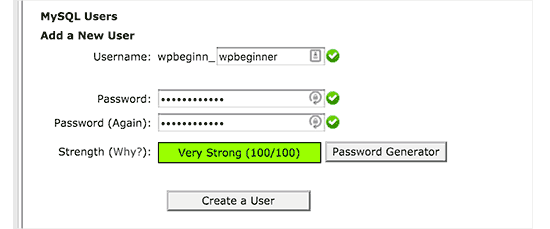
Now you need to assign database permissions to the new user.
Scroll down to the ‘Add User to Database’ section. Simply select the database user you created from the dropdown menu next to the ‘User’ field, then select the database. Finally, click on the ‘Add’ button.

Your new database is now ready to be used for the fresh WordPress installation.
Step 3: Run the Duplicator Wizard
Now, you need to upload the Duplicator archive package and the installer file you downloaded earlier to the root directory of your website.
This will be the directory containing the/wordpress/ folder.
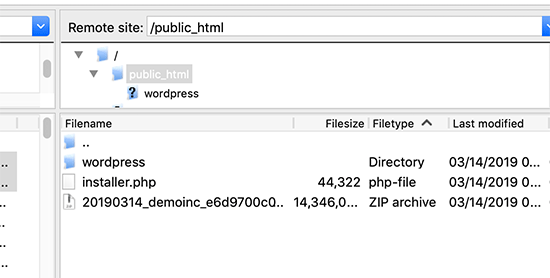
After you have uploaded both files, open the installer script in a browser window. You will need to enter your site’s root URL and then prefix it with /installer.php.
https://example.com/installer.php |
Hosted with ❤️ by WPCode
This will open the Duplicator installer wizard.
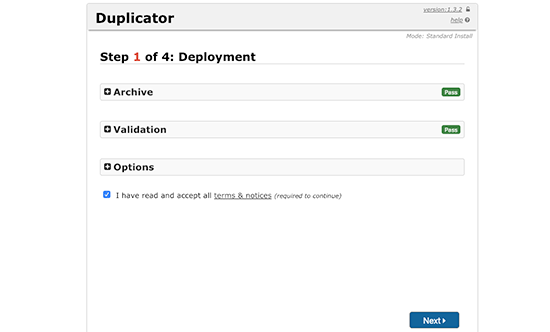
Check the terms and conditions box and then click on the ‘Next’ button to continue.
Next, it will ask you to provide the database information. Enter the information for the database we created earlier in step 2.
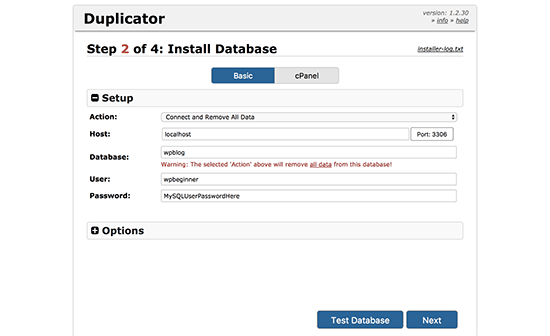
After entering the database information, click on the ‘Next’ button to continue. Duplicator will now unpack your WordPress database backup from the archive into your new database.
Next, it will ask you to update the site URL and path. You don’t need to do anything here, as it will automatically detect the new URL and path. However, if it doesn’t, then you can manually enter the details here.
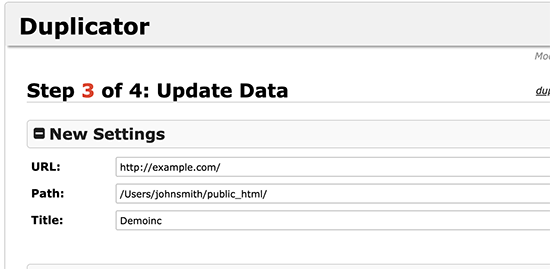
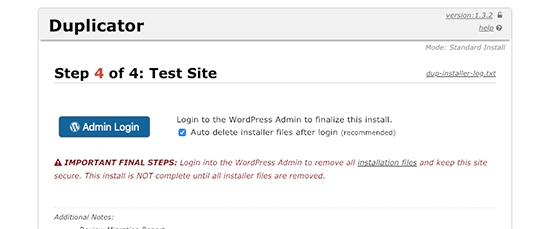
Duplicator will now finish the migration, and you will be able to click on the ‘Admin Login’ button to access your website at the new location.
Step 4: Set Up Subdirectory to Root Folder Redirects
Congratulations, you have successfully moved your WordPress site from the subdirectory to the root folder.
Now it is time to set up redirects so that your users and search engines can find your website’s new location.
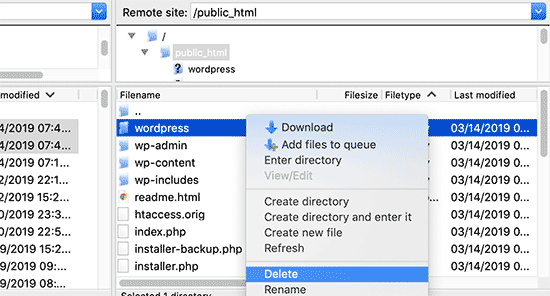
First, you need to connect to your WordPress site using an FTP client and then delete the old /wordpress/ folder.
After that, switch to the admin area of your WordPress site. Since you have moved it to the root of your website, your WordPress admin URL will be like this:
https://example.com/wp-admin |
Now, you need to install and activate the Redirection plugin. For more details, see our step-by-step guide on how to install a WordPress plugin.
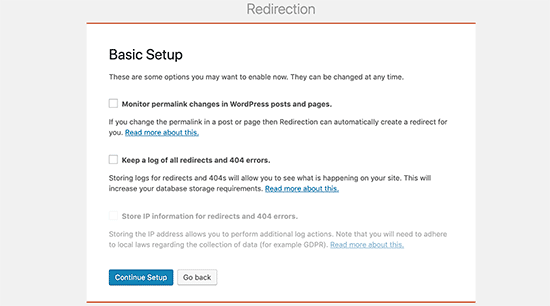
Upon activation, you need to visit the Tools » Redirection page. The plugin will now show you a setup wizard. Simply click on the ‘Continue Setup’ and then ‘Finish Setup’ buttons.
Next, you need to switch to the ‘Redirects’ tab and add your new redirect.
First, you need to check the ‘Regex’ box at the corner of the first field.
After that, go to the ‘Source URL’ field and add https://example.com/wordpress/.*Next, go to the ‘Target URL’ field and add https://example.com/$1.
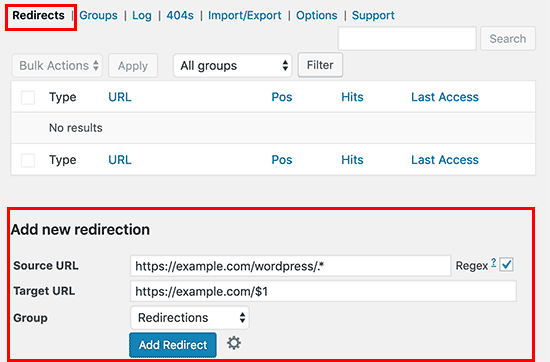
Don’t forget to replace ‘example.com’ with your own domain name. Then make sure you click the ‘Add Redirect’ button to save your changes, and you are done.
Another tool you can use to redirect posts and pages is All in One SEO (AIOSEO). We show you how to redirect visitors using old URLs containing /wordpress/ to your new site location in our beginner’s guide on how to do full site redirects in WordPress.
Plus, you can enable 404 error tracking to catch any broken links so that you don’t lose keyword rankings.
From now on, all users trying to access your website with /wordpress/ in the URL will be automatically redirected to the correct posts with your new root URL.
We hope this article helped you learn how to get rid of /wordpress/ from your WordPress site URL. You may also want to learn how to speed up your WordPress performance or see our top picks for the best WordPress SEO plugins and tools.
Are you trying to remove /wordpress/ from your website’s URL? Sometimes beginners install WordPress in a subdirectory, and this causes /wordpress/ to appear in their website URL, such as http://example.com/wordpress/. In this article, we will show you how to get rid of /wordpress/ from your WordPress site URL. Note: The method shown in this tutorial also works for…
Are you trying to remove /wordpress/ from your website’s URL? Sometimes beginners install WordPress in a subdirectory, and this causes /wordpress/ to appear in their website URL, such as http://example.com/wordpress/. In this article, we will show you how to get rid of /wordpress/ from your WordPress site URL. Note: The method shown in this tutorial also works for…