How to Insert Ads Within Your Post Content in WordPress
-
- 102
Do you want to insert ads within your post content in WordPress?
Your post content is the place where visitors are most engaged with your website, which makes it the perfect place to show an ad.
In this article, we will show three ways to insert ads within your post content in WordPress.

Why Insert Ads Within Your Post Content in WordPress?
Banner and sidebar ads are a great way to make money online blogging with WordPress. However, they’re also easy for visitors to ignore.
People visit your site to read your content, and may not pay as much attention to your sidebar or other areas of the page. Since your post content gets the most attention from visitors, it’s the perfect place to show ads.
With that being said, let’s look at three different ways to insert ads within your post content in WordPress.
If you prefer to jump straight to a particular method then you can use the links below.
- Method 1. Inserting Ads Within Post Content using WPCode (Automatically)
- Method 2. Inserting Ads Within Post Content using Ad Inserter
- Method 3. Inserting Ads Within Post Content using Code (Advanced)
Method 1. Inserting Ads Within Post Content using WPCode (Automatically)
One way to insert ads within your post content is by using the free WPCode plugin.
WPCode is one of the best WordPress code snippets plugin on the market and it doubles as one of the top WordPress ad management plugins. It allows you to easily insert code to place ads on any page, post, or widget area of your WordPress website.
You can show advertisements from third-party ad networks such as Google AdSense. Or, you can display your own hosted ads, which is perfect for selling ads on your WordPress blog.
To get started, you’ll need to install and activate the WPCode plugin. If you need help, then please see our guide on how to install a WordPress plugin.
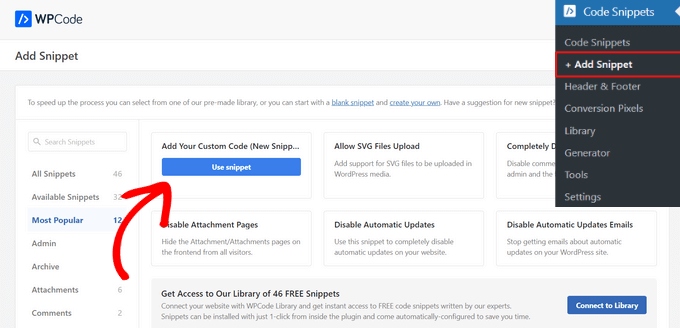
Upon activation, go to Code Snippets » + Add Snippet from your WordPress dashboard.
This will bring you to the built-in code snippets library. Hover over the ‘Add Your Custom Code (New Snippet)’ option, and click the ‘Use snippet’ button to select it.
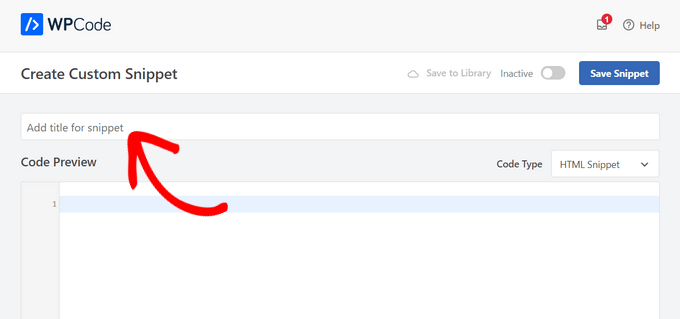
Next, you’ll need to give your ad a title by typing into the field that shows ‘Add title for snippet.’
Your site visitors won’t see the title since it’s for your own reference only.
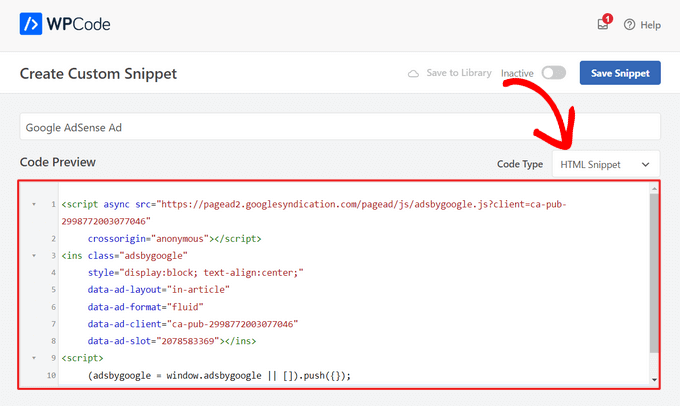
Next, you need to choose the type of ad you want to place on your site.
One option is to use the ad code provided by a program like Google AdSense.
If you’re using Google AdSense code, then you may want to see our guide on the highest performing Google AdSense banner sizes and formats. We also have a complete guide on how to optimize your AdSense revenue in WordPress.
Another option is to create your own ad. In that case, you would need to get the code from the person who is paying you to show the ad on your WordPress site or write the code yourself.
Once you have the ad code, simply copy and paste it into the ‘Code Preview’ box.
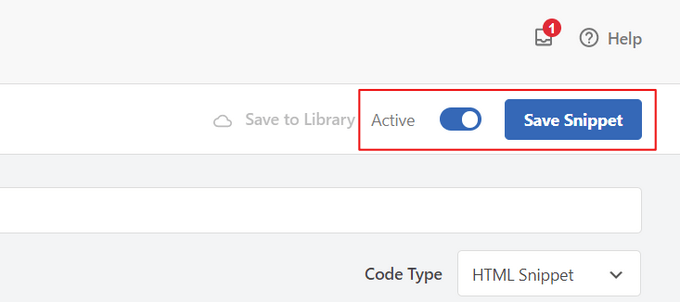
You also need to select ‘HTML Snippet’ as the ‘Code Type’ from the dropdown list on the right side of the screen.
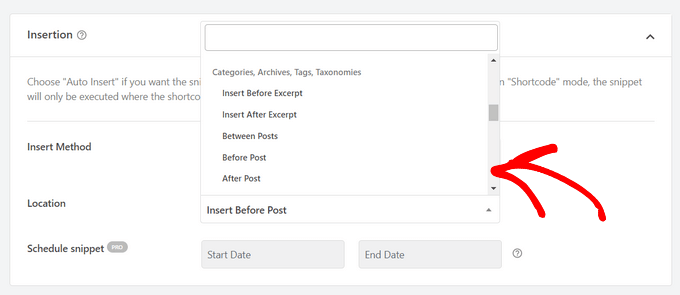
After that, scroll down to the ‘Insertion’ section. There are two main insertion options you can choose from:
- Auto-Insert – The ad code will be automatically inserted and executed on your website in the location that you choose.
- Shortcode – The ad code will not be automatically inserted. You will get a shortcode that you can manually insert anywhere on your WordPress blog.
Click on the ‘Auto-Insert’ method to automatically display ads within post content.
Then, choose the ‘Insert After Paragraph’ option from the dropdown list next to the ‘Location’ field.
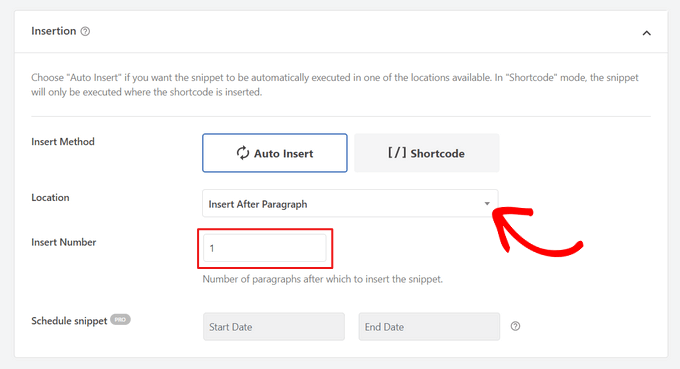
You can also modify the ‘Insert Number’ to choose the number of paragraphs after which to insert the snippet. For example, if you want to display the ad after the second paragraph instead of the first, simply replace the 1 with a 2.
Aside from inserting ads after a paragraph, you can also automatically display ads in locations (WordPress functions) such as before or after content, between posts, before or after excerpts, and more.
With the premium version of WPCode, you can also insert ads in WooCommerce locations like before or after products, cart, and checkout page, just to name a few.
WPCode Pro also lets you schedule your ad code snippets with a start and end date. This is perfect for displaying ads around the holiday season or for other limited-time promotions.
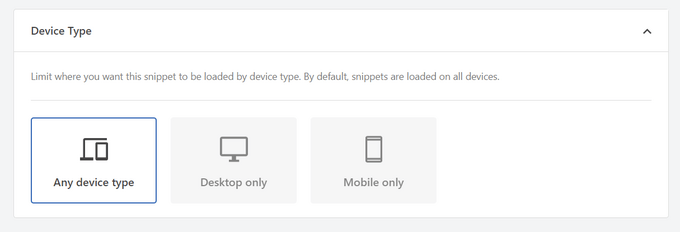
Next, you can scroll down to the ‘Device Type’ section. Here, you can choose whether you want to display your ad on any device type, desktop only, or mobile only.
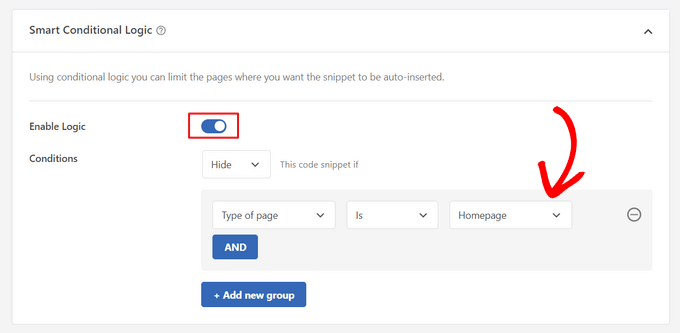
If you want to limit the pages or posts where the ad code snippet is auto-inserted, you can scroll down to the ‘Smart Conditional Logic’ section.
For example, you can hide your ads on specific page types or page URLs.
To help organize your ads, you can go to the ‘Basic info’ section. In this area, you can add tags and notes to help you remember what your ad code snippet is for.
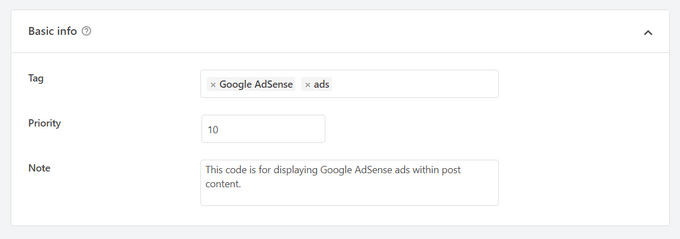
There’s also a ‘Priority’ field that allows you to control the order in which the snippets are executed when you want to display multiple snippets in the same location.
All snippets get a priority of 10 as a default, so if you want your ad code to display earlier than others, simply set the priority to a lower number.
Once you’ve finished working on your ad, it’s time to publish it.
To do that, go back to the top of the page and toggle the switch from ‘Inactive’ to ‘Active.’ Then, click on the ‘Save Snippet’ button.
That’s it! Your ad will now automatically be inserted within your post content if you selected the ‘Auto-Insert’ method shown in this tutorial.
If you chose the ‘Shortcode’ insertion method instead, you can either create a new page or post, or open one for editing. Then, simply find the exact place where you want to show this ad within your post content, and create a new shortcode block.
You can then go ahead and paste the shortcode into this block. For step by step instructions, see our beginner’s guide on how to add a shortcode in WordPress.
Now, you can visit the page or post to see the ad within your post content.
Note: If you are displaying Google AdSense ads, it may take 20-30 minutes for the ad to appear on the page.
Method 2. Inserting Ads Within Post Content using Ad Inserter
Another option is to use Ad Inserter. This is a WordPress ad management plugin that can show both hosted ads and advertisements provided by a network.
If you’re using a network then you can simply paste your ad code into the Ad Inserter plugin. However, if you’re creating a hosted ad, then you’ll either have to write the code yourself, or get it from the person who is paying to show their ad on your website.
The first thing you need to do is install and activate the free Ad Inserter plugin. If you need help, then please see our guide on how to install a WordPress plugin.
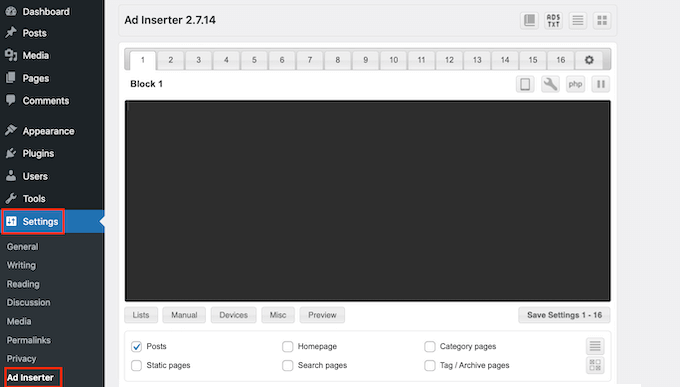
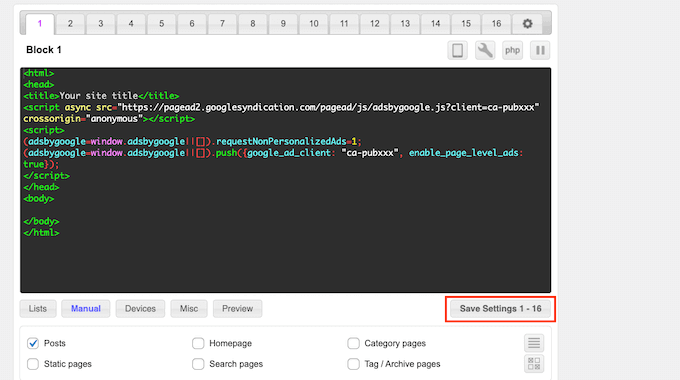
Upon activation, go to Settings » Ad Inserter.
On this screen, each tab is a different advertisement. This allows you to create multiple different ads, and place them on your website.
You can now either type in or copy/paste the code for the advertisement that you want to show within your post content.

The next step is placing this ad on your website. One option is to add the advertisement to any page, post, or widget-ready area using a shortcode.
Another option is to tell Ad Inserter to automatically add this advertisement to every post, at a certain location such as after every third paragraph.
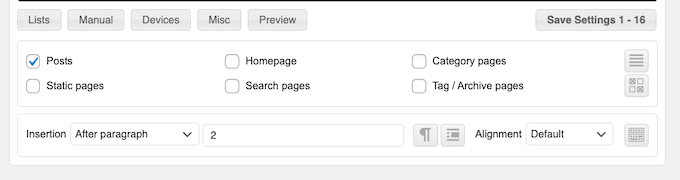
If you want to add this advertisement to your posts automatically, then start by checking the ‘Post’ box.
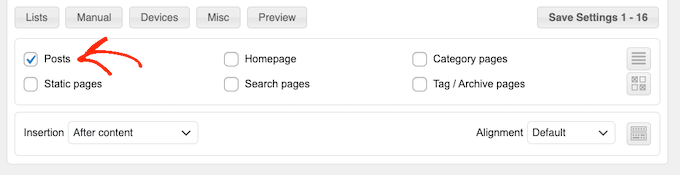
Next, you’ll need to open the ‘Insertion’ dropdown and choose where Ad Inserter should show this ad.
Since we want to insert ads within the post content, you’ll typically want to choose either Before Paragraph, After Paragraph, Before Image, or After Image.
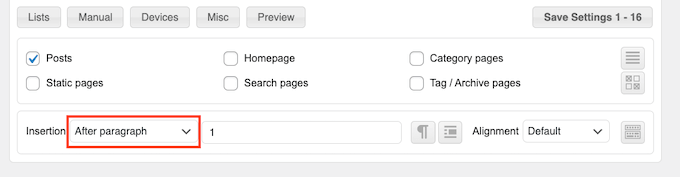
After choosing an option from the list, type in exactly where this ad should appear.
For example if you wanted to show the ad after the second paragraph, then you would type in ‘2’ as you can see in the following image.
When you’re happy with your settings, click on the ‘Save Settings’ button.
Ad Inserter will now insert this ad within your post content, in your chosen location.
Just like we mentioned earlier, you can also place this ad on your site using a shortcode.
To do this, click on the ‘Manual’ button and then check the ‘Shortcode’ box.
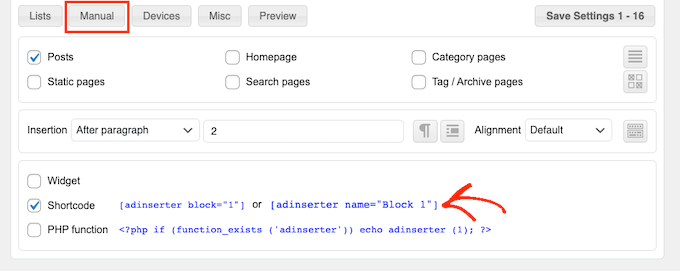
Once you’ve done that, just copy the Ad Inserter shortcode. You can then click on the ‘Save Settings’ button to save your ad.
With that done, you’re ready to place this shortcode on any page, post, or widget-ready area. For step by step instructions, you can see our guide on how to add a shortcode in WordPress.
Method 3. Inserting Ads Within Post Content using Code (Advanced)
You can also add an advertisement to your post content in WordPress using code.
Since you’re editing your site’s code, this isn’t the most beginner friendly method. However, it does allow you to create ads without having to install a special ad management plugin.
To insert an ad using code, either open your theme’s functions.php file, create a site-specific plugin, or use a code snippets plugin.
Again, we recommend using the free WPCode plugin because it makes it easy to paste snippets into WordPress, without editing your theme’s functions.php file.
Plus, WPCode comes with smart code snippet validation to help you prevent common code errors and protect you from breaking your site.
You can then add the following code:
| 123456789101112131415161718192021222324252627282930313233 | //Insert ads after second paragraph of single post content. add_filter( 'the_content', 'prefix_insert_post_ads'); functionprefix_insert_post_ads( $content) { $ad_code= '<div>Ads code goes here</div>'; if( is_single() && ! is_admin() ) { returnprefix_insert_after_paragraph( $ad_code, 2, $content); } return$content;} // Parent Function that makes the magic happen functionprefix_insert_after_paragraph( $insertion, $paragraph_id, $content) { $closing_p= '</p>'; $paragraphs= explode( $closing_p, $content); foreach($paragraphsas$index=> $paragraph) { if( trim( $paragraph) ) { $paragraphs[$index] .= $closing_p; } if( $paragraph_id== $index+ 1 ) { $paragraphs[$index] .= $insertion; } } returnimplode( '', $paragraphs);} |
Hosted with ❤️ by WPCode
1-click Use in WordPress
This code will show an advertisement after the second paragraph of a post’s content.
If you want to show your ad in some other location, then you simply need to change the following section:
| 123 | if( is_single() && ! is_admin() ) { returnprefix_insert_after_paragraph( $ad_code, 3, $content);} |
Hosted with ❤️ by WPCode
1-click Use in WordPress
In the sample code above, you can see that we’re inserting the ad after the third paragraph.
Once you’ve done that, you can go ahead and either type in or paste your ad code. This is the code that controls how your ad looks and acts.
You’ll add this code as the $ad_code value, which is where it says ‘Add code goes here.’
| 1 | $ad_code= '<div>Ads code goes here</div>'; |
Hosted with ❤️ by WPCode
1-click Use in WordPress
After you’ve done that, you’re ready to publish your ad. To do this, either activate your site-specific plugin, save the changes you’ve made to your site’s functions.php file, or activate and save your code snippet in WPCode.
Now if you visit your website, you should see your ad live.
We hope this article helped you learn how to insert ads within your post content in WordPress. You may also want to learn how to increase your blog traffic, or check out our list of the best WordPress tools and SEO plugins that you should use.
Do you want to insert ads within your post content in WordPress? Your post content is the place where visitors are most engaged with your website, which makes it the perfect place to show an ad. In this article, we will show three ways to insert ads within your post…
Do you want to insert ads within your post content in WordPress? Your post content is the place where visitors are most engaged with your website, which makes it the perfect place to show an ad. In this article, we will show three ways to insert ads within your post…