How to Properly Change Your WordPress Username (Step by Step)
-
- 41
Do you want to change the username you use when logging in to your WordPress website?
It’s not possible to change your username in WordPress using the same method as changing your full name or password, but there are a few ways around that.
In this article, we will show you three different methods to change WordPress usernames, step by step.

Changing Your WordPress Username
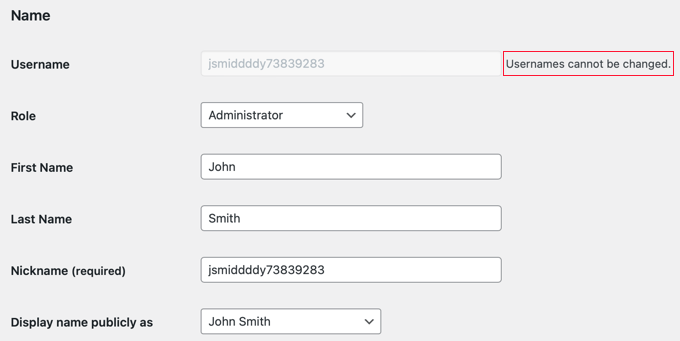
Would you like to change your name on your WordPress website? While it is easy to change your full name from your user profile, you’ll see a message that usernames can’t be changed.
This can be frustrating and confusing to beginner WordPress users. The good news is that there are several workarounds to change your WordPress admin username and other usernames.
In this article, we will show you three ways to change your WordPress username. You can use the links below to jump to the method you wish to use:
- Method 1: Create a New User and Delete the Old One
- Method 2: Change Username by Using a Plugin
- Method 3: Change Your WordPress Username Using phpMyAdmin
Method 1: Create a New User and Delete the Old One
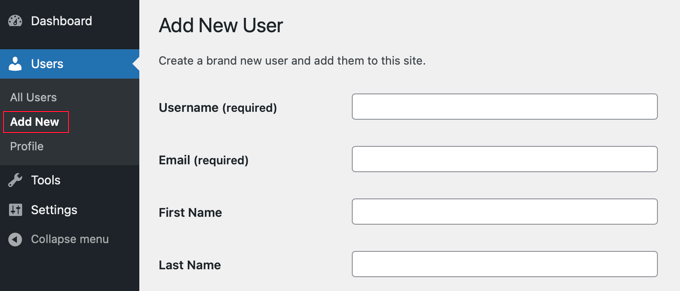
The easiest way to change your WordPress username is by creating a new user with your desired username and with the administrator user role.
The only catch is that you will need to use a different email address than the one used by your current account.
Note: If you are using Gmail, then you can insert a plus sign (+) with additional letters after your username. For example, if your email address is myname@gmail.com, then you can use the email address myname+wordpress@gmail.com. It will still go to the same email inbox, but WordPress will consider it a separate email address.
After creating the new account, you need to log out of your WordPress account and then log in with the new user account you just created.
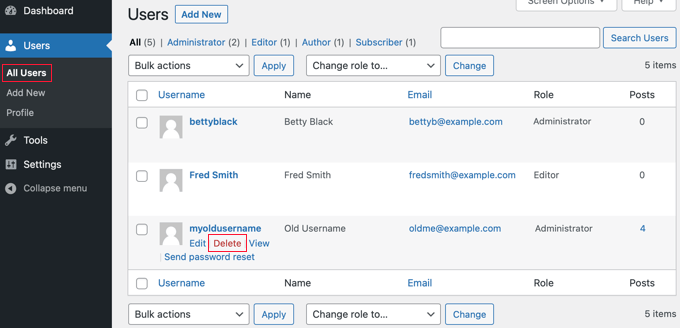
Next, head over to the Users » All Users page in your WordPress dashboard and then click the ‘Delete’ link under your old username to remove it.
When you delete the old username, WordPress will ask what you want to do with any content created by that user.
Make sure that you click the ‘Attribute all content to’ option and then select the new user you just created.
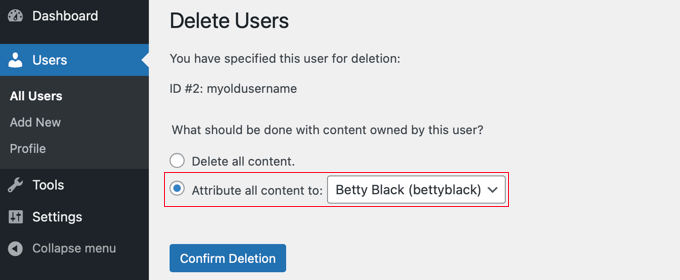
After that, you should click the ‘Confirm Deletion’ button to delete the old user account.
Congratulations, you have now successfully changed your WordPress username. If you want to use the same email address as before, then you can now change the email address of the new user.
Method 2: Change Username by Using a Plugin
Another simple way to change your WordPress username is by using a plugin. If you are worried about using too many plugins, then let us assure you that you can safely delete the plugin once you have changed your WordPress username.
The first thing you need to do is install and activate the Easy Username Updater plugin. For more details, see our step-by-step guide on how to install a WordPress plugin.
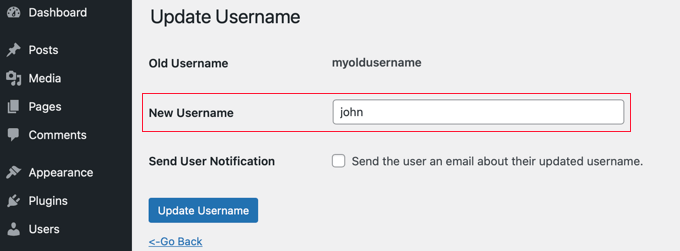
Upon activation, simply go to the Users » Username Updater page and then click the ‘update’ link next to the username you want to change.

Now, you simply enter the new username and then click the ‘Update Username’ button.
If you’d like to notify the user about the change, then make sure you check the ‘Send User Notification’ box first.
That’s all! Now, you can remove the username changer plugin from your site.
Method 3: Change Your WordPress Username Using phpMyAdmin
This method is a little bit complicated as it requires that you make direct changes to your WordPress database.
We recommend that users avoid doing this if possible since it’s easy to make a mistake and cause errors on your WordPress site. However, in some cases, you may not have an option, such as when you forget your WordPress username and email address and get locked out of your admin account.
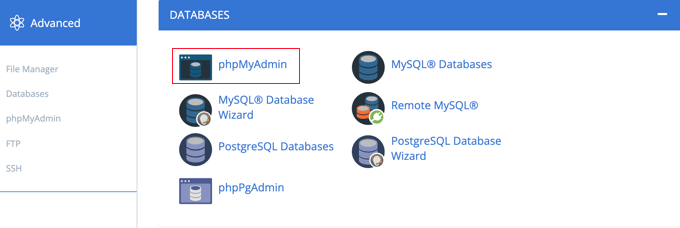
First, you will need to log in to your web hosting dashboard and click the ‘phpMyAdmin’ icon under the Databases section.
We are using Bluehost in this example. Your dashboard may look different if you are using a different host that doesn’t use cPanel, but the phpMyAdmin option should still be available.
This will launch phpMyAdmin in a new browser tab.
You will need to select your WordPress database if it is not already selected.
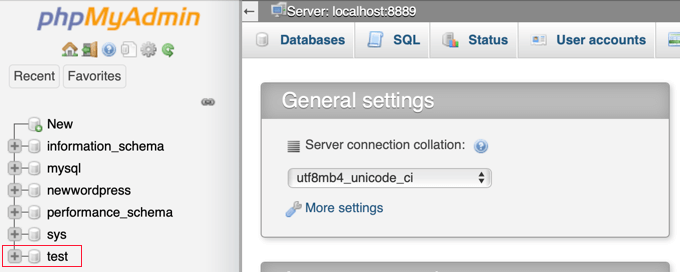
You will now see your WordPress database tables. By default, WordPress database tables use wp_ as a prefix before each table’s name. It is possible that you may have changed the database prefix to something else.
You need to click on the wp_users table on the left-hand side. Then, you should click ‘Edit’ next to the username that you wish to change.
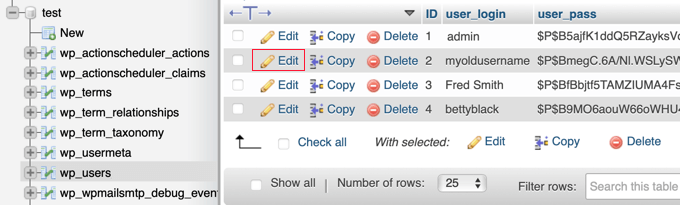
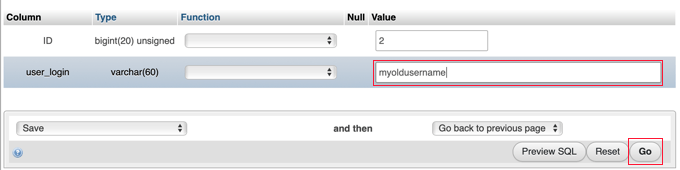
Now, you will be able to type the new username you wish to use into the user_login field.
When you are done, you’ll need to click the ‘Go’ button at the bottom of the screen to save the new username.
That’s all! Now, you should be able to log in to your dashboard with your new username.
We hope this tutorial helped you learn how to properly change your WordPress username. You may also want to see our tutorial on how to choose the best WordPress hosting or check out our complete guide to WordPress SEO.
Do you want to change the username you use when logging in to your WordPress website? It’s not possible to change your username in WordPress using the same method as changing your full name or password, but there are a few ways around that. In this article, we will show…
Do you want to change the username you use when logging in to your WordPress website? It’s not possible to change your username in WordPress using the same method as changing your full name or password, but there are a few ways around that. In this article, we will show…