How to Install and Use Istio on Vultr Kubernetes Engine (VKE)
-
- 60
Introduction
Istio is a service mesh implementation that enables observability of your services to monitor how services communicate with each other through a visual dashboard. In addition, Istio also allows you to simplify the canary deployment process so that you can safely deploy a new version of your application to a small number of users and monitor how they interact with it. It also supports the mutual transport layer security (mutual TLS) for requests sent amongst your services, which adds an extra layer of security defense system for your cluster applications.
Istio consists of two main components, the data and control planes as below:
- The data plane is a group of proxies that enable communication between your services.
- The control plane manages the proxies to apply observability, traffic management, and security enhancement.
This article explains how to install and use Istio on a Vultr Kubernetes Engine (VKE) Cluster. You are to apply Istio to your applications to achieve observability, traffic management, and security improvement in your cluster.
Prerequisites
Before you begin, you should:
- Deploy a VKE cluster with at least 3 nodes
- Deploy a Ubuntu management server to work as the client machine to connect to the VKE cluster
On the management machine:
- Using SSH, access the server
- Create a non-root user with sudo privileges and switch to the account
- Install Kubectl to access the VKE cluster
- Install Nginx to enable access to the Kiali dashboard
Installation
Install the Istio Command Line tool
- Download and install
istioctlthat lets you install Istio components to your cluster$ curl -L https://istio.io/downloadIstio | sh - - Switch to the downloaded Istio directory. Replace
1.18.2with your actual Istio version number$ cd istio-1.18.2 - Add the
istioctlcommand to your environment variables to allow usage from any directory.$ export PATH=$PWD/bin:$PATH - Verify that you can access the
istioctltool$ istioctlOutput:Istio configuration command line utility for service operators to debug and diagnose their Istio mesh. Usage: istioctl [command] Available Commands:
Export the Kubernetes Environment Variable
To connect to your VKE cluster, verify that you installed kubectl, then export the KUBECONFIG environment variable with your VKE cluster YAML file as described below.
- Export the
KUBECONFIGenvironment variable with the path to your VKE configuration file$ export KUBECONFIG=/home/user/downloads/vke-config-file.yaml - View the cluster notes to verify that
kubectlconnects to the VKE cluster$ kubectl get nodesYou should see a similar result as below:NAME STATUS ROLES AGE VERSION test-46b7042bfeea Ready <none> 4d16h v1.27.2 test-682460cea1fb Ready <none> 4d16h v1.27.2 test-df51b2c65bc2 Ready <none> 4d16h v1.27.2
Install Istio Components on the VKE Cluster
Istio supports built-in configuration profiles and customized profiles to match the vendor-specific platform. Use the default profile to deploy Istio in production deployment. For this article, use the demo profile to install Istio as described below.
- Run the following command to install Istio using the
demoprofile$ istioctl install --set profile=demo -yYou should see a similar output as below:- Istio core installed - Istiod installed - Egress gateways installed - Ingress gateways installed - Installation complete Making this installation the default for injection and validation.The above components install in theistio-systemnamespace. With thedemoprofile, Istio installsistiod,istio-egressgateway, andistio-ingressgatewaycomponents as below:istiod: The Istio control plane component responsible for managing proxies and traffic routingistio-ingressgateway: Allows you to define entry points for your servicesistio-egressgateway: Allows you to define exit points for your services
- Run the following command to list the Istio pods
$ kubectl get pods --namespace istio-systemOutput:NAME READY STATUS RESTARTS AGE istio-egressgateway-77db8d5479-qkhtj 1/1 Running 0 3h35m istio-ingressgateway-5ccb67cdc7-phg8t 1/1 Running 0 3h35m istiod-64b55f66f-gxvfp 1/1 Running 0 3h35mAs displayed in the output, verify that all Istio components are ready and running.
Configuration
In this section, configure Istio to apply service mesh for the demo application deployed on your VKE cluster.
Enable the Istio Envoy Proxy
Istio injects Envoy proxies into the application pods to enforce constant communication with each other. As a result, the Istio control plane can apply traffic management, observability, and security enhancement through the Envoy proxies.
To allow Istio mark pods it should inject with the Envoy proxy, label the namespace that the pods belong to with the is-injection=enabled option. For example. run the following command to mark the default namespace with is-injection=enabled
$ kubectl label namespace default istio-injection=enabledOutput:
namespace/default labeledThe is-injection=enabled label marks all pods in the default namespace. Deploy a sample application to test the Envoy proxy functionality
Deploy a Sample Application
In this section, deploy a sample bookinfo application that has the following services:
product page: Retrieves book information from thedetailsandreviewsservices.reviews: Contains the book review. It has three versions:v1,v2, andv3.ratings: Stores the book ranking informationdetails: Stores the book information
Within the Istio package directory you downloaded on installation, sample deployment scripts for the bookinfo app are available within the sample sub-directory
- Switch to the Istio data directory
$ cd istio-1.18.2 - Deploy the
bookinfoapplication to thedefaultnamespace.$ kubectl apply -f samples/bookinfo/platform/kube/bookinfo.yamlOutput:service/details created serviceaccount/bookinfo-details created deployment.apps/details-v1 created service/ratings created serviceaccount/bookinfo-ratings created deployment.apps/ratings-v1 created service/reviews created serviceaccount/bookinfo-reviews created deployment.apps/reviews-v1 created deployment.apps/reviews-v2 created deployment.apps/reviews-v3 created service/productpage created serviceaccount/bookinfo-productpage created deployment.apps/productpage-v1 created - After a few minutes, verify the status of the pods
$ kubectl get podsYour output should look like the one below:NAME READY STATUS RESTARTS AGE details-v1-7c7dbcb4b5-tvkml 2/2 Running 0 2m53s productpage-v1-664d44d68d-7pg6k 2/2 Running 0 2m47s ratings-v1-844796bf85-f9jqz 2/2 Running 0 2m51s reviews-v1-5cf854487-xwsdj 2/2 Running 0 2m50s reviews-v2-955b74755-7tfmj 2/2 Running 0 2m49s reviews-v3-797fc48bc9-sv8w2 2/2 Running 0 2m48sAs displayed in the above output, each pod has two running containers, the application container, and the envoy proxy container - To view the containers inside a pod, for example, pod
details-v1-7c7dbcb4b5-tvkml, run the following command:$ kubectl get pods details-v1-7c7dbcb4b5-9dxsr -o jsonpath='{.spec.containers[*].name}'Output:details istio-proxyIn the above output:detailsis the container name of the application containeristio-proxyis the Envoy proxy name injected by Istio into the pod
Expose the Application
Your sample application requires customers to retrieve book information using the productpage service. To enable access to the bookinfo application, you need to:
- Create an Istio gateway that acts as a load balancer for your application
- Forward requests from the gateway to the
productpageservice
Create an Istio Gateway
- Within the Istio data directory, use a text editor such as
Nanoto create a new file namedistio-gateway.yaml$ nano istio-gateway.yaml - Add the following contents to the file
apiVersion: networking.istio.io/v1alpha3 kind: Gateway metadata: name: bookinfo-gateway spec: selector: istio: ingressgateway # use istio default controller servers: - port: number: 80 name: HTTP protocol: HTTP hosts: - "*"Save and close the file.In the above configuration, you set the Istio gateway namedbookinfo-gatewayand chose the selector type asingressgateway. This means incoming traffic forwards to the Istio service mesh. The gateway on port80accepts HTTP traffic and sets the gateway to accept any hostname. - Apply the configuration to create the Istio gateway
$ kubectl apply -f istio-gateway.yamlOutput:gateway.networking.istio.io/bookinfo-gateway created - View the
EXTERNAL-IPof the Istio gateway$ kubectl get svc istio-ingressgateway -n istio-systemYour output should appear like the one below:NAME TYPE CLUSTER-IP EXTERNAL-IP PORT(S) AGE istio-ingressgateway LoadBalancer 10.111.89.113 192.0.2.100 15021:32290/TCP,80:30270/TCP,443:31066/TCP,31400:31694/TCP,15443:30141/TCP 5h41m - Using
curl, make an HTTP request to the gateway$ curl "http://192.0.2.100"The request returns an empty result because you need to implement a mechanism to forward the request to the target application.
Forward External Requests to the Application Service
- Create a new file named
product-page-virtual-service.yml$ nano product-page-virtual-service.yaml - Add the following configurations to the file
apiVersion: networking.istio.io/v1alpha3 kind: VirtualService metadata: name: productpage spec: hosts: - "*" gateways: - bookinfo-gateway http: - match: - uri: exact: /productpage route: - destination: host: productpage port: number: 9080Save and close the file.The above configuration defines an IstioVirtualServiceto forward requests with the URL$GATEWAY-URL/productpageto theproductpageservice on port9080. - Run the following command to create the
VirtualServicefor the above configuration$ kubectl apply -f product-page-virtual-service.yamlYour output should appear like the one below:virtualservice.networking.istio.io/productpage created - Make an HTTP request to the Istio gateway again
$ curl "http://192.0.2.100/productpage"You should view the content of your product page service as below:<!DOCTYPE html> <html> <head> <title>Simple Bookstore App</title> <meta charset="utf-8"> <meta http-equiv="X-UA-Compatible" content="IE=edge"> <meta name="viewport" content="width=device-width, initial-scale=1"> ...
Set Up the Istio Service Mesh
Enable observability, traffic management, and security enhancement for your application using Istio as described in the following sections.
Observability
To enable observability in the application, install Kiali to visualize how services communicate with each other. Additionally, implement addon services like Prometheus or Jaeger to collect service metrics as described in the steps below.
- The Istio data directory contains all necessary addons, install them to your cluster using the following command
$ kubectl apply -f samples/addonsWait for a few minutes for the installation of all required addons to complete. When successful, your output should look like the one below:service/kiali created deployment.apps/kiali created serviceaccount/loki created configmap/loki created configmap/loki-runtime created service/loki-memberlist created service/loki-headless created service/loki created statefulset.apps/loki created serviceaccount/prometheus created configmap/prometheus created clusterrole.rbac.authorization.k8s.io/prometheus created clusterrolebinding.rbac.authorization.k8s.io/prometheus created service/prometheus created deployment.apps/prometheus created - Start the Kiali dashboard in the background to view how services in the
bookinfoapp communicate$ istioctl dashboard kiali &The above command forwards your Kiali cluster port to your localhost machine IP address. When successful, your output should appear like the one below:http://localhost:20001/kialiLater, to stop the Kiali dashboard background process, view the job ID$ jobsStop the background process by job ID. For example, job id1.$ kill %1 - By default, the
istioctl dashboard kialiport forwarding command only accepts connections from the localhost hostname address127.0.0.1. To access the dashboard using your public management Server IP, set up a new configuration file to enable Nginx as a reverse proxy using the command below$ sudo nano /etc/nginx/sites-enabled/kiali.conf - Add the following configurations to the file
server { listen 8080; server_name _; location / { proxy_pass http://localhost:20001; proxy_set_header Host $host; proxy_set_header X-Real-IP $remote_addr; proxy_set_header X-Forwarded-For $proxy_add_x_forwarded_for; proxy_set_header X-Forwarded-Proto $scheme; } }Save and close the fileThe above configuration securely forwards all requests to the Nginx listening port8080to the Kiali dashboard localhost port20001for further processing. - Enable the listening port
8080through the firewall$ sudo ufw allow 8080/tcp - Using a web browser such as Chrome, access the Kiali dashboard
http://SERVER-IP:8080/kialiThe main Kiali dashboard interface should display in your browser window.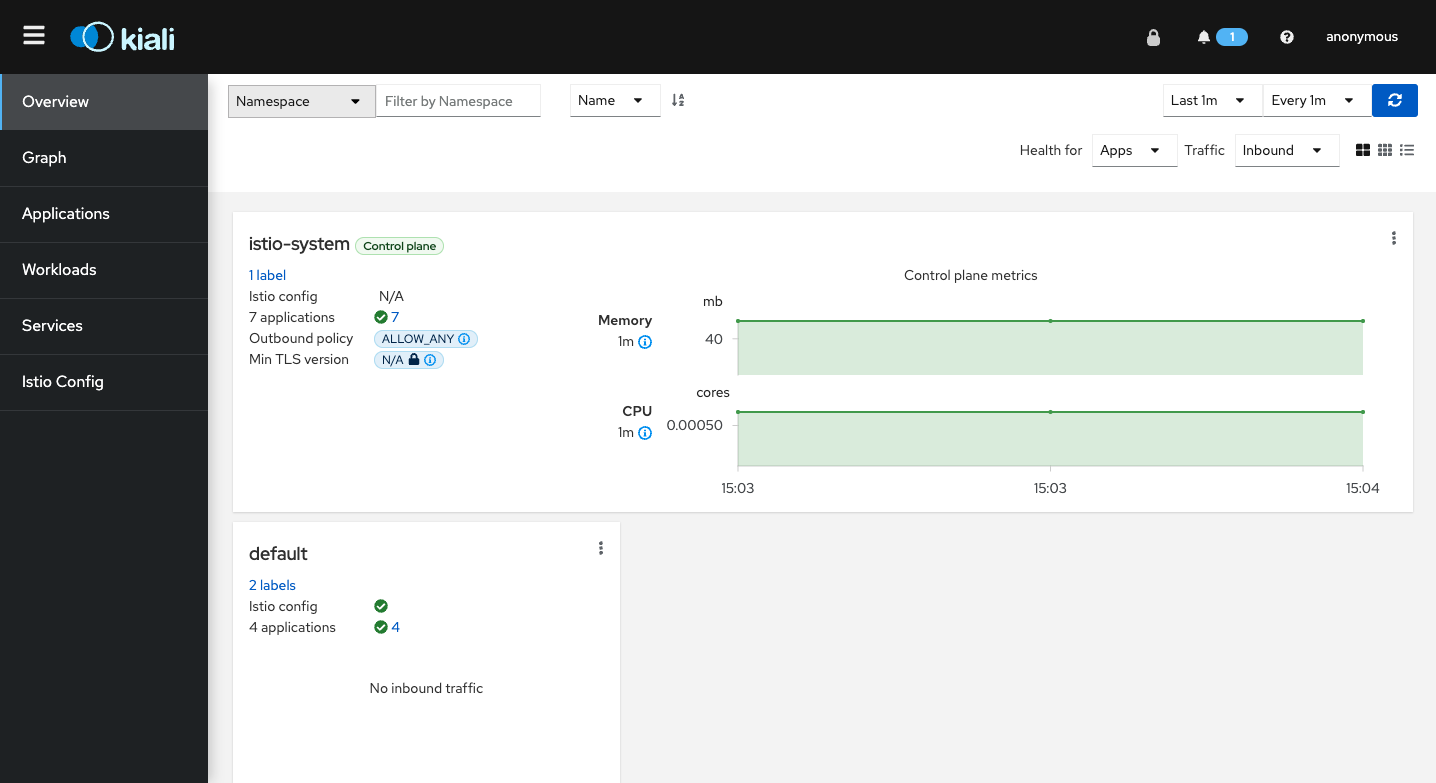
- In your terminal session, send sample requests to the
bookinfoapplication to view how the services interact with each other. Replace192.0.2.100with your actual cluster external address$ for i in $(seq 1 1000); do curl -s -o /dev/null "http://192.0.2.100/productpage"; done - On the main navigation menu, click Graph
- On the top bar, click the Select Namespaces button, and check Select all to read all cluster namespaces
- Verify that the graph displays how services send requests to each other
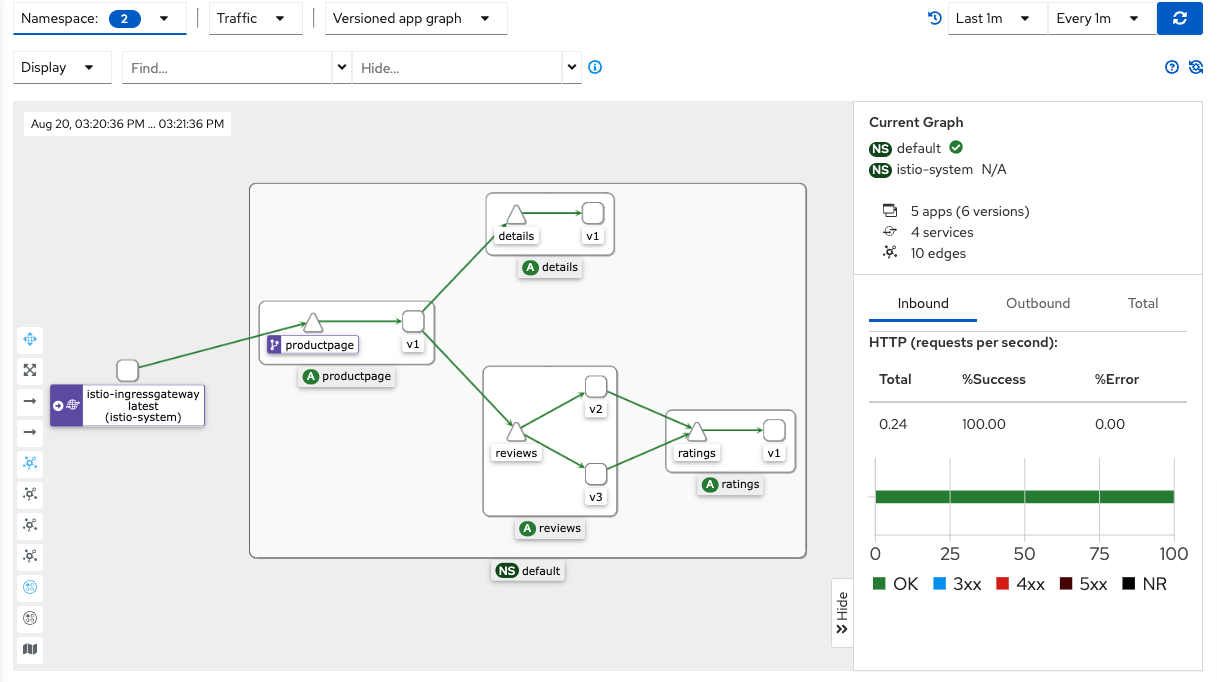 As displayed in the graph, requests distribute evenly for the
 reviewersservice versionv1,v2,v3, this is the built-in support for traffic management that Istio offers. By default, Istio applies theleast requestload balancing algorithm to distribute requests to the pods.In your terminal session, press CTRL + C to stop sending sample requests
Traffic Management
To apply customized traffic management for your services, create a new virtual service and destination rule to distribute the traffic to different versions of the reviewer service as described below.
- In your terminal session, create a new file named
custom-traffic-management.yaml$ nano custom-traffic-management.yaml - Add the following contents to the file
apiVersion: networking.istio.io/v1alpha3 kind: VirtualService metadata: name: reviews spec: hosts: - reviews http: - route: - destination: host: reviews subset: v1 weight: 10 - destination: host: reviews subset: v2 weight: 70 - destination: host: reviews subset: v3 weight: 20 --- kind: DestinationRule apiVersion: networking.istio.io/v1alpha3 metadata: name: reviews-destination spec: host: reviews trafficPolicy: ~ subsets: - labels: version: v1 name: v1 - labels: version: v2 name: v2 - labels: version: v3 name: v3Save and close the file.In the above configuration, theDestinationRuleresource definition instructs Istio to label thereviewsservice versions into differentsubsetsasv1,v2, andv3. TheVirtualServiceresource definition instructs Istio to distribute different traffic weights to different versions of thereviewsservice by theirsubsetslabel as below:- 10 percent of the traffic to the
reviewsservice version 1 - 70 percent of the traffic to the
reviewsservice version 2 - 20 percent of the traffic to the
reviewsservice version 3
- 10 percent of the traffic to the
- Apply the resource to your cluster
$ kubectl apply -f custom-traffic-management.yml - Again, send some requests to the
bookinfoapplication$ for i in $(seq 1 1000); do curl -s -o /dev/null "http://192.0.2.100/productpage"; done - In your browser session, access the Kiali dashboard, find, and click the refresh button in the top right corner to view the traffic graph again.
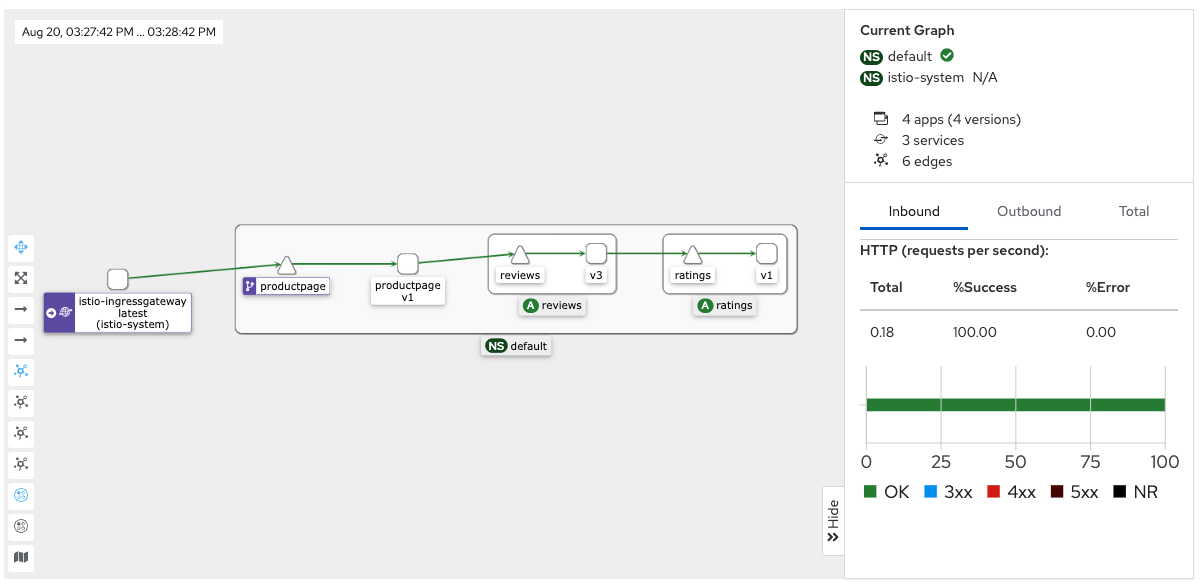 As displayed in the updated graph, the ratio of requests for each
 reviewsservice version is different. Thereviewsservice version 2 should have the most significant number of traffic.
Security Enhancement
To enable services inside the Kubernetes cluster to securely communicate with each other and prevent MITM (Man in the Middle) type of attacks, enable TLS authentication on external traffic requests. However, using TLS for every service in your application is time consuming depending on the number of running services. With this difficulty, Istio supports TLS using mutual TLS that allows both the client and server to verify the identities of each other.
Below are the supported Istio mutual TLS authentication modes:
- Permissive mode: It’s the default supported mode in which the Envoy proxies accept mutual TLS and non-mutual TLS traffic. You can send HTTP requests to the application pods outside the Kubernetes cluster.
- Strict mode: The Envoy proxies only accept mutual TLS traffic. You cannot send HTTP requests to the application pods outside the Kubernetes cluster. Instead, you must send HTTPS requests to the pods.
To better note the difference between the permissive and strict mode, send an HTTP request to the productpage service without using the gateway endpoint.
- Run the following command to list the services in your Kubernetes cluster
$ kubectl get svcYour output should appear like the one below:NAME TYPE CLUSTER-IP EXTERNAL-IP PORT(S) AGE details ClusterIP 10.102.170.227 <none> 9080/TCP 20h kubernetes ClusterIP 10.96.0.1 <none> 443/TCP 22h loki ClusterIP 10.99.14.65 <none> 3100/TCP,9095/TCP 20h loki-memberlist ClusterIP None <none> 7946/TCP 20h productpage ClusterIP 10.106.169.43 <none> 9080/TCP 20h ratings ClusterIP 10.108.144.95 <none> 9080/TCP 20h reviews ClusterIP 10.101.40.10 <none> 9080/TCP 20hAs displayed in the output, theproductpageservice uses theClusterIPtype with noEXTERNAL-IPvalue for you to access it. - To set the service
EXTERNAL-IPvalue, change theClusterIPtype toLoadBalancerusing the following command$ kubectl edit svc productpageThe above command opens the service YAML configuration in thevimtext editor. Scroll the Selector section, find thetype: ClusterIPentry, press I on your keyboard to edit the file, and change the valuetype: LoadBalancerPress ESC, enter:, and add W + Q to save the file, and close the editor. - Wait for a few minutes for Kubernetes to apply changes, and check the cluster services again
$ kubectl get svcYou should see a similar output as below:NAME TYPE CLUSTER-IP EXTERNAL-IP PORT(S) AGE details ClusterIP 10.102.170.227 <none> 9080/TCP 20h kubernetes ClusterIP 10.96.0.1 <none> 443/TCP 22h loki ClusterIP 10.99.14.65 <none> 3100/TCP,9095/TCP 20h loki-memberlist ClusterIP None <none> 7946/TCP 20h productpage LoadBalancer 10.106.169.43 192.0.2.100 9080:30933/TCP 20h ratings ClusterIP 10.108.144.95 <none> 9080/TCP 20h reviews ClusterIP 10.101.40.10 <none> 9080/TCP 20hVerify that theproductpageservice now has your loadbalancer’s external IP value. - Run the following command to make a HTTP request to the
productpageservice using itsEXTERNAL-IPaddress$ curl http://external-ip:9080/productpage --> able to capture the contentTheproductpageservice response should look like the one below:<!DOCTYPE html> <html> <head> <title>Simple Bookstore App</title> <meta charset="utf-8"> <meta http-equiv="X-UA-Compatible" content="IE=edge"> <meta name="viewport" content="width=device-width, initial-scale=1.0"> ... <div class="navbar navbar-inverse navbar-fixed-top"> <div class="container"> <div class="navbar-header pull-left"> <a class="navbar-brand" href="#">Microservices Fabric BookInfo Demo</a> </div> </div> </div> ...Because Istio applies thepermissivemutual TLS mode by default, a client can send HTTP requests to the service. - To change the mutual TLS mode to
strictmode, create a new file namedstrict-mode-tls.yaml$ nano strict-mode-tls.yaml - Add the following contents to the file
apiVersion: "security.istio.io/v1beta1" kind: "PeerAuthentication" metadata: name: "default" namespace: "istio-system" spec: mtls: mode: STRICTSave and close the file.The above configuration instructs Istio to apply thestrictmode to thePeerAuthenticationresource within theistio-systemnamespace. - Apply the change to your cluster
$ kubectl apply -f strict-mode-tls.yaml - Wait for a few seconds for Istio to apply the change. Then, try to make an HTTP request to the
productpageagain$ curl https://external-ip:9080/productpageThis time, you should receive an error message from theproductpageservice as below:curl: (52) Empty reply from serverThe above error displays because Istio now applies astrictmode for the mutual TLS authentication. If the client does not send an HTTPS request to the service, Istio does not allow the client to interact with the service.
Conclusion
In this article, you used Istio to apply observability, traffic management, and security enhancement for your application.
Introduction Istio is a service mesh implementation that enables observability of your services to monitor how services communicate with each other through a visual dashboard. In addition, Istio also allows you to simplify the canary deployment process so that you can safely deploy a new version of your application to…
Introduction Istio is a service mesh implementation that enables observability of your services to monitor how services communicate with each other through a visual dashboard. In addition, Istio also allows you to simplify the canary deployment process so that you can safely deploy a new version of your application to…