How to Add Custom Fields Automatically on Post Publish in WordPress
-
- 44
Do you need to automatically create custom fields when publishing your WordPress posts?
This is a simple trick that developers can use when adding new features to their WordPress website.
In this article, we’ll show you how to add custom fields automatically on post publish in WordPress.
Why Add Custom Fields Automatically?
Custom fields let you add additional information to your posts. This information can be displayed on your website, kept private, or be used by themes and plugins to extend the functionality of your WordPress website.
There are many ways to use custom fields. You’ll find a list of helpful ideas in our custom fields tips, tricks, and hacks guide.
Sometimes you’ll want a custom field to be created automatically whenever you publish a post. This is especially true when you’re adding functionality to WordPress so you can use it as more than a simple blog.
We used this method when creating a gallery website. We wanted to store short URLs for each item submitted to the gallery. So we automatically created a custom field to store the short URL when each post was published.
This trick can be very useful for developers who are looking to push WordPress to the next level.
Adding Custom Fields Automatically on Post Publish
This method involves adding a custom code snippet to your theme’s functions.php file. We don’t recommend editing your theme files to inexperienced users, because even a small mistake could break your website.
Instead, we’ll show you how to use the WPCode plugin in this tutorial.
WPCode makes it easy to add code snippets in WordPress without having to edit your theme’s functions.php file. You can also manage all of your code snippets from one central screen.
If this is your first time adding code to WordPress, then you should check out our guide on how to copy and paste code snippets in WordPress for more details.
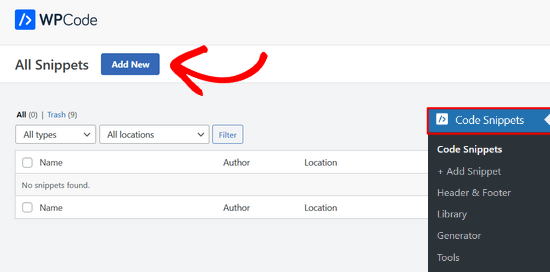
Once you’ve installed and activated the free WPCode plugin, a new menu item labeled ‘Code Snippets’ will be added to your WordPress admin bar. Click on it and then click on the ‘Add New’ button.
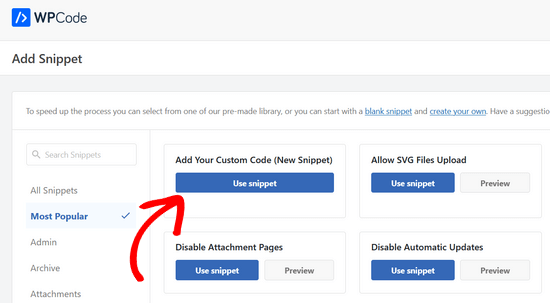
Next, navigate to the ‘Add Your Custom Code (New Snippet)’ option.
Then, click on the ‘Use snippet’ button.
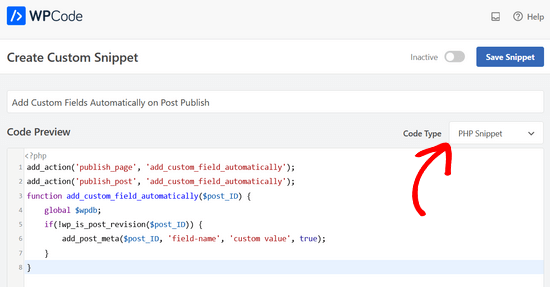
After that, you need to give the snippet a title, and then copy the following code and paste it into the ‘Code Preview’ box.
| 1 2 3 4 5 6 7 8 | add_action('publish_page', 'add_custom_field_automatically');add_action('publish_post', 'add_custom_field_automatically');function add_custom_field_automatically($post_ID) { global $wpdb; if(!wp_is_post_revision($post_ID)) { add_post_meta($post_ID, 'field-name', 'custom value', true); }} |
You’ll have to replace ‘field-name’ and ‘custom value’ with the actual name and value you want to use for the custom field.
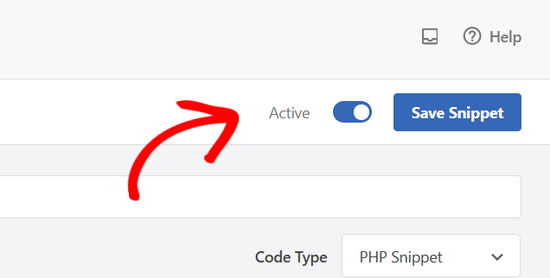
Don’t forget to choose ‘PHP Snippet’ as the code type from the dropdown menu on the right.
With the Auto Insert method, the snippet will be automatically inserted and executed in the proper location.
Once you’re done, you’ll need to toggle the switch from ‘Inactive’ to ‘Active’ and then click the ‘Save Snippet’ button.
Once the snippet is activated, the custom field will be created whenever you publish a post.
We hope this tutorial helped you learn how to add custom fields automatically on post publish in WordPress.
You may also want to learn how to choose the best WordPress hosting or check out our list of must-have WordPress plugins to grow your website.
Do you need to automatically create custom fields when publishing your WordPress posts? This is a simple trick that developers can use when adding new features to their WordPress website. In this article, we’ll show you how to add custom fields automatically on post publish in WordPress. Why Add Custom…
Do you need to automatically create custom fields when publishing your WordPress posts? This is a simple trick that developers can use when adding new features to their WordPress website. In this article, we’ll show you how to add custom fields automatically on post publish in WordPress. Why Add Custom…