How to Add Pinterest “Pin It” Button in WordPress (4 Ways)
-
by cobra_admin
- 48
Do you want to add a Pinterest ‘Pin It’ button in WordPress?
Pinterest is a popular social networking site that allows you to share visual content and get more visitors to your website. By adding a ‘Pin It’ button to your site, you can encourage more people to share your content on Pinterest.
In this article, we will show you how to add the Pinterest ‘Pin It’ button to WordPress.

Why Add Pinterest “Pin It” Button in WordPress?
Pinterest is a popular social media website that allows users to collect website links and other visual content by creating boards.
When users add your content to their Pinterest board, it helps other people discover your website. Pinterest is a particularly important source of traffic if you are running a photography website, fashion blog, or any other type of blog that has lots of images and videos.
By adding a ‘Pin It’ button to your website, you can encourage visitors to share your content on Pinterest.

Note: Pinterest officially changed the ‘Pin It’ button name to ‘Save’ in 2016. However, many guides and WordPress plugins still use ‘Pin It,’ which is why we are using the original name in this guide.
With that being said, let’s see how you can add a Pinterest ‘Pin It’ button in WordPress. Simply use the quick links below to jump straight to the method you want to use:
- Method 1: Using Shared Counts (Quick and Easy)
- Method 2: Using a Custom Shortcode (Recommended)
- Method 3: Using Code and FTP (No WordPress Plugin Required)
- Method 4: Add Pinterest Pin It Button Over Your Images
Method 1: Using Shared Counts (Quick and Easy)
The easiest way to add a Pinterest button to your WordPress site is by using Shared Counts.
It is one of the best social media plugins for WordPress that allows you to easily add a Pinterest button to your site, along with buttons for all the other major social networks.
To get started, you need to install and activate the Shared Counts plugin. You can follow our step-by-step guide on how to install a WordPress plugin for detailed instructions.
Upon installation, you need to head over to Settings » Shared Counts to configure the plugin.
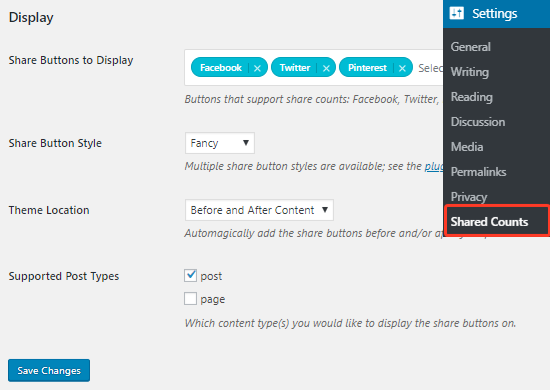
Here, scroll to the Display section and then click on the ‘Share Buttons to Display’ textbox.
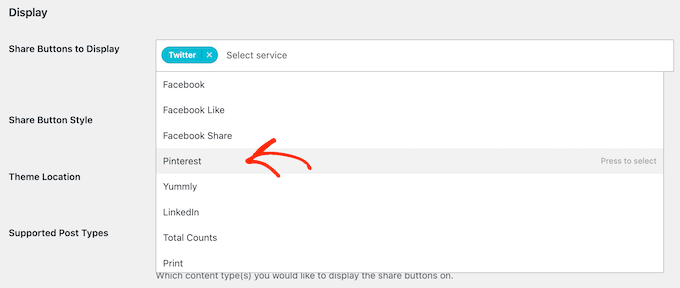
This will open a dropdown menu where you can select the social media services you want to add. For example, you can use Shared Counts to add a Facebook like button, add a Twitter share and retweet button, and more.
To create a ‘Pin It’ button, go ahead and select ‘Pinterest’ from the dropdown.
After that, you can open the ‘Share Button Style’ dropdown and choose a style for the Pinterest button.
You can also select the location and post type where you want to show the Pinterest button.
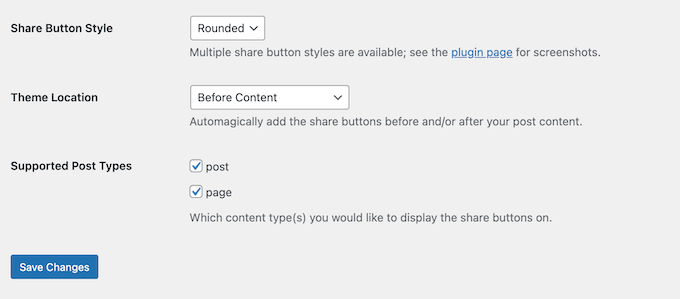
When you are happy with how the button is set up, just click on the ‘Save Changes’ button.
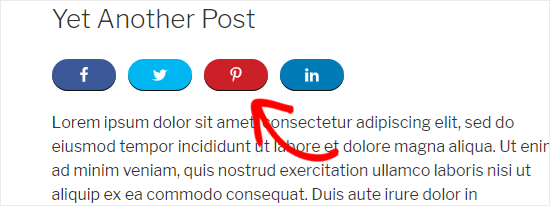
You can now visit any post on your WordPress blog to see the Pinterest button in action.
Method 2: Using a Custom Shortcode (Recommended)
Sometimes, you may want to control exactly where the ‘Pin It’ button appears on your site. For example, you may want to show the Pinterest button on specific landing pages or inside the post content.
One option is to create the button using code and then place it on each page or post using a custom shortcode. This gives you the freedom to show the ‘Pin It’ button in different locations, but you will need to add it to each page or post manually.
The easiest way to add custom code to WordPress is by using WPCode. It is the best code snippets plugin and allows you to add custom PHP, CSS, JavaScript, and more to your website. You can also create custom shortcodes, so it’s perfect for adding a ‘Pin It’ button to your website.
First, you will need to install and activate the free WPCode plugin. For more information, see our step-by-step guide on how to install a WordPress plugin.
Once the plugin is activated, go to Code Snippets » Add Snippet.
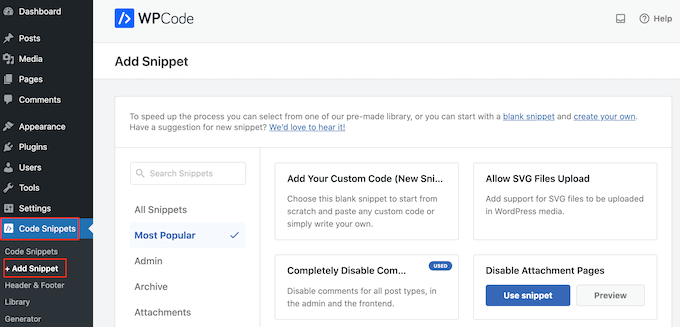
Here, you will see all the pre-made snippets that WPCode can add to your site. These include a snippet that allows you to completely disable comments, upload file types that WordPress doesn’t usually support, disable attachment pages, and much more.
Here, you need to hover your mouse over the ‘Add Your Custom Code (New Snippet)’ option and click the ‘Use snippet’ button when it appears.
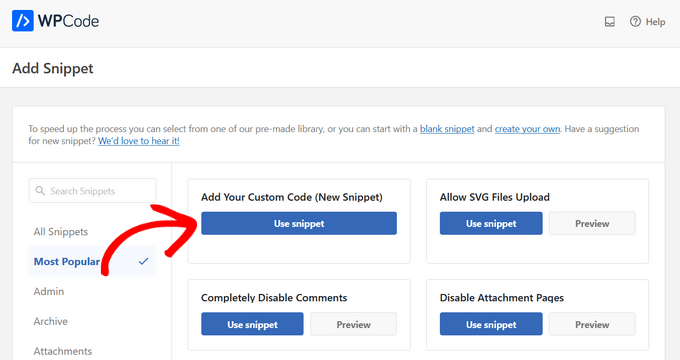
On the next screen, type in a title for the code snippet. This is just for your reference, so you can use anything you want.
You are going to add PHP to WordPress, so just open the ‘Code Type’ dropdown menu and choose ‘PHP Code.’
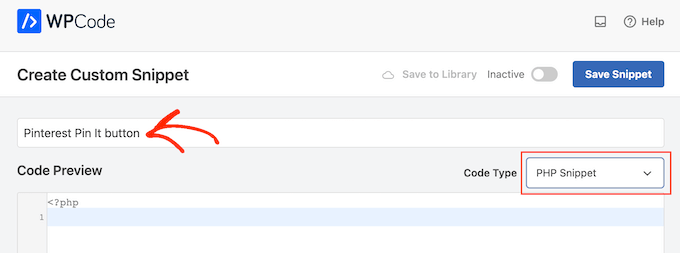
With that done, simply paste the following into the code editor:
| 12345 | functionget_pin($atts) {$pinterestimage= wp_get_attachment_image_src( get_post_thumbnail_id( $post->ID ), 'full');return'<a href="http://pinterest.com/pin/create/button/?url='. urlencode(get_permalink($post->ID)) . '&media='. $pinterestimage[0] . '&description='. get_the_title() .'" class="pin-it-button" count-layout="vertical">Pin It</a>'; } add_shortcode('pin', 'get_pin'); |
Hosted with ❤️ by WPCode
After that, scroll down the page to the ‘Insertion’ section. Here, you can keep the default ’Auto Insert’ method to make sure the code runs everywhere.
If it isn’t already selected, then select ‘Run Everywhere’

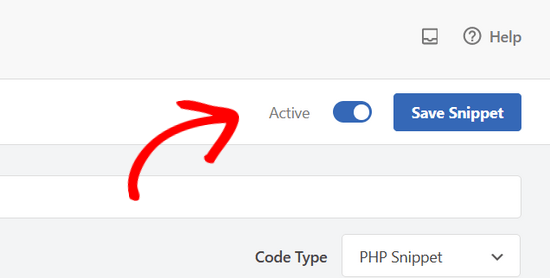
Finally, scroll to the top of the screen and click on the ‘Inactive’ slider so that it shows ‘Active.’
Then just click the ‘Save Snippet’ or ‘Update’ button to make the code snippet live.
Now, you can add a ‘Pin It’ button to any WordPress page, post, or widget-ready area using the [pin] shortcode.
For step-by-step instructions on how to place the shortcode, please see our guide on how to add a shortcode in WordPress.
![use the [pin] shortcode in your WordPress posts use the [pin] shortcode in your WordPress posts](https://www.wpbeginner.com/wp-content/uploads/2019/06/pin-it-button-shortcode.jpg)
How to Add Pinterest ‘Pin It’ Button Using the Full-Site Editor
If you are using one of the newer block-enabled themes, then you can add a ‘Pin It’ button anywhere in your WordPress theme using the custom shortcode.
This is an easy way to add the button to every page and post. You can also add the ‘Pin It’ button to areas you can’t edit using the standard WordPress content editor, such as your site’s 404 page template.
To get started, just go to Themes » Editor in the WordPress dashboard.
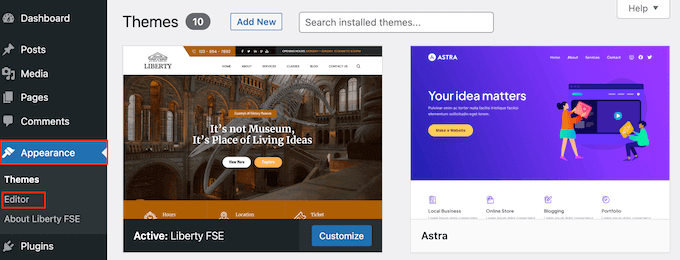
By default, the full site editor will show your theme’s home template.
To add a ‘Pin It’ button to a different page, just select either ‘Template’ or ‘Template Parts’ from the left-hand menu.
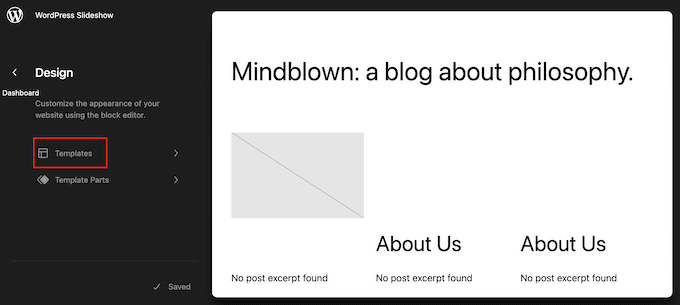
You can now select the template you want to edit.
In this example, we will show you how to add a ‘Pin It’ button to your site’s Single page template. However, the steps will be similar no matter what template you choose.
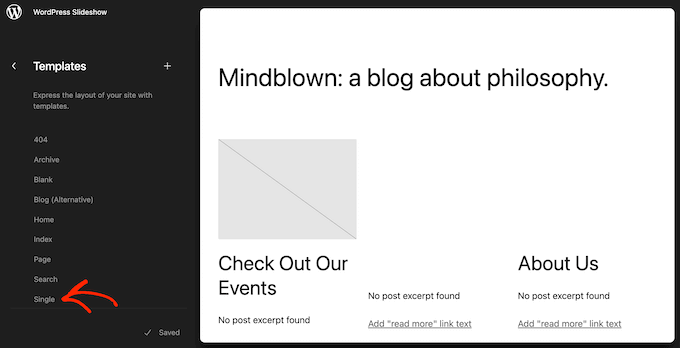
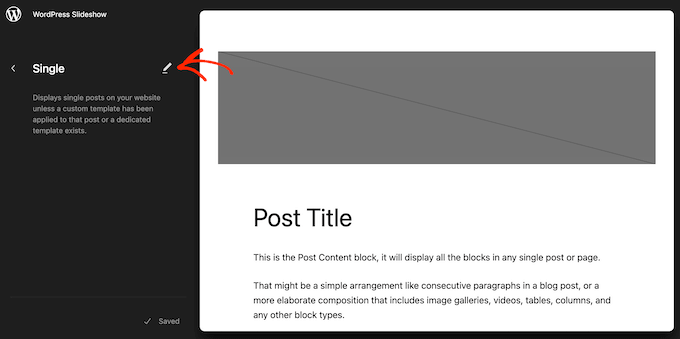
WordPress will now show a preview of the template or template part.
To edit this template, go ahead and click on the small pencil icon.
With that done, click on the blue ‘+’ icon in the top left corner.
In the search bar that appears, type in ‘Shortcode.’
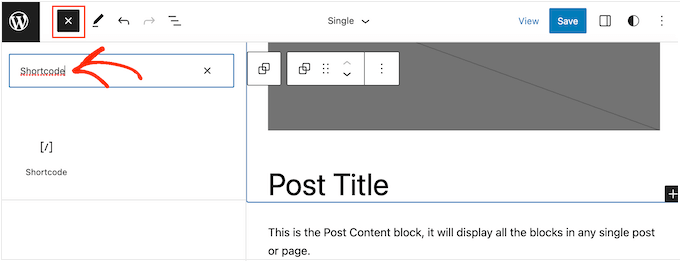
When the right block appears, drag and drop it onto the template layout.
You can now type the Pin shortcode into the block.
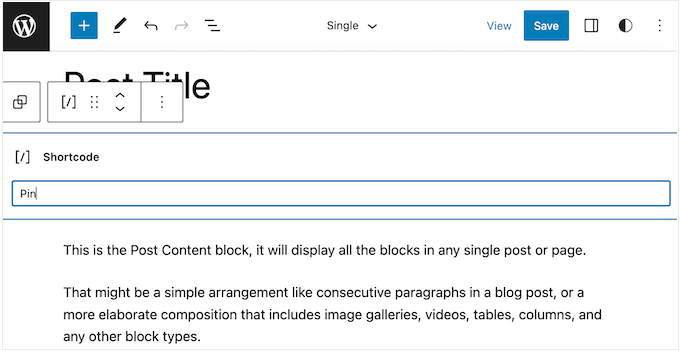
After that, simply click on ‘Save’ to make the new shortcode live.
Now, if you visit your WordPress website, you will see the ‘Pin it’ button in action.
Method 3: Using Code and FTP (No WordPress Plugin Required)
If you don’t want to use a plugin, then you can add a Pinterest button to your website by adding code to your theme files.
Editing the theme files directly can cause many common WordPress errors, and you’ll lose all the custom code when you update the WordPress theme. With that in mind, we always recommend using WPCode instead.
However, if you do use this method, then you’ll need to start by making a complete WordPress backup of your site. This will help you restore your site in case something breaks by accident.
With that done, connect to your WordPress hosting using an FTP client and then go to the /wp-content/themes/ folder.
From here, you need to open your current theme folder and then locate the footer.php file.
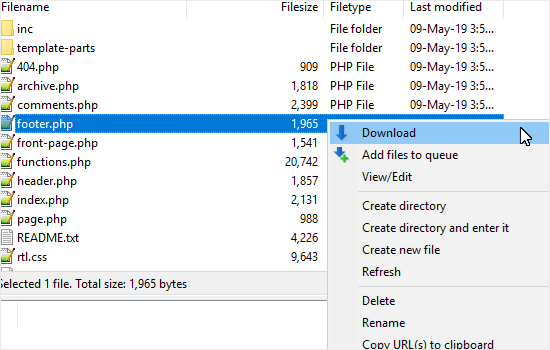
Next, simply right-click on that file and then select ‘Download’ from the menu. This will download the footer.php file to your computer.
Now, you need to open the footer.php file using a plain text editor like Notepad and paste the following script right before the </body> tag.
| 12345678910111213141516171819 | <script type="text/javascript">(function() { window.PinIt = window.PinIt || { loaded:false}; if(window.PinIt.loaded) return; window.PinIt.loaded = true; functionasync_load(){ vars = document.createElement("script"); s.type = "text/javascript"; s.async= true; s.src = "https://assets.pinterest.com/js/pinit.js"; varx = document.getElementsByTagName("script")[0]; x.parentNode.insertBefore(s, x); } if(window.attachEvent) window.attachEvent("onload", async_load); else window.addEventListener("load", async_load, false);})();</script> |
Hosted with ❤️ by WPCode
Once you have done that, you need to save the file and then upload it back to the current theme folder.
Next, locate the template file in your theme where you want to add the button. Usually, this will be the single.php file, but it can vary depending on your WordPress theme. If you are not sure, then you can see our beginner’s guide to the WordPress template hierarchy.
To edit the template file, simply download it from your theme folder and open it for editing.
You will need to choose the location where you want to show the ‘Pin It’ button. Many websites show social sharing buttons directly below the post title, but you can use any location you want.
After choosing a location, simply add the following code:
| 12 | <?php $pinterestimage= wp_get_attachment_image_src( get_post_thumbnail_id( $post->ID ), 'full'); ?><a href="http://pinterest.com/pin/create/button/?url=<?php echo urlencode(get_permalink($post->ID)); ?>&media=<?php echo $pinterestimage[0]; ?>&description=<?php the_title(); ?>"class="pin-it-button"count-layout="vertical">Pin It</a> |
Hosted with ❤️ by WPCode
The above code snippet adds the post’s featured image, title, description, and URL in the share URL parameter.
The code snippet above will add a vertical share button to all your posts. If you want to display a horizontal share button instead, then simply change the count-layout="vertical"> section to count-layout="horizontal">.
When you are ready, save the file and upload it back to your theme directly using FTP.
Method 4: Add Pinterest Pin It Button Over Your Images
If you are running a fashion, photography, food, or some other type of blog that uses lots of images, then you can add a Pinterest button over these images. This allows visitors to share your content by simply hovering over the image they want to pin.
The easiest way to add a Pinterest button over your images is by using Weblizar Pin It Button On Image Hover And Post.
First, you need to install and activate the plugin. For more details, you can refer to our guide on how to install a WordPress plugin. Upon activation, select PinIt Button from the left-hand menu to configure the plugin settings.
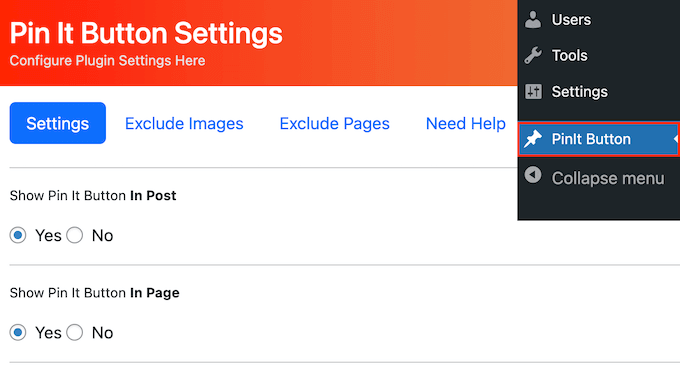
Here, you can choose whether to add the ‘Pin It’ button to your posts or pages.
Next, find the ‘Show Pin It Button On Image Hover’ section and make sure it’s set to ‘Yes.’
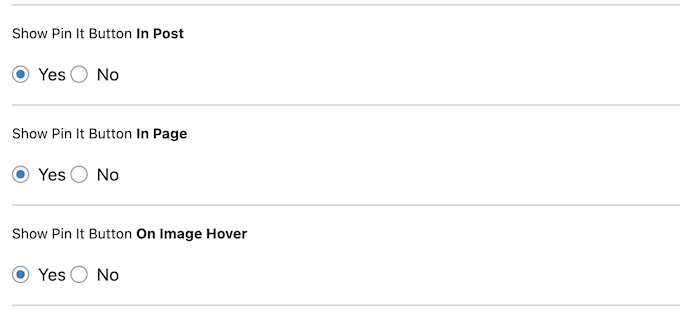
Besides that, the plugin lets you show the Pin It button on mobile devices and change the button’s size.
When you are happy with how the plugin is configured, don’t forget to click on ‘Save’ to store your changes. Now, simply visit your website and hover over any image to see the Pinterest button in action.

Do you want to remove the ‘Pin It’ button from a specific image? To do this, you’ll need to get the image’s URL in WordPress.
After that, simply go to the PinIt Button page, but this time select the ‘Exclude Images’ tab. You can now add the image URL to the field that shows ‘Enter Image SRC URL’ by default.
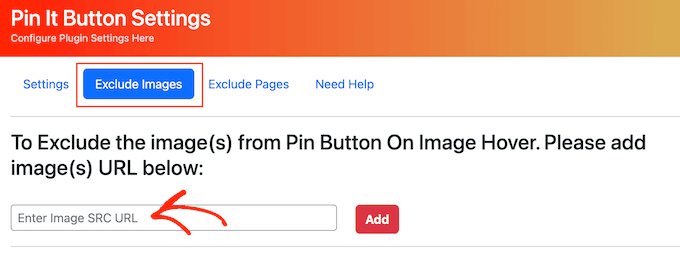
With that done, click on the ‘Add’ button.
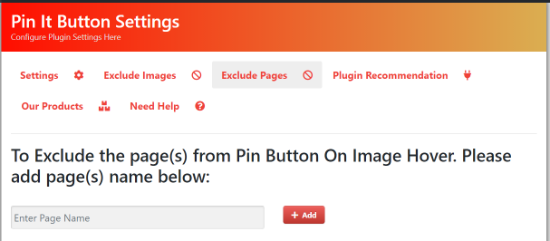
You can also remove the Pinterest button from a specific page by selecting the ‘Exclude Pages’ tab. Here, simply type in the name of the page you want to exclude and then click on the ‘Add’ button.
Alternative: If you are looking for a more powerful plugin to add Pinterest Pin It buttons on your images, then we recommend Tasty Pins.
Tasty Pins lets you easily add ‘Pin It’ hover buttons over all your images. You can even add fully customizable ‘Pin It’ banners to the first image in your blog posts.
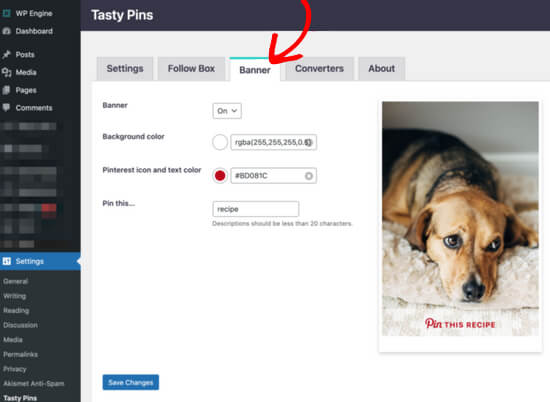
You can also use Tasty Pins to add a Pinterest follow box, set Pinterest descriptions, disable pinning on certain images, hide Pinterest-specific images from your page, and more.
We hope this article helped you understand how to add a Pinterest ‘Pin It’ button to your WordPress blog. You may also want to see our guide on how to create an email newsletter or our comparison of the best web design software.
Do you want to add a Pinterest ‘Pin It’ button in WordPress? Pinterest is a popular social networking site that allows you to share visual content and get more visitors to your website. By adding a ‘Pin It’ button to your site, you can encourage more people to share your…
Do you want to add a Pinterest ‘Pin It’ button in WordPress? Pinterest is a popular social networking site that allows you to share visual content and get more visitors to your website. By adding a ‘Pin It’ button to your site, you can encourage more people to share your…