How to Change Private and Protected Posts Prefix in WordPress
-
- 33
Do you want to change the private and protected posts prefix in WordPress?
By default, WordPress adds the ‘Private’ or ‘Protected’ prefix to the post titles when you make them private or password protected.
In this article, we’ll show you how to easily change that Private or Protected posts prefix in WordPress to anything you like.
What are Private or Protected Posts in WordPress
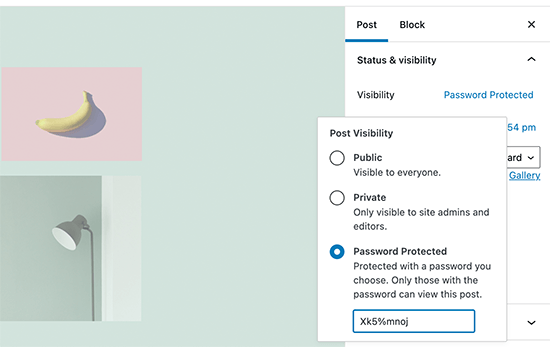
WordPress comes with some basic tools to create content and keep it private from public viewing. You can select these options under the ‘Status & Visibility’ box on the editor screen.
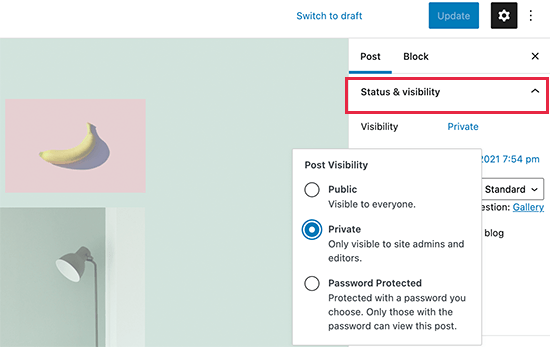
The ‘Private’ option only allows logged-in users to view the content. Users will need at least an Editor or Administrator user role to view private content.
The ‘Password Protected’ option allows anyone with a password to view the content, even if they aren’t a user on your WordPress site.
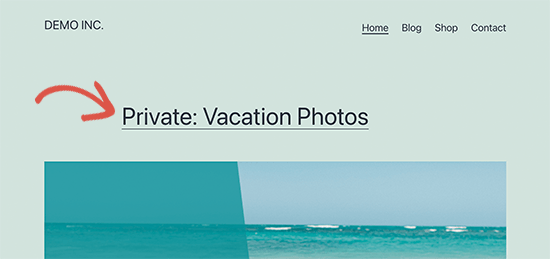
When you publish a private post, WordPress will automatically display ‘Private’ as a prefix before the post title.
It will be visible to logged-in administrator or editor users on the post or page itself, as well as on any archive pages such as the home page or main blog page.
Similarly, WordPress adds the ‘Protected’ prefix to the password-protected posts and pages.
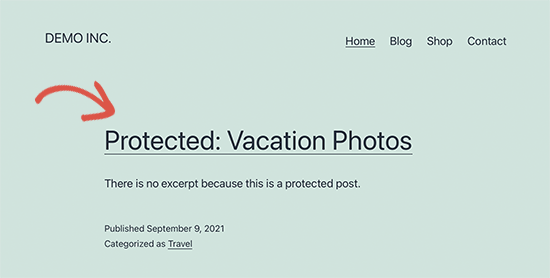
The reason for adding these labels to the post titles is to distinguish them from other non-private and public posts on your website.
Now some users may want to change these prefixes to something more meaningful or helpful for their audiences.
That being said, let’s see how to easily change the private and password-protected posts or page prefixes in WordPress.
Changing Private & Protected Prefixes in WordPress
For this tutorial, you’ll need to add some code to your WordPress website. If you haven’t done this before then see our guide on how to easily add custom code snippets in WordPress.
1. Change Protected Posts Prefix
Simply add this code to your theme’s functions.php file, a site-specific plugin, or a code snippets WordPress plugin.
| 1234 | functionchange_protected_title_prefix() { return'Family Only: %s';}add_filter('protected_title_format', 'change_protected_title_prefix'); |
Hosted with ❤️ by WPCode
1-click Use in WordPress
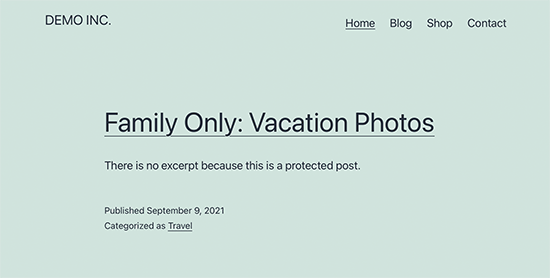
Feel free to change ‘Family Only’ to whatever prefix you want to use for your password-protected posts.
We recommend adding this code in WordPress with WPCode, the best code snippets plugin.
WPCode makes it easy to add custom code in WordPress without having to edit your theme’s functions.php file. So, you don’t have to worry about breaking your site.
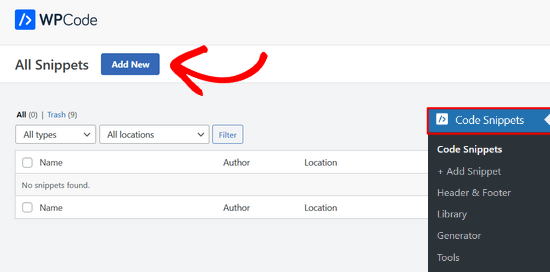
To get started, you’ll need to install and activate the WPCode plugin. For step by step instructions, see this guide on how to install a WordPress plugin.
Once the plugin is activated, click on the Code Snippets menu item from your WordPress dashboard. Then, click the ‘Add New’ button.
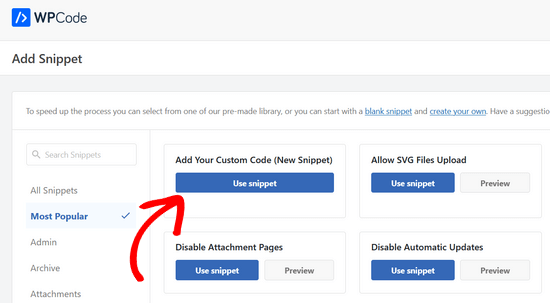
Next, navigate to the ‘Add Your Custom Code (New Snippet)’ option and click on the ‘Use snippet’ button underneath it.
Now, you can give your code snippet a title, which can be anything to help you remember what the code is for.
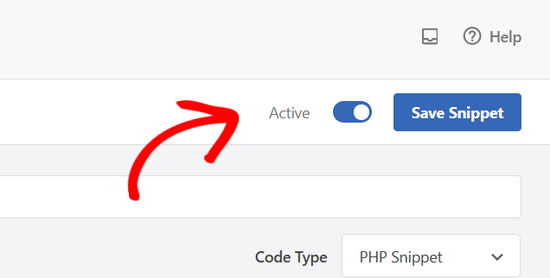
Then, paste the code snippet from above into the ‘Code Preview’ box and select ‘PHP Snippet’ as the code type from the dropdown menu on the right.
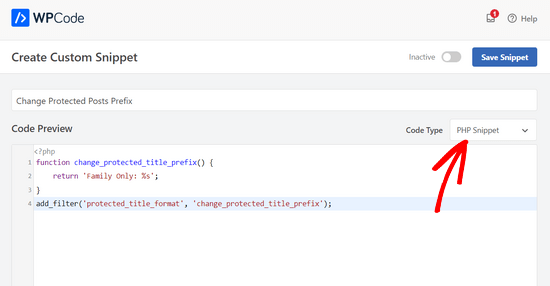
After that, simply toggle the switch from ‘Inactive’ to ‘Active’ and click on the ‘Save Snippet’ button.
You can now preview a password-protected post on your website. Here is how it looked on our test website.
Change Private Post Prefix
Similarly, you can use the following code to change the prefix for your private posts.
| 1234 | functionchange_private_title_prefix() { return'Editors Only: %s';}add_filter('private_title_format', 'change_private_title_prefix'); |
Hosted with ❤️ by WPCode
1-click Use in WordPress
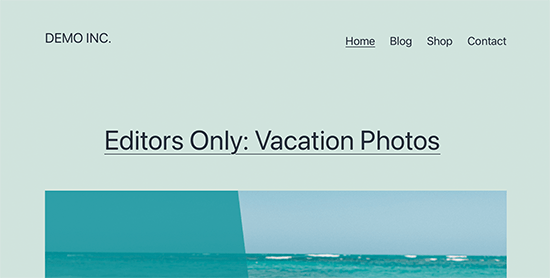
Feel free to replace ‘Editors Only’ with anything you want to use for your private posts.
Simply follow the same steps as above to add the custom code with WPCode.
After that, you can visit a private post or page to see it in action. Here is how it looked on our test site.
Bonus: Properly Protect Content in WordPress
If you regularly share content with specific users as private or password-protected posts, then it’s a good idea to start using a proper tool to manage user access.
MemberPress is the best WordPress membership plugin on the market. It comes with powerful access control features that allow you to restrict content to specific users.
You can create user groups and restrict some posts or pages to those groups. You can also add paid subscriptions to sell members-only content on your website.
For complete instructions, see our tutorial on how to make a membership website in WordPress.
We hope this article helped you learn how to easily change private and protected posts prefix in WordPress. You may also want to see our tutorial on how to password protect an entire WordPress website or how to create a private blog using WordPress.
Do you want to change the private and protected posts prefix in WordPress? By default, WordPress adds the ‘Private’ or ‘Protected’ prefix to the post titles when you make them private or password protected. In this article, we’ll show you how to easily change that Private or Protected posts prefix…
Do you want to change the private and protected posts prefix in WordPress? By default, WordPress adds the ‘Private’ or ‘Protected’ prefix to the post titles when you make them private or password protected. In this article, we’ll show you how to easily change that Private or Protected posts prefix…