How to Deploy Cassandra – Distributed NoSQL Database
How to Deploy Cassandra – Distributed NoSQL Database
Deploy Cassandra with Docker Compose on Ubuntu 24.04 for persistent log management and CQL access.
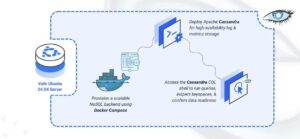
Cassandra is a distributed, highly available NoSQL database designed for handling large volumes of data across multiple servers. Originally developed at Facebook, it provides linear scalability and fault tolerance with no single point of failure when deployed as a multi-node cluster. Cassandra’s columnar data model and tunable consistency make it ideal for storing time-series log data where write performance and horizontal scalability are critical.
In this article, you will deploy Cassandra using Docker Compose and configure persistent storage for database files. You will access Cassandra through its CQL (Cassandra Query Language) shell to create keyspaces, tables, and manage log data.
Prerequisites
Before you begin, you need to:
- Have access to an Ubuntu 24.04-based server as a non-root user with
sudoprivileges. - Install Docker and Docker Compose.
Set Up the Directory Structure and Environment Variables
In this section, you prepare the required directory structure for Cassandra and define environment variables in a .env file.
- Create the directory structure for Cassandra.
console
$ mkdir -p ~/cassandra-logging/cassandra-dataThis directory stores commit logs, data files, and hints for the Cassandra cluster.
- Navigate into the
cassandra-loggingdirectory.console$ cd ~/cassandra-logging
- Set proper ownership for the Cassandra data directory. Cassandra runs as the
cassandrauser (UID 999) inside the container.console$ sudo chown -R 999:999 cassandra-data
- Create a
.envfile.console$ nano .envAdd the following variables:
iniCASSANDRA_CLUSTER_NAME=LogCluster CASSANDRA_DC=datacenter1 CASSANDRA_RACK=rack1
Modify these values based on your cluster topology requirements.
Save and close the file.
Deploy with Docker Compose
In this section, you create and deploy the Docker Compose stack that runs Cassandra. Docker Compose manages the container and applies the environment variables from your .env file.
- Create a new Docker Compose manifest.
console
$ nano docker-compose.yaml - Add the following content.
yaml
services:
  cassandra:
    image: cassandra:latest
    container_name: cassandra
    hostname: cassandra
    ports:
      - "9042:9042"
    volumes:
      - "./cassandra-data:/var/lib/cassandra"
    environment:
      - CASSANDRA_CLUSTER_NAME=${CASSANDRA_CLUSTER_NAME}
      - CASSANDRA_DC=${CASSANDRA_DC}
      - CASSANDRA_RACK=${CASSANDRA_RACK}
      - CASSANDRA_ENDPOINT_SNITCH=GossipingPropertyFileSnitch
    restart: unless-stopped
Save and close the file.
This deployment defines:
- services: Single container running the database:
- cassandra: Operates the wide-column database engine and accepts CQL protocol connections.
- image: Official Cassandra image from Docker Hub’s verified repository.
- container_name: Fixed container identifier for consistent referencing in commands.
- hostname: Establishes the container’s network hostname used in cluster topology.
- ports: Publishes port 9042 to the host, allowing external CQL clients to connect directly.
- volumes: Local directory (
./cassandra-data) stores all database files including SSTables, commit logs, and saved caches permanently. - environment: References cluster configuration from the
.envfile:- CASSANDRA_CLUSTER_NAME: Sets the cluster identifier for node association.
- CASSANDRA_DC: Assigns the datacenter name for multi-datacenter replication strategies.
- CASSANDRA_RACK: Designates the rack location within the datacenter for fault tolerance.
- CASSANDRA_ENDPOINT_SNITCH: Configures topology detection for optimal replica distribution.
- restart: unless-stopped: Automatically restarts the container on failure or reboot unless explicitly stopped.
- services: Single container running the database:
- Create and start the service.
console
$ docker compose up -d - Verify that the service is running.
console
$ docker compose psOutput:
NAME        IMAGE               COMMAND                  SERVICE     CREATED          STATUS                    PORTS
cassandra   cassandra:latest    "docker-entrypoint.s…"   cassandra   25 seconds ago   Up 24 seconds (healthy)   7000-7001/tcp, 7199/tcp, 9160/tcp, 0.0.0.0:9042->9042/tcp, [::]:9042->9042/tcp
The container is running with a
healthystatus. Cassandra is accepting CQL connections on port9042. - Monitor Cassandra initialization logs. The database requires 30-60 seconds for initial startup.
console
$ docker compose logsWait until you see messages indicating the node is ready:
INFO  [main] ... Created default superuser role 'cassandra'
INFO  [main] ... Node localhost/127.0.0.1:7000 state jump to NORMAL
Press
Ctrl + Cto exit the log view.For more information on managing a Docker Compose stack, see the How To Use Docker Compose article.
Access Cassandra
This section walks through validating your Cassandra setup using the CQL shell to establish a keyspace, design table structures, and insert test log records.
- Access the CQL shell inside the container.
console
$ docker exec -it cassandra cqlsh
Output:
Connected to LogCluster at 127.0.0.1:9042 [cqlsh 6.2.0 | Cassandra 5.0.2 | CQL spec 3.4.7 | Native protocol v5] Use HELP for help. cqlsh> - Check cluster status.
sql
cqlsh> DESCRIBE CLUSTER;
Output displays your cluster name (
LogCluster) and the Cassandra version. - Create a keyspace for log storage. Keyspaces in Cassandra are analogous to databases in relational systems.
sql
cqlsh> CREATE KEYSPACE logs WITH replication = {'class': 'SimpleStrategy', 'replication_factor': 1};
The
SimpleStrategyis appropriate for single-datacenter deployments with a replication factor of 1. - Use the newly created keyspace.
sql
cqlsh> USE logs;
- Create a table for application logs.
sql
cqlsh:logs> CREATE TABLE application_logs (
              log_id UUID PRIMARY KEY,
              timestamp TIMESTAMP,
              level TEXT,
              message TEXT,
              service TEXT,
              host TEXT
            );
- Insert a sample log entry.
sql
cqlsh:logs> INSERT INTO application_logs (log_id, timestamp, level, message, service, host)
              VALUES (uuid(), toTimestamp(now()), 'INFO', 'Application started successfully', 'web-server', 'app-01');
- Query the log data.
sql
cqlsh:logs> SELECT * FROM application_logs;
Output displays your inserted log entry:
log_id | host | level | message | service | timestamp --------------------------------------+--------+-------+----------------------------------+------------+--------------------------------- cccbadb4-2b86-4e37-a500-db7be9d22942 | app-01 | INFO | Application started successfully | web-server | 2025-12-01 17:16:07.719000+0000 - Count total log entries.
sql
cqlsh:logs> SELECT COUNT(*) FROM application_logs;
Output:
count ------- 1 - Exit the CQL shell.
sql
cqlsh:logs> EXIT;
Conclusion
You have successfully deployed Cassandra for log management with durable data persistence. This single-node deployment uses Docker Compose for reliable container orchestration with local volume storage protecting your data during restarts and upgrades. The Cassandra node operates at full capacity, prepared to receive time-series log entries through CQL drivers, manage write-heavy workloads efficiently, and expand into a multi-node cluster when horizontal scaling becomes necessary for growing log volumes.