How to Deploy Emby – Personal Media Streaming
How to Deploy Emby – Personal Media Streaming
Deploy Emby Media Server on Ubuntu using Docker Compose with Traefik-secured HTTPS access.
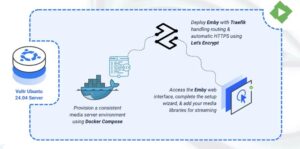
Emby is a personal media server that allows you to organize, manage, and stream your movies, TV shows, music, and photos across multiple devices. It provides a web-based interface for managing your media library and supports local as well as remote access. Emby runs entirely on your own server, giving you full control over your content.
This article explains how to deploy Emby Media Server using Docker Compose, configure persistent storage, and securely expose the web interface using Traefik with HTTPS.
Prerequisites
Before you begin, you need to:
- Have access to an Ubuntu 24.04-based server as a non-root user with
sudoprivileges. - Install Docker and Docker Compose.
- Create a DNS A record pointing to your server’s IP address (for example,
emby.example.com).
Set Up the Directory Structure and Environment Variables
In this section, you create the required directory structure for Emby and define environment variables in a .env file that Docker Compose loads automatically.
- Create the project directory.
console
$ mkdir -p ~/emby-server/{config,media}
- Navigate into the project directory.
console
$ cd ~/emby-server
- Create a
.envfile to store the environment variables.console$ nano .envAdd the following variables:
iniDOMAIN=emby.example.com LETSENCRYPT_EMAIL=admin@example.com
Replace:
DOMAINwith your actual domain name.LETSENCRYPT_EMAILwith your email address for SSL certificate registration.
Save and close the file.
Deploy with Docker Compose
In this section, you deploy both Emby and Traefik using a single Docker Compose stack with automatic HTTPS via Let’s Encrypt.
- Create the Docker Compose manifest.
console
$ nano docker-compose.yamlAdd the following content:
yamlservices: traefik: image: traefik:v3.6 container_name: traefik command: - "--providers.docker=true" - "--providers.docker.exposedbydefault=false" - "--entrypoints.web.address=:80" - "--entrypoints.websecure.address=:443" - "--entrypoints.web.http.redirections.entrypoint.to=websecure" - "--entrypoints.web.http.redirections.entrypoint.scheme=https" - "--certificatesresolvers.letsencrypt.acme.httpchallenge=true" - "--certificatesresolvers.letsencrypt.acme.httpchallenge.entrypoint=web" - "--certificatesresolvers.letsencrypt.acme.email=${LETSENCRYPT_EMAIL}" - "--certificatesresolvers.letsencrypt.acme.storage=/letsencrypt/acme.json" ports: - "80:80" - "443:443" volumes: - "letsencrypt:/letsencrypt" - "/var/run/docker.sock:/var/run/docker.sock:ro" restart: unless-stopped emby: image: emby/embyserver:latest container_name: emby hostname: emby expose: - "8096" volumes: - "./config:/config" - "./media:/media" labels: - "traefik.enable=true" - "traefik.http.routers.emby.rule=Host(`${DOMAIN}`)" - "traefik.http.routers.emby.entrypoints=websecure" - "traefik.http.routers.emby.tls.certresolver=letsencrypt" - "traefik.http.services.emby.loadbalancer.server.port=8096" restart: unless-stopped volumes: letsencrypt:
Save and close the file.
In this manifest:
- services: Defines the containers managed by Docker Compose:
- traefik: Acts as the reverse proxy, handles HTTPS termination, manages routing, and automatically generates Let’s Encrypt certificates.
- emby: Runs the Emby Media Server and exposes the web interface through Traefik.
- image: Specifies the container image used for each service.
- container_name: Assigns a fixed container name to simplify logging and container management.
- hostname (Emby): Sets a stable internal hostname for the Emby container.
- command (Traefik): Configures Traefik with Docker service discovery, HTTP/HTTPS entry points, automatic HTTP→HTTPS redirection, and ACME (Let’s Encrypt) certificate generation.
- ports (Traefik): Publishes ports
80and443on the host so Traefik can receive and route all incoming traffic. - expose (Emby): Exposes port
8096(Emby Web UI) to Traefik internally without exposing it directly to the host machine. - volumes:
./configstores Emby configuration, database, and metadata../mediastores your media library files.letsencryptstores TLS certificates generated by Traefik./var/run/docker.sockallows Traefik to detect running Docker services automatically.
- labels (Emby): Enables Traefik for the container, defines the domain-based routing rule, selects the HTTPS entry point, and specifies the internal port (
8096) Traefik should forward requests to. - restart: unless-stopped: Ensures the service automatically restarts unless manually stopped.
- services: Defines the containers managed by Docker Compose:
- Start the services in detached mode.
console
$ docker compose up -d - Verify that both services are running.
console
$ docker compose ps - View the logs for the services.
console
$ docker compose logsFor more information on managing a Docker Compose stack, see the How To Use Docker Compose article.
Access the Emby Web Interface
In this section, you access the Emby web interface through your secured domain and complete the initial server setup.
- Open Emby web interface in your web browser.
https://emby.example.com - Select your preferred display language, then click Next.
- Enter a username and a strong password to create the administrative user.
- Click New Library to start setting up your media libraries.
- Select a content type, enter a display name, and click Add to choose the folder that contains your media files.
- Configure any advanced options as required, then click OK to add the library.
- Repeat these steps to add additional media libraries.
- Click Next to continue.
- Turn on Configure Remote Access to allow external access from outside your internal network.
- Click Next, accept the terms of use, and click Next again.
- Click Finish to complete the setup.
- When Emby redirects you to the login page, select Manual Login.
- Enter the administrator credentials you created earlier.
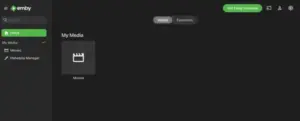
- Verify that the Emby home page loads successfully.
Conclusion
You successfully deployed Emby Media Server using Docker Compose and Traefik with persistent storage and automatic HTTPS encryption. You configured domain-based secure access, enabled persistent volumes for media and application data, and verified that the Emby dashboard is reachable through a trusted SSL connection.