How to Deploy MongoDB – NoSQL Document Database
How to Deploy MongoDB – NoSQL Document Database
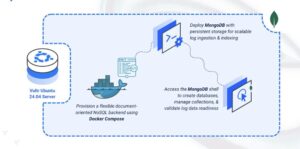
Deploy MongoDB with Docker Compose on Ubuntu 24.04 for persistent log management and queries.
MongoDB is a document-oriented NoSQL database that stores data in flexible JSON-like documents. It provides high performance, automatic scaling, and rich query capabilities including aggregation pipelines and full-text search. MongoDB’s schema flexibility makes it well-suited for log management where log structures vary across services, and its indexing capabilities enable efficient querying of large log collections.
In this article, you will deploy MongoDB using Docker Compose and configure persistent storage for database files. You will access MongoDB through its shell to create databases, collections, and manage log documents.
Prerequisites
Before you begin, you need to:
- Have access to an Ubuntu 24.04-based server as a non-root user with
sudoprivileges. - Install Docker and Docker Compose.
Set Up the Directory Structure and Environment Variables
In this section, you prepare the required directory structure for MongoDB and define environment variables in a .env file.
- Create the directory structure for MongoDB.
console
$ mkdir -p ~/mongodb-logging/mongodb-dataThis directory stores database files, collections, and indexes.
- Navigate into the
mongodb-loggingdirectory.console$ cd ~/mongodb-logging
- Create a
.envfile.console$ nano .envAdd the following variables:
iniMONGO_ROOT_USERNAME=admin MONGO_ROOT_PASSWORD=changeme
Replace
changemewith a strong password.Save and close the file.
Deploy with Docker Compose
In this section, you create and deploy the Docker Compose stack that runs MongoDB. Docker Compose manages the container and applies the environment variables from your .env file.
- Create a new Docker Compose manifest.
console
$ nano docker-compose.yaml - Add the following content.
yaml
services:
  mongodb:
    image: mongo:latest
    container_name: mongodb
    hostname: mongodb
    ports:
      - "27017:27017"
    volumes:
      - "./mongodb-data:/data/db"
    environment:
      - MONGO_INITDB_ROOT_USERNAME=${MONGO_ROOT_USERNAME}
      - MONGO_INITDB_ROOT_PASSWORD=${MONGO_ROOT_PASSWORD}
    restart: unless-stopped
Save and close the file.
This manifest establishes:
- services: One container providing database functionality:
- mongodb: Executes the document-oriented database server and handles MongoDB wire protocol communications.
- image: Latest MongoDB image sourced from Docker Hub’s official repository.
- container_name: Static naming convention for predictable container identification.
- hostname: Assigns the container’s network identifier used by clients and monitoring tools.
- ports: Maps container port 27017 to the host system, enabling direct client connections.
- volumes: Host directory (
./mongodb-data) persists all database content including collections, indexes, and transaction logs. - environment: References administrative credentials from the
.envfile:- MONGO_INITDB_ROOT_USERNAME: Creates the root user account name for full database access.
- MONGO_INITDB_ROOT_PASSWORD: Establishes the root user password.
- restart: unless-stopped: Guarantees automatic container restart after crashes or host reboots, excluding manual stops.
- services: One container providing database functionality:
- Create and start the service.
console
$ docker compose up -d - Verify that the service is running.
console
$ docker compose psOutput:
NAME      IMAGE         COMMAND                  SERVICE   CREATED          STATUS          PORTS
mongodb   mongo:latest  "docker-entrypoint.s…"   mongodb   19 seconds ago   Up 18 seconds   0.0.0.0:27017->27017/tcp, [::]:27017->27017/tcp
The container is operational. MongoDB accepts connections on port
27017. - View container logs.
console
$ docker compose logsFor more information on managing a Docker Compose stack, see the How To Use Docker Compose article.
Access MongoDB
This section guides you through testing your MongoDB installation via the mongosh shell, covering database creation, document insertion, and query execution for log management workflows.
- Access the MongoDB shell inside the container.
console
$ docker exec -it mongodb mongosh -u admin -p changeme
Replace
adminandchangemewith your configured credentials from the.envfile.Output:
Current Mongosh Log ID: 692dcedbfb795baf399dc29c Connecting to: mongodb://<credentials>@127.0.0.1:27017/?directConnection=true Using MongoDB: 8.2.2 Using Mongosh: 2.5.9 test> - Switch to the logs database. MongoDB creates databases automatically when you first insert data.
test> use logsOutput:
switched to db logs - Insert a sample log document into the
application_logscollection.logs> db.application_logs.insertOne({ timestamp: new Date(), level: "INFO", message: "Application started successfully", service: "web-server", host: "app-01" })Output includes the inserted document ID:
{ acknowledged: true, insertedId: ObjectId('674893a1b2c3d4e5f6789012') } - Query all log documents.
logs> db.application_logs.find()Output displays your log entry:
[ { _id: ObjectId('674893a1b2c3d4e5f6789012'), timestamp: ISODate('2025-12-01T17:25:06.384Z'), level: 'INFO', message: 'Application started successfully', service: 'web-server', host: 'app-01' } ] - Query logs with specific criteria.
logs> db.application_logs.find({ level: "INFO" }) - Count total log documents.
logs> db.application_logs.countDocuments()Output:
1 - Insert multiple log entries at once.
logs> db.application_logs.insertMany([ { timestamp: new Date(), level: "ERROR", message: "Database connection failed", service: "api-server", host: "app-02" }, { timestamp: new Date(), level: "WARN", message: "High memory usage detected", service: "worker", host: "app-03" } ]) - Query logs by severity level.
logs> db.application_logs.find({ level: { $in: ["ERROR", "WARN"] } }) - Create an index on the timestamp field for improved query performance.
logs> db.application_logs.createIndex({ timestamp: -1 })The
-1specifies descending order, optimizing queries that retrieve recent logs first. - Show all collections in the current database.
logs> show collectionsOutput:
application_logs - Exit the MongoDB shell.
logs> exit
Conclusion
You have successfully deployed MongoDB for log management with permanent data storage. The Docker-based deployment establishes a production-ready database instance where volume persistence guarantees data retention through container lifecycle events. MongoDB now accepts structured and unstructured log documents from application clients, executes sophisticated aggregation pipelines for log insights, and supports both vertical scaling through resource allocation and horizontal scaling via sharding as your logging infrastructure grows.