How to Deploy OpenWebUI – Local AI Interface
How to Deploy OpenWebUI – Local AI Interface
Set up a self-hosted Open WebUI with Docker Compose and Traefik for secure AI chat
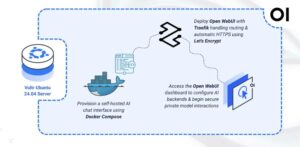
Open WebUI is an open-source, self-hosted web interface for interacting with large language models. It provides a ChatGPT-like experience while maintaining complete data privacy through local deployment. Open WebUI supports multiple AI backends including Ollama, OpenAI API-compatible services, and various open-source models, offering features like conversation history, document uploads, and customizable system prompts.
In this article, you will deploy Open WebUI using Docker Compose, configure persistent storage for conversations and settings, and set up Traefik as a reverse proxy to securely access your Open WebUI instance.
Prerequisites
Before you begin, you need to:
- Have access to an Ubuntu 24.04-based server as a non-root user with
sudoprivileges. - Install Docker and Docker Compose.
- Configure a domain A record pointing to your server’s IP address (for example,
openwebui.example.com).
Set Up the Directory Structure and Environment Variables
In this section, you prepare the required directory structure for Open WebUI and define environment variables in a .env file.
- Create the directory structure for Open WebUI.
console
$ mkdir -p ~/openwebui/dataThis directory stores user accounts, conversation history, and application settings.
- Navigate into the
openwebuidirectory.console$ cd ~/openwebui
- Create a
.envfile.console$ nano .envAdd the following variables:
iniDOMAIN=openwebui.example.com LETSENCRYPT_EMAIL=admin@example.com
Replace:
openwebui.example.comwith your domain.admin@example.comwith your email.
Save and close the file.
Deploy with Docker Compose
In this section, you create and deploy the Docker Compose stack that runs Open WebUI behind Traefik. Docker Compose manages both containers, applies the environment variables from your .env file, and automatically configures HTTPS routing through Traefik.
- Create a new Docker Compose manifest.
console
$ nano docker-compose.yaml - Add the following content.
yaml
services:
  traefik:
    image: traefik:v3.6
    container_name: traefik
    command:
      - "--providers.docker=true"
      - "--providers.docker.exposedbydefault=false"
      - "--entrypoints.web.address=:80"
      - "--entrypoints.websecure.address=:443"
      - "--entrypoints.web.http.redirections.entrypoint.to=websecure"
      - "--entrypoints.web.http.redirections.entrypoint.scheme=https"
      - "--certificatesresolvers.letsencrypt.acme.httpchallenge=true"
      - "--certificatesresolvers.letsencrypt.acme.httpchallenge.entrypoint=web"
      - "--certificatesresolvers.letsencrypt.acme.email=${LETSENCRYPT_EMAIL}"
      - "--certificatesresolvers.letsencrypt.acme.storage=/letsencrypt/acme.json"
    ports:
      - "80:80"
      - "443:443"
    volumes:
      - "letsencrypt:/letsencrypt"
      - "/var/run/docker.sock:/var/run/docker.sock:ro"
    restart: unless-stopped

  openwebui:
    image: ghcr.io/open-webui/open-webui:main
    container_name: openwebui
    hostname: openwebui
    expose:
      - "8080"
    volumes:
      - "./data:/app/backend/data"
    environment:
      - WEBUI_AUTH=true
    labels:
      - "traefik.enable=true"
      - "traefik.http.routers.openwebui.rule=Host(`${DOMAIN}`)"
      - "traefik.http.routers.openwebui.entrypoints=websecure"
      - "traefik.http.routers.openwebui.tls.certresolver=letsencrypt"
      - "traefik.http.services.openwebui.loadbalancer.server.port=8080"
    restart: unless-stopped

volumes:
  letsencrypt:
Save and close the file.
This deployment specifies:
- services: Two containers provide the AI chat infrastructure:
- traefik: Accepts external connections, manages TLS certificates, and forwards requests to Open WebUI.
- openwebui: Runs the chat interface and handles AI model interactions.
- image: Open WebUI image is pulled from GitHub Container Registry.
- container_name: Descriptive naming facilitates container identification during administration.
- command (Traefik): Configures Docker discovery, HTTP/HTTPS entry points on ports 80 and 443, automatic HTTPS enforcement, and Let’s Encrypt certificate generation through HTTP challenge.
- ports (Traefik): Binds standard web ports for external access.
- expose (Open WebUI): Opens port 8080 for container-to-container communication only.
- volumes:
- Bind mount (
./data) preserves user accounts, chat history, and uploaded documents. - Named volume
letsencryptmaintains certificate storage independently. - Docker socket enables Traefik’s automatic service detection.
- Bind mount (
- environment (Open WebUI): Enables user authentication for secure multi-user access.
- labels (Open WebUI): Traefik configuration for proxy activation, domain-based routing, SSL certificate attachment, and service port declaration.
- restart: unless-stopped: Provides automatic container restart after system events.
- services: Two containers provide the AI chat infrastructure:
- Create and start the services.
console
$ docker compose up -d - Verify that the services are running.
console
$ docker compose psOutput:
NAME        IMAGE                                COMMAND                  SERVICE     CREATED          STATUS                    PORTS
openwebui   ghcr.io/open-webui/open-webui:main   "bash start.sh"          openwebui   59 seconds ago   Up 58 seconds (healthy)   8080/tcp
traefik     traefik:v3.6                         "/entrypoint.sh --pr…"   traefik     59 seconds ago   Up 58 seconds             0.0.0.0:80->80/tcp, [::]:80->80/tcp, 0.0.0.0:443->443/tcp, [::]:443->443/tcp
Both containers are running. Open WebUI processes chat requests while Traefik handles connections on ports
80and443. - View the logs of the services.
console
$ docker compose logsFor more information on managing a Docker Compose stack, see the How To Use Docker Compose article.
Access Open WebUI
This section shows how to access the Open WebUI interface, create an administrator account, and configure an AI backend for chat functionality.
- Open the Open WebUI interface in your browser.
https://openwebui.example.com - Click Get started to create the first user account. The initial account automatically receives administrator privileges.
- After registration, the chat interface displays. Configure an AI backend:
- Click your profile icon in the bottom-left corner and select Admin Panel.
- Navigate to Settings > Connections.
- Add your AI backend (Ollama server URL or OpenAI API key).
- Start a conversation by selecting a model from the dropdown and typing your message. Open WebUI supports:
- Ollama: Connect to a local or remote Ollama server for open-source models.
- OpenAI API: Use GPT models with your API key.
- Compatible APIs: Connect to any OpenAI-compatible endpoint.
- Explore additional features:
- Click New Chat to start fresh conversations.
- Upload documents using the attachment icon for context-aware responses.
- Access conversation history from the sidebar.
Conclusion
You have successfully deployed Open WebUI for AI chat interaction with HTTPS encryption. The Docker Compose architecture combines the chat interface with automated SSL certificate management, while volume persistence protects your conversation history and user data. Traefik handles secure traffic routing and certificate renewal automatically. Your Open WebUI instance is prepared to connect with various AI backends, support multiple users, and provide a private ChatGPT-like experience under your complete control.