How to Deploy Plex – Home Media Streaming
How to Deploy Plex – Home Media Streaming
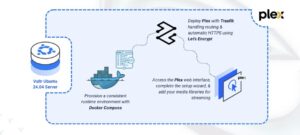
Run Plex using Docker Compose with Traefik reverse proxy for secure media access.
Plex Media Server is a user-friendly platform for organizing, streaming, and accessing your personal collection of movies, TV shows, music, and photos from any device. It transforms your server into a private media hub, providing a seamless experience across desktops, mobile devices, smart TVs, and web browsers.
In this article, you will deploy Plex Media Server using Docker Compose, configure persistent storage for Plex data and media, and set up Traefik as a reverse proxy to securely access your Plex instance through a custom domain.
Prerequisites
Before you begin, you need to:
- Have access to an Ubuntu 24.04-based server as a non-root user with
sudoprivileges. - Install Docker and Docker Compose.
- Configure a domain A record pointing to your server’s IP address (for example,
plex.example.com). - Retrieve your Plex claim token from the official Plex claim page.
Set Up the Directory Structure and Environment Variables
In this section, you prepare the required directory structure for Plex and define environment variables in a .env file.
- Create the directory structure for Plex.
console
$ mkdir -p ~/plex-media-server/{config,transcode,media}
This command creates the following directories:
- config: Stores Plex configuration files, metadata, and database.
- transcode: Stores temporary transcoding files.
- media: Contains your media library (movies, TV shows, music, photos).
- Navigate into the
plex-media-serverdirectory.console$ cd ~/plex-media-server
- Create a
.envfile.console$ nano .envAdd the following variables:
iniTZ=YOUR_TIMEZONE PLEX_CLAIM=YOUR_PLEX_CLAIM_TOKEN DOMAIN=plex.example.com LETSENCRYPT_EMAIL=admin@example.com
Replace:
YOUR_TIMEZONEwith your time zone.YOUR_PLEX_CLAIM_TOKENwith the token from the Plex claim page.plex.example.comwith your actual domain.admin@example.comwith your email.
Save and close the file.
Deploy with Docker Compose
In this section, you create and launch the Docker Compose stack that runs Plex behind Traefik. Docker Compose loads the environment variables from your .env file, starts both containers, and configures Traefik to provide secure HTTPS access to your Plex instance.
- Create a new Docker Compose manifest.
console
$ nano docker-compose.yamlAdd the following content:
yamlservices: traefik: image: traefik:v3.6 container_name: traefik command: - "--providers.docker=true" - "--providers.docker.exposedbydefault=false" - "--entrypoints.web.address=:80" - "--entrypoints.websecure.address=:443" - "--entrypoints.web.http.redirections.entrypoint.to=websecure" - "--entrypoints.web.http.redirections.entrypoint.scheme=https" - "--certificatesresolvers.letsencrypt.acme.httpchallenge=true" - "--certificatesresolvers.letsencrypt.acme.httpchallenge.entrypoint=web" - "--certificatesresolvers.letsencrypt.acme.email=${LETSENCRYPT_EMAIL}" - "--certificatesresolvers.letsencrypt.acme.storage=/letsencrypt/acme.json" ports: - "80:80" - "443:443" volumes: - "letsencrypt:/letsencrypt" - "/var/run/docker.sock:/var/run/docker.sock:ro" restart: unless-stopped plex: image: plexinc/pms-docker:latest container_name: plex hostname: plex ports: - "3005:3005/tcp" - "8324:8324/tcp" - "32469:32469/tcp" - "1900:1900/udp" - "32410:32410/udp" - "32412:32412/udp" - "32413:32413/udp" - "32414:32414/udp" environment: - TZ=${TZ} - PLEX_CLAIM=${PLEX_CLAIM} - ADVERTISE_IP=http://0.0.0.0:32400/ volumes: - "./config:/config" - "./transcode:/transcode" - "./media:/data" labels: - "traefik.enable=true" - "traefik.http.routers.plex.rule=Host(`${DOMAIN}`)" - "traefik.http.routers.plex.entrypoints=websecure" - "traefik.http.routers.plex.tls.certresolver=letsencrypt" - "traefik.http.services.plex.loadbalancer.server.port=32400" restart: unless-stopped volumes: letsencrypt:
Save and close the file.
In the above manifest:
- services: Defines the two containers managed by Docker Compose:
- traefik: Handles reverse proxying, routing, HTTPS, and Let’s Encrypt certificates.
- plex: Runs the Plex Media Server application.
- image: Specifies the container image used for each service.
- container_name: Assigns a fixed container name for easier management and logging.
- command (Traefik): Configures Traefik with Docker service discovery, HTTP/HTTPS entry points, automatic HTTP-to-HTTPS redirection, and Let’s Encrypt certificate generation.
- ports (Traefik): Exposes ports
80and443so Traefik can receive and route all external traffic. - ports (Plex): Publishes Plex’s discovery, streaming, and DLNA ports.
- volumes:
./config,./transcode,./mediapersist Plex configuration, transcoding files, and your media library.letsencryptstores Traefik TLS certificates./var/run/docker.socklets Traefik detect containers and apply routing rules.
- environment (Plex): Sets the server timezone, Plex claim token, and the URL that Plex advertises to clients.
- labels (Plex): Enables Traefik for this container, sets the routing rules for your domain, and defines the internal port (
32400) that Traefik forwards secure traffic to. - restart: unless-stopped: Ensures both Traefik and Plex automatically restart unless manually stopped.
- services: Defines the two containers managed by Docker Compose:
- Create and start the services.
console
$ docker compose up -d - Verify that the services are running.
console
$ docker compose psOutput:
NAME      IMAGE                       COMMAND                  SERVICE   CREATED          STATUS                    PORTS
plex      plexinc/pms-docker:latest   "/init"                  plex      48 minutes ago   Up 48 minutes (healthy)   0.0.0.0:3005->3005/tcp, [::]:3005->3005/tcp, ...
traefik   traefik:v3.6                "/entrypoint.sh --pr…"   traefik   48 minutes ago   Up 48 minutes             0.0.0.0:80->80/tcp, [::]:80->80/tcp, 0.0.0.0:443->443/tcp, [::]:443->443/tcp
The above output confirms that both services are running successfully. Plex is healthy, and Traefik is listening on ports
80and443for incoming traffic. - View the logs for the services.
console
$ docker compose logsFor more information on managing a Docker Compose stack, see the How To Use Docker Compose article.
Configure Plex Media Server
In this section, you use the Plex web interface to configure your server, claim your instance, and add your media libraries.
- Open the Plex web interface in your browser.
https://plex.example.com - On the welcome screen, click GOT IT! to start the setup.
- (Optional) You may see a prompt for Plex Pass upgrades.
- Plex Pass provides premium features such as HDR support, hardware transcoding, remote watch, and early access to new updates.
- To skip this step, click X in the upper-right corner.
- On the Set Up Your Server page, enter a Server Name.
- (Optional) Disable Allow me to access my media outside my home if you want to restrict external access.
- If prompted, sign in to your Plex account to claim your server.
- Click NEXT to proceed.
- On the Add Library page, click ADD LIBRARY to create a new media library.
- Select the library type (Movies, TV Shows, Music, Photos, etc.).
- Click NEXT, then click BROWSE FOR MEDIA FOLDER. Navigate to the directory you mounted in Docker (for example,
/data/movies), select it, and click ADD. - (Optional) Click Advanced to configure settings such as language preferences, metadata behavior, and scanning rules.
- Click ADD LIBRARY to save the library configuration.
- Repeat the process to add more libraries. You can also add more libraries later from settings.
- After you finish adding libraries, click NEXT and then DONE to complete the setup.
- Plex now loads your Dashboard, where you can manage libraries, users, and streaming settings.

Conclusion
You have successfully deployed your own Plex Media Server and made it accessible through a secure domain. You set up the required services using Docker Compose, created persistent storage directories for configuration, transcode, and media files, configured Traefik as the reverse proxy, and enabled HTTPS encryption with Let’s Encrypt.