How to Deploy Technitium – DNS Server Platform
How to Deploy Technitium – DNS Server Platform
Deploy Technitium DNS Server on Ubuntu using Docker Compose with Traefik-secured HTTPS access.
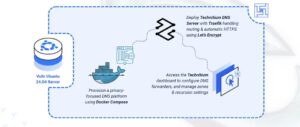
Technitium DNS Server is an open-source, authoritative, and recursive DNS server designed for privacy and security. It offers advanced features such as DNS-over-TLS (DoT) and DNS-over-HTTPS (DoH). It features a modern, user-friendly web console for managing zones, records, and logs.
This article demonstrates how to deploy Technitium DNS Server on Ubuntu 24.04 using Docker Compose. The stack includes Traefik for secure HTTPS access to the administration dashboard.
Prerequisites
Before you begin:
Have access to an Ubuntu 24.04 server as a non-root user with sudo privileges.
Install Docker and Docker Compose.
Configure a domain name, such as technitium.example.com, to point to your server’s public IP address for the web dashboard.
Freeing Port 53
By default, Ubuntu 24.04 runs a local stub resolver systemd-resolved that occupies port 53. To run your own DNS server, you must disable this service to allow Technitium to bind to the port.
Stop the systemd-resolved service.
console
$ sudo systemctl stop systemd-resolved
Disable the service so it does not start again when you reboot.
console
$ sudo systemctl disable systemd-resolved
Remove the symbolic link for /etc/resolv.conf.
console
$ sudo rm /etc/resolv.conf
To ensure the server itself can still connect to the internet to download updates, you need to configure the server to use a public DNS provider. Create a new DNS configuration file.
console
$ echo “nameserver 1.1.1.1” | sudo tee /etc/resolv.conf
This configuration tells your server to send its own DNS queries to 1.1.1.1, a public DNS server provided by Cloudflare.
Set Up the Directory Structure and Environment Variables
Technitium requires persistent folders for configuration and data, along with environment variables that specify your domain and other settings. This section prepares both the directory structure and the .env file.
Create the project folders.
console
$ mkdir -p ~/technitium/{config,letsencrypt}
config – Persistent storage for Technitium logs, zones, and settings.
letsencrypt – Traefik ACME certificates.
Navigate to the root Technitium directory.
console
$ cd ~/technitium
Create a file named .env in the project directory.
console
$ nano .env
Add the following values:
ini
DOMAIN=technitium.example.com
LETSENCRYPT_EMAIL=admin@example.com
Replace technitium.example.com with your domain, and admin@example.com with your email address. Save and close the file.
Deploy with Docker Compose
This section sets up the Technitium deployment. The stack includes Traefik for handling HTTPS connections to the administrative web panel and the Technitium service for handling actual DNS queries.
Add your user account to the docker user group.
console
$ sudo usermod -aG docker $USER
Apply new group membership.
console
$ newgrp docker
Create the Docker Compose manifest file.
console
$ nano docker-compose.yml
Add the following contents:
yaml
services:
traefik:
image: traefik:latest
container_name: traefik
restart: unless-stopped
environment:
DOCKER_API_VERSION: “1.44”
command:
– “–providers.docker=true”
– “–providers.docker.exposedbydefault=false”
– “–providers.docker.network=traefik-public”
– “–entrypoints.web.address=:80”
– “–entrypoints.websecure.address=:443”
– “–entrypoints.web.http.redirections.entrypoint.to=websecure”
– “–entrypoints.web.http.redirections.entrypoint.scheme=https”
– “–certificatesresolvers.le.acme.httpchallenge=true”
– “–certificatesresolvers.le.acme.httpchallenge.entrypoint=web”
– “–certificatesresolvers.le.acme.email=${LETSENCRYPT_EMAIL}”
– “–certificatesresolvers.le.acme.storage=/letsencrypt/acme.json”
ports:
– “80:80”
– “443:443”
volumes:
– /var/run/docker.sock:/var/run/docker.sock:ro
– ./letsencrypt:/letsencrypt
dns-server:
image: technitium/dns-server:latest
container_name: dns-server
restart: unless-stopped
environment:
– TZ=UTC
– DNS_SERVER_DOMAIN=${DOMAIN}
ports:
– “53:53/udp”
– “53:53/tcp”
volumes:
– ./config:/etc/dns
labels:
– “traefik.enable=true”
– “traefik.http.routers.dns.rule=Host(`${DOMAIN}`)”
– “traefik.http.routers.dns.entrypoints=websecure”
– “traefik.http.routers.dns.tls=true”
– “traefik.http.routers.dns.tls.certresolver=le”
– “traefik.http.services.dns.loadbalancer.server.port=5380”
Save and close the file.
This Docker Compose configuration deploys Technitium DNS Server behind Traefik, providing secure HTTPS access to the administrative panel while exposing DNS ports directly for network-wide DNS resolution. Each service plays a specific role in the deployment:
dns-server service (Technitium DNS Server)
Runs the container using the official technitium/dns-server image.
Exposes ports 53/udp and 53/tcp so local devices can use this server for regular DNS queries.
Stores persistent configuration in the ./config directory, preserving DNS zones and settings across restarts.
Includes Traefik labels that route HTTPS traffic for your domain (${DOMAIN}) to Technitium’s web management interface running internally on port 5380.
Uses environment variables to configure the server domain and timezone.
traefik service
Acts as a reverse proxy and handles all incoming web traffic on ports 80 and 443.
Automatically provisions and renews SSL certificates using Let’s Encrypt.
Enforces HTTP→HTTPS redirection and forwards secure web requests to Technitium’s admin dashboard.
Stores ACME certificate files inside the ./letsencrypt directory.
Start all services in detached mode.
console
$ docker compose up -d
Check the container status.
console
$ docker compose ps
Note
For more information on managing a Docker Compose stack, see the How To Use Docker Compose article.
Initial Configuration
Technitium is now running, but you need to set the administrative password and configure the upstream resolvers (forwarders), so your server can resolve domains it doesn’t host locally.
Open your web browser and navigate to your Technitium domain, such as https://technitium.example.com.
You will be greeted by the initial login screen. The default user is admin, and the default password is admin.
Upon logging in, the system will immediately prompt you to change the password. Enter a strong password and save.
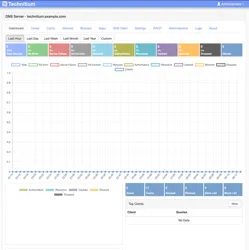
The dashboard will load, showing current statistics.
Navigate to the Settings tab in the main menu.
Select the Proxy & Forwarders sub-tab.
Go to the Forwarders section. In the text box, enter your preferred upstream DNS providers (one per line), such as 1.1.1.1 and 8.8.8.8. This ensures your server can resolve public domains, such as vultr.com, by querying these providers.
Scroll to the bottom of the page and click Save Settings.
Note
If you wish to control who can query your server, the Recursion tab allows you to set the server to “Allow Recursion Only For Private Networks” (default) or define a specific “Network Access Control List (ACL)”.
Testing
Verify that the server is working correctly and accessible from your client.
Run this command from your local computer. Replace SERVER_IP with your server’s public IP address.
console
$ dig @SERVER_IP vultr.com
You should get a response containing the A records of the vultr.com domain.
Conclusion
You have successfully deployed Technitium DNS Server on Ubuntu 24.04. You now have a private, secure DNS resolver that can block ads and manage custom DNS records. For more information, refer to the Technitium Help page.