How to Display All Your WordPress Posts on One Page
-
by cobra_admin
- 27
Do you want to display all your WordPress posts on one page?
Just like the index page of a book, this can help visitors find exactly the content they need even if your website has dozens or even hundreds of posts.
In this article, we will show you how to display all your WordPress posts on one page.

Why and When to Display All Posts on One Page?
WordPress comes with built-in archive pages for each category, tag, author, and date.
However, many website owners prefer to create custom archives pages so they can control exactly what content is shown to visitors. For example, you might use a custom archive page to highlight your site’s most popular posts or show a date-based compact archive.
By showing all your posts on one page you can help visitors jump straight to the content they’re interested in. This list can also be a good starting point for visitors who are unsure what to read next.
With that being said, let’s look at a few different ways to display your WordPress posts on one page. Simply use the quick links below to jump straight to the method you prefer.
- Method 1. Using the Latest Posts block (simple but limited)
- Method 2. Using the SeedProd page builder plugin (customizable)
- Method 3. List all your posts grouped by publish year with a plugin
Method 1. Using the Latest Posts Block
You can display all your WordPress posts on one page by using the Latest Posts block in either the block editor or the Full Site. Editor.
The following image shows an example of how the block may look on your website.
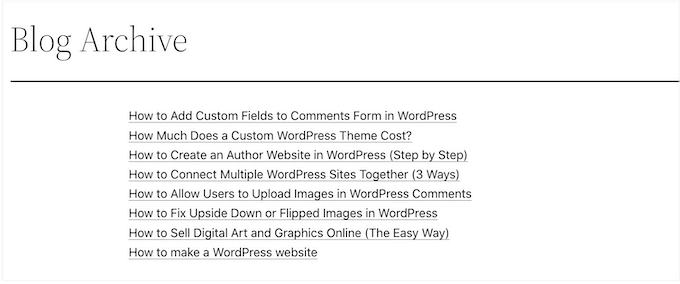
The good thing about this method is that you don’t have to install a new plugin. However, the Latest Posts block can only display a maximum of 100 WordPress posts. If you want to show more than 100 posts, then you’ll need to use one of the other methods in this guide.
You can add the Latest Posts block to a page or post, or you can add it to a block-based theme using the Full Site Editor.
For this example, we’ll show you how to add it to a post. The steps are similar for any other area of your website.
To get started, click on the + button and type in ‘Latest Posts.’
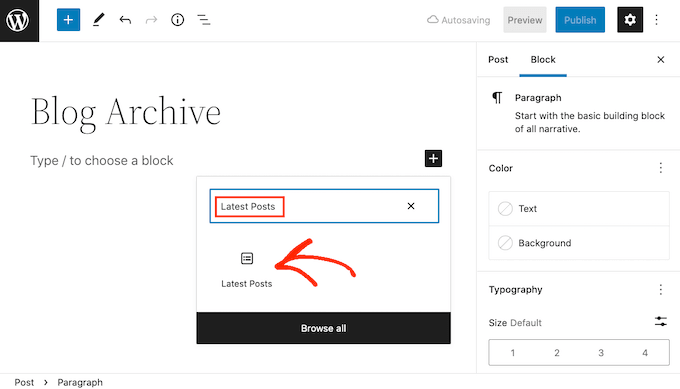
You can add the block to your page by clicking on ‘Latest Posts.’
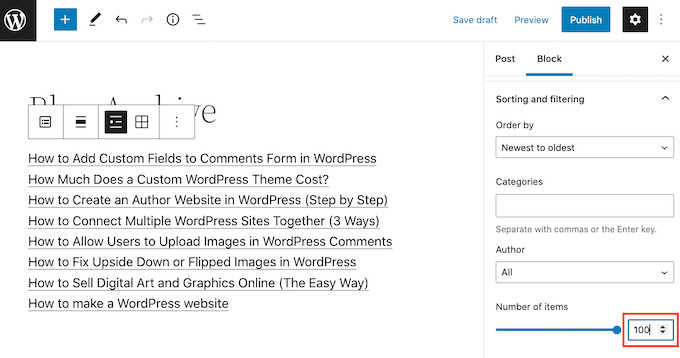
You can customize the Latest Posts block in a few different ways, but you’ll want to start by finding the ‘Number of items’ section in the right-hand menu.
This is how many posts the block will show to the people who visit your WordPress blog. To show all your posts you’ll typically type ‘100’ into the text box, which is the maximum.
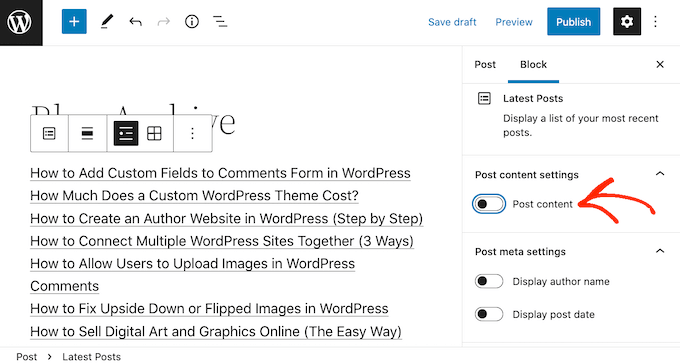
By default, the Latest Posts block will only show the title of each post. However, you may also want to give visitors a preview of each post’s content by showing an excerpt.
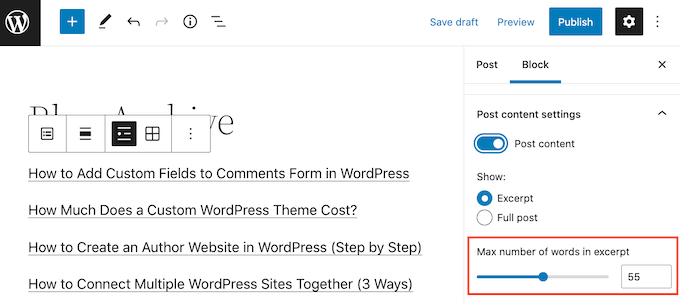
To do this, simply find ‘Post content settings’ in the right-hand menu and enable the ‘Post content’ toggle.
Once you’ve done that, click to select the ‘Excerpt’ setting.
Then drag the ‘Max number of words in excerpt’ toggle to change how many words are included in the post excerpt.
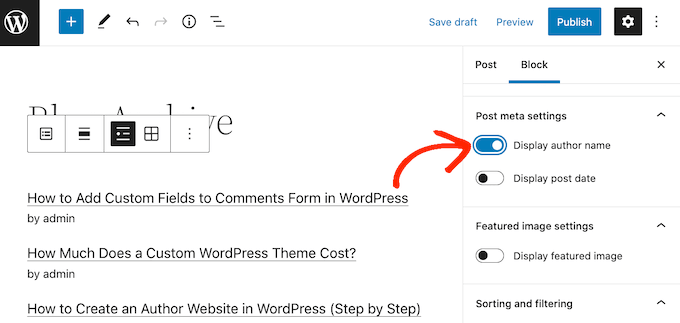
If you run a multi-author WordPress blog, then you may want to include. the post’s author in your list using the ‘Display author name’ toggle.
This can help visitors find posts by their favorite authors.
You may also want to show the date when the post was published using the ‘Display post date’ toggle.
There are some more settings that you may want to try but this should give good results for most websites.
When you’re happy with how the list looks you can go ahead and either publish or update the page. Now if you visit this page on your site, you’ll see a list of all your WordPress posts.
Method 2. Using the SeedProd Page Builder Plugin
Another option is to create a custom page that shows all of your WordPress posts. This method gives you more control over how the post list looks and is a good choice if you want to create a completely custom archive page.
You can easily design a page using SeedProd. It is the best landing page builder for WordPress and comes with a ready-made Posts block that will display all your posts.
The first thing you need to do is install and activate the SeedProd plugin. For more details, see our step by step guide on how to install a WordPress plugin.
Note: There is a free version of SeedProd but we’ll be using the Pro version since it comes with the Posts block.
After activating the plugin, SeedProd will ask for a license key.

You can find this information under your account on the SeedProd website and in the purchase confirmation email you got when you bought SeedProd.
After entering your license key, go to SeedProd » Landing Pages.
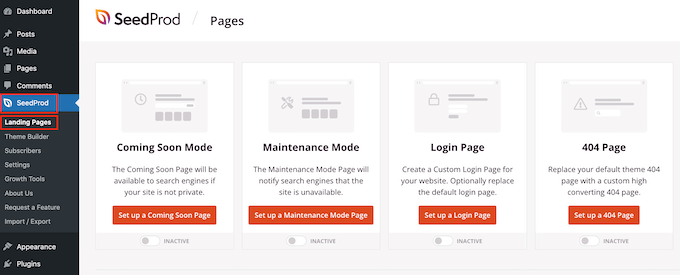
SeedProd comes with more than 150 professionally designed templates that are grouped into categories. Along the top you’ll see categories that let you create a custom login page for WordPress, activate maintenance mode, create beautiful coming soon pages, and more.
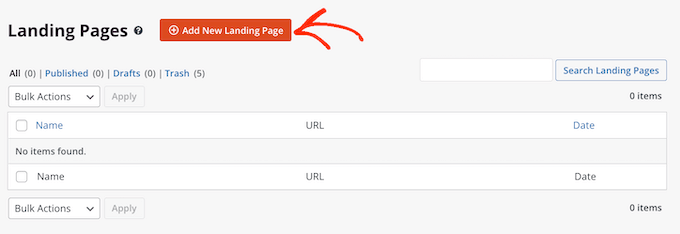
In this example, we’ll design a new page so go ahead and click on ‘Add New Landing Page.’
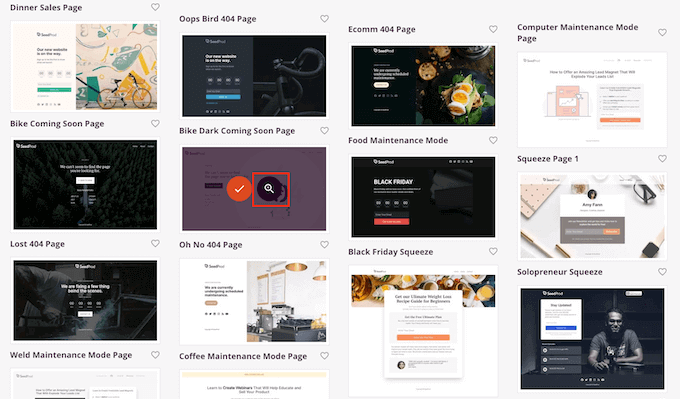
You will now see all the different templates.
To take a closer look at any design, simply hover your mouse over that template and click on the magnifying glass icon.
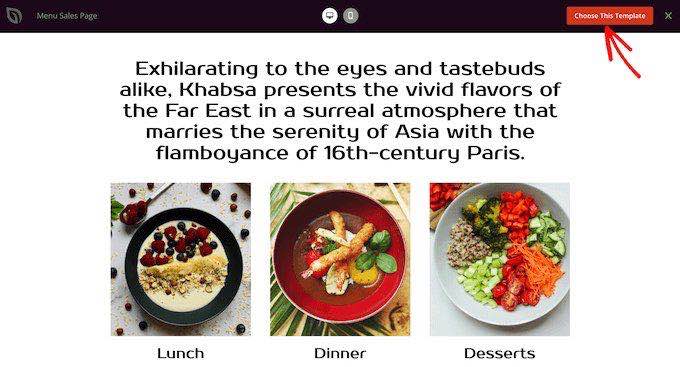
When you find a template that you want to use, simply click on ‘Choose This Template.’
In our images we’re using the Menu Sales Page template.
You can now type a name into the ‘Page Name’ field.
SeedProd will automatically create a ‘Page URL’ based on the page name. This is the web address where your page will live.
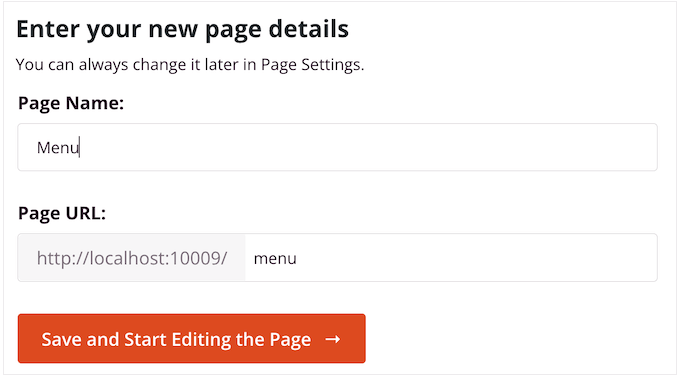
Next, click on ‘Save and Start Editing the Page’ to load the SeedProd page editor.
This simple drag and drop builder shows a preview of your page to the right. On the left is a menu that has all the different blocks that you can add to your design using drag and drop.

SeedProd comes with lots of ready-made blocks that you can use to easily add content and features to your design.
When you find a block that you want to add to the page, simply drag and drop it onto your SeedProd template.
To customize a block, go ahead and click to select the block in the SeedProd editor. The left-hand menu will show all the settings that you can use to customize the block.
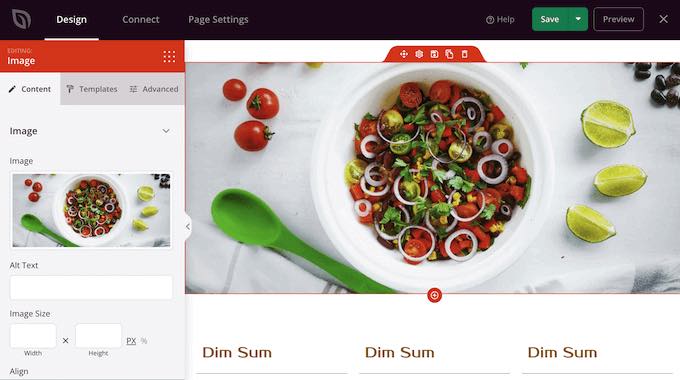
Since we want to display all our WordPress posts on one page, find the ‘Posts’ block in the left-hand menu.
Then, simply drag and drop the Posts block onto your template.
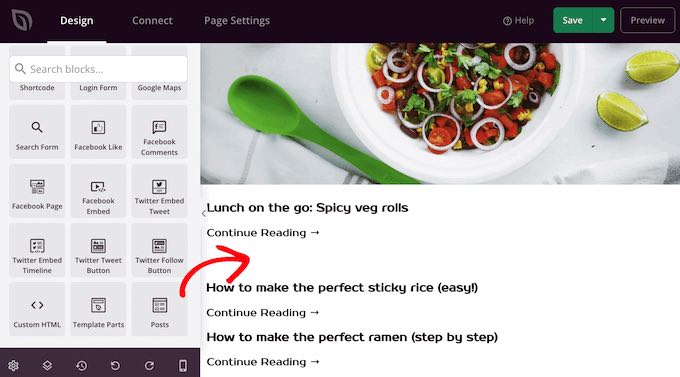
You can customize the block using the settings in the left-hand menu.
Since we want to show all our posts on a single page, find ‘Included Post Types(s)’ and click on ‘Posts.’
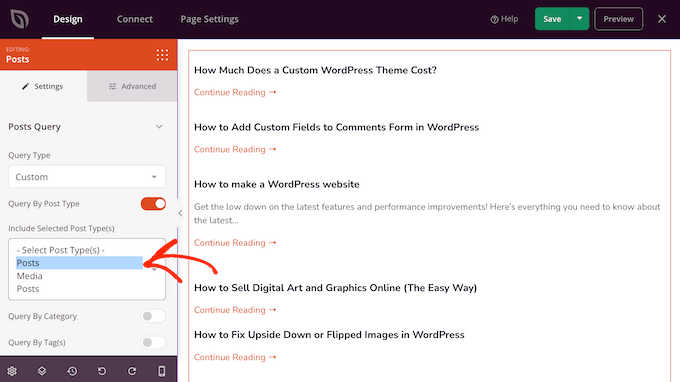
Then, scroll to the ‘Layout’ section.
By default, the block will show 10 posts. You can change this to a much higher number by typing into the ‘Number Per Pages’ box.
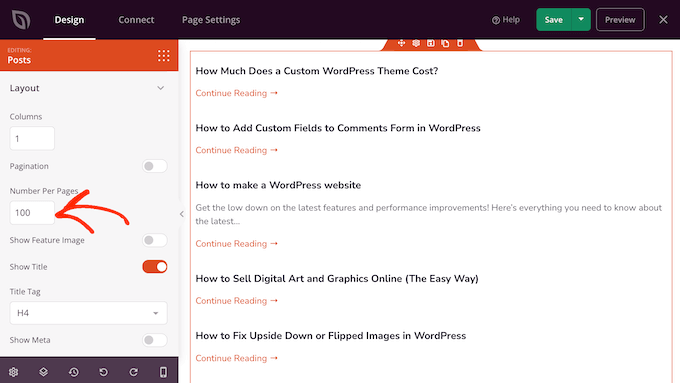
There are some other settings that you may want to try, but this is enough to display all your WordPress posts on one page.
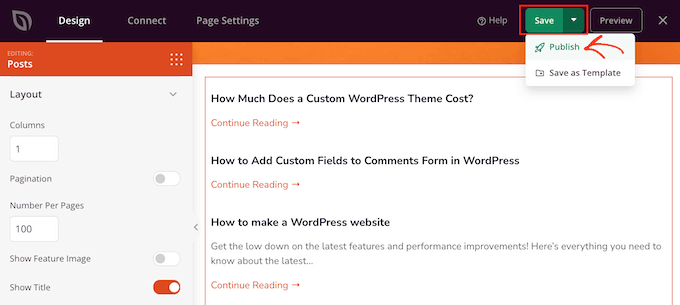
When you’re happy with how the page looks, click on ‘Save’ and then choose ‘Publish.’
Method 3: Using the Simple Yearly Archive Plugin
If you have lots of content, then showing all your posts on a single page means visitors will have to scroll to find the content they want.
One solution is to separate your posts into the year they were published using the Simple Yearly Archive plugin.
To start, you’ll need to install and activate the Simple Yearly Archive plugin. If you need help, then please see our guide on how to install a WordPress plugin.
Upon activation, you’ll need to configure the plugin’s settings by heading over to Settings » Simple Yearly Archive.
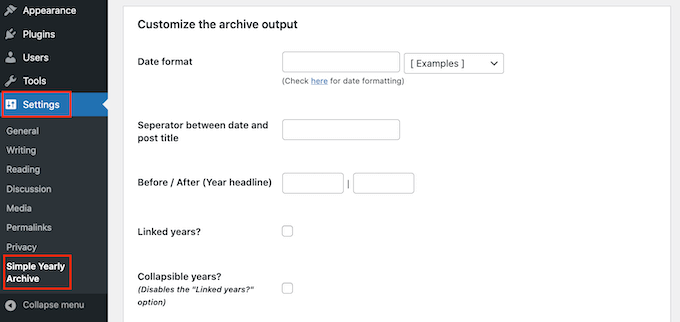
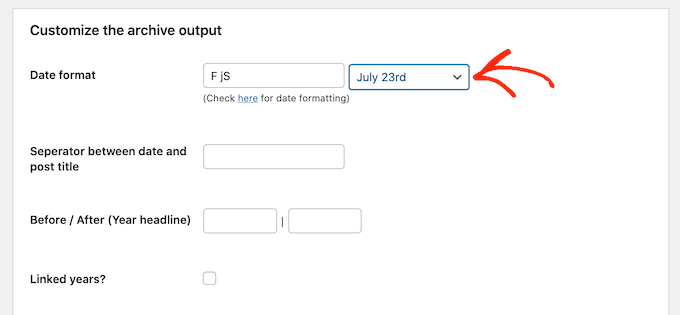
Your first task is choosing how to show the dates in your lists by finding the ‘Date format’ section and opening the dropdown menu labeled ‘[Examples].’
Now, you will see examples of the date formats that you can use. Simply click on the one you want to use.
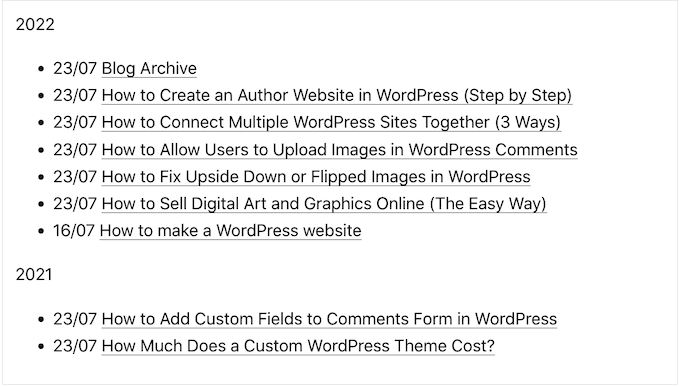
By default, the plugin will show your posts under the years they were published.
The following image shows an example of how this might look on your website.
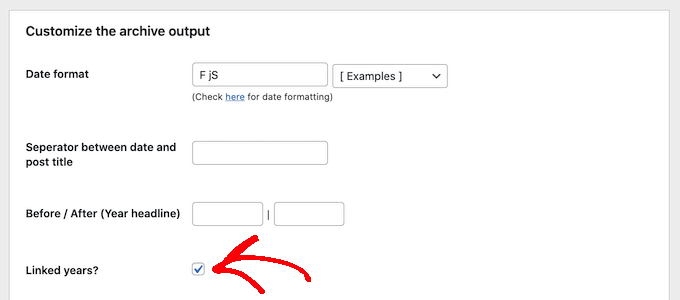
If you prefer, then you can turn the year subheadings into links by checking the ‘Linked years?’ box.
Visitors can then click these links to see an archive of all the posts published in that year.
Happy with how the plugin is configured?
Then you can go ahead and click on ‘Update Options’ to save your changes.
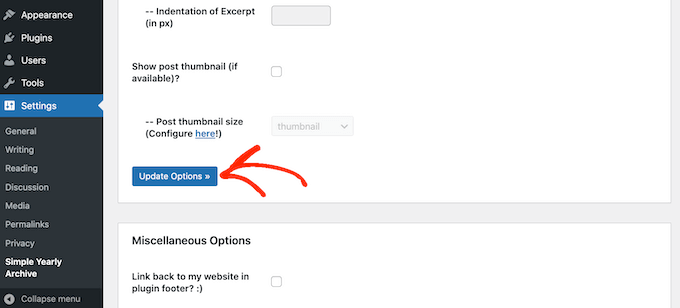
After that, you can add the list of posts to any page using the shortcode [SimpleYearlyArchive]. For detailed step-by-step instructions, please see our beginner’s guide on how to add a shortcode in WordPress.
We hope this article helped you learn how to display all your WordPress posts on one page. You may also want to check out our guide on how to create and sell online courses with WordPress and proven ways to make money online blogging with WordPress.
Do you want to display all your WordPress posts on one page?
Just like the index page of a book, this can help visitors find exactly the content they need even if your website has dozens or even hundreds of posts.
In this article, we will show you how to display all your WordPress posts on one page.

Why and When to Display All Posts on One Page?
WordPress comes with built-in archive pages for each category, tag, author, and date.
However, many website owners prefer to create custom archives pages so they can control exactly what content is shown to visitors. For example, you might use a custom archive page to highlight your site’s most popular posts or show a date-based compact archive.
By showing all your posts on one page you can help visitors jump straight to the content they’re interested in. This list can also be a good starting point for visitors who are unsure what to read next.
With that being said, let’s look at a few different ways to display your WordPress posts on one page. Simply use the quick links below to jump straight to the method you prefer.
- Method 1. Using the Latest Posts block (simple but limited)
- Method 2. Using the SeedProd page builder plugin (customizable)
- Method 3. List all your posts grouped by publish year with a plugin
Method 1. Using the Latest Posts Block
You can display all your WordPress posts on one page by using the Latest Posts block in either the block editor or the Full Site. Editor.
The following image shows an example of how the block may look on your website.

The good thing about this method is that you don’t have to install a new plugin. However, the Latest Posts block can only display a maximum of 100 WordPress posts. If you want to show more than 100 posts, then you’ll need to use one of the other methods in this guide.
You can add the Latest Posts block to a page or post, or you can add it to a block-based theme using the Full Site Editor.
For this example, we’ll show you how to add it to a post. The steps are similar for any other area of your website.
To get started, click on the + button and type in ‘Latest Posts.’

You can add the block to your page by clicking on ‘Latest Posts.’
You can customize the Latest Posts block in a few different ways, but you’ll want to start by finding the ‘Number of items’ section in the right-hand menu.
This is how many posts the block will show to the people who visit your WordPress blog. To show all your posts you’ll typically type ‘100’ into the text box, which is the maximum.

By default, the Latest Posts block will only show the title of each post. However, you may also want to give visitors a preview of each post’s content by showing an excerpt.
To do this, simply find ‘Post content settings’ in the right-hand menu and enable the ‘Post content’ toggle.

Once you’ve done that, click to select the ‘Excerpt’ setting.
Then drag the ‘Max number of words in excerpt’ toggle to change how many words are included in the post excerpt.

If you run a multi-author WordPress blog, then you may want to include. the post’s author in your list using the ‘Display author name’ toggle.
This can help visitors find posts by their favorite authors.

You may also want to show the date when the post was published using the ‘Display post date’ toggle.
There are some more settings that you may want to try but this should give good results for most websites.
When you’re happy with how the list looks you can go ahead and either publish or update the page. Now if you visit this page on your site, you’ll see a list of all your WordPress posts.
Method 2. Using the SeedProd Page Builder Plugin
Another option is to create a custom page that shows all of your WordPress posts. This method gives you more control over how the post list looks and is a good choice if you want to create a completely custom archive page.
You can easily design a page using SeedProd. It is the best landing page builder for WordPress and comes with a ready-made Posts block that will display all your posts.
The first thing you need to do is install and activate the SeedProd plugin. For more details, see our step by step guide on how to install a WordPress plugin.
Note: There is a free version of SeedProd but we’ll be using the Pro version since it comes with the Posts block.
After activating the plugin, SeedProd will ask for a license key.

You can find this information under your account on the SeedProd website and in the purchase confirmation email you got when you bought SeedProd.
After entering your license key, go to SeedProd » Landing Pages.

SeedProd comes with more than 150 professionally designed templates that are grouped into categories. Along the top you’ll see categories that let you create a custom login page for WordPress, activate maintenance mode, create beautiful coming soon pages, and more.
In this example, we’ll design a new page so go ahead and click on ‘Add New Landing Page.’

You will now see all the different templates.
To take a closer look at any design, simply hover your mouse over that template and click on the magnifying glass icon.

When you find a template that you want to use, simply click on ‘Choose This Template.’
In our images we’re using the Menu Sales Page template.

You can now type a name into the ‘Page Name’ field.
SeedProd will automatically create a ‘Page URL’ based on the page name. This is the web address where your page will live.

Next, click on ‘Save and Start Editing the Page’ to load the SeedProd page editor.
This simple drag and drop builder shows a preview of your page to the right. On the left is a menu that has all the different blocks that you can add to your design using drag and drop.

SeedProd comes with lots of ready-made blocks that you can use to easily add content and features to your design.
When you find a block that you want to add to the page, simply drag and drop it onto your SeedProd template.
To customize a block, go ahead and click to select the block in the SeedProd editor. The left-hand menu will show all the settings that you can use to customize the block.

Since we want to display all our WordPress posts on one page, find the ‘Posts’ block in the left-hand menu.
Then, simply drag and drop the Posts block onto your template.

You can customize the block using the settings in the left-hand menu.
Since we want to show all our posts on a single page, find ‘Included Post Types(s)’ and click on ‘Posts.’

Then, scroll to the ‘Layout’ section.
By default, the block will show 10 posts. You can change this to a much higher number by typing into the ‘Number Per Pages’ box.

There are some other settings that you may want to try, but this is enough to display all your WordPress posts on one page.
When you’re happy with how the page looks, click on ‘Save’ and then choose ‘Publish.’

Method 3: Using the Simple Yearly Archive Plugin
If you have lots of content, then showing all your posts on a single page means visitors will have to scroll to find the content they want.
One solution is to separate your posts into the year they were published using the Simple Yearly Archive plugin.
To start, you’ll need to install and activate the Simple Yearly Archive plugin. If you need help, then please see our guide on how to install a WordPress plugin.
Upon activation, you’ll need to configure the plugin’s settings by heading over to Settings » Simple Yearly Archive.

Your first task is choosing how to show the dates in your lists by finding the ‘Date format’ section and opening the dropdown menu labeled ‘[Examples].’
Now, you will see examples of the date formats that you can use. Simply click on the one you want to use.

By default, the plugin will show your posts under the years they were published.
The following image shows an example of how this might look on your website.

If you prefer, then you can turn the year subheadings into links by checking the ‘Linked years?’ box.
Visitors can then click these links to see an archive of all the posts published in that year.

Happy with how the plugin is configured?
Then you can go ahead and click on ‘Update Options’ to save your changes.

After that, you can add the list of posts to any page using the shortcode [SimpleYearlyArchive]. For detailed step-by-step instructions, please see our beginner’s guide on how to add a shortcode in WordPress.
We hope this article helped you learn how to display all your WordPress posts on one page. You may also want to check out our guide on how to create and sell online courses with WordPress and proven ways to make money online blogging with WordPress.
Do you want to display all your WordPress posts on one page? Just like the index page of a book, this can help visitors find exactly the content they need even if your website has dozens or even hundreds of posts. In this article, we will show you how to…
Do you want to display all your WordPress posts on one page? Just like the index page of a book, this can help visitors find exactly the content they need even if your website has dozens or even hundreds of posts. In this article, we will show you how to…