How to Install Ghost Blogging Platform on Ubuntu 24.04
How to Install Ghost Blogging Platform on Ubuntu 24.04
Install Ghost on Ubuntu 24.04 via Ghost-CLI or Docker Compose, proxy with Nginx, secure SSL using Certbot, enable analytics with Tinybird and federation using ActivityPub.
Ghost is an open-source publishing platform designed for bloggers, journalists, and content creators. It provides built-in newsletter functionality, membership management, and subscription features. Recent versions support ActivityPub federation for interaction with decentralized social networks and include web analytics through Tinybird integration.
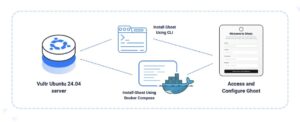
This article explains how to install Ghost Blogging Platform on Ubuntu 24.04 using two methods: Ghost-CLI for a traditional installation and Docker Compose for containerized deployments with analytics capabilities.
Prerequisites
Before you begin, ensure you:
- Have access to an Ubuntu 24.04 based server as a non-root user with
sudoprivileges. - Create a domain A record pointing to the instance’s public IP address, such as
ghost.example.com.
The CLI method installs Ghost directly on the host system using Ghost-CLI. This requires you to install Node.js, MySQL, and Nginx as dependencies before installing Ghost.
Install Node.js
Ghost is compatible with Node v22 LTS. You can check the list of compatible Node versions for Ghost at the official documentation.
- Download and run the NodeSource setup script to install Node.js v22 LTS.
console
$ curl -fsSL https://deb.nodesource.com/setup_22.x -o nodesource_setup.sh
$ sudo -E bash nodesource_setup.sh
$ sudo apt install -y nodejs
- Verify the installed Node.js version.
console
$ node -vOutput:
v22.21.0
Install and Configure MySQL
- Install the MySQL Server.
console
$ sudo apt install -y mysql-serverMySQL starts automatically and runs as a service.
- Verify the MySQL installation.
console
$ mysql --versionYour output should be similar to the one below.
mysql Ver 8.0.43-0ubuntu0.24.04.2 for Linux on x86_64 ((Ubuntu)) - Secure the MySQL installation.
console
$ sudo mysql_secure_installationFollow the interactive prompts to improve MySQL security. The root account uses the
auth_socketplugin by default, which authenticates based on the system user and does not require a separate password.- VALIDATE Password: Enter
yto enable password validation for new database users. - Password Validation Policy: Enter
2for strong password requirements (uppercase, lowercase, numbers, special characters). - Remove anonymous users: Enter
yto remove anonymous access. - Disallow root login remotely: Enter
yto restrict root access to localhost only. - Remove test database: Enter
yto delete the test database. - Reload privilege tables: Enter
yto apply changes immediately.
- VALIDATE Password: Enter
- Log in to the MySQL console.
console
$ sudo mysql - Create a database, user, and grant privileges.
sql
mysql> CREATE DATABASE ghost_db;
mysql> CREATE USER 'ghostuser'@'localhost' IDENTIFIED BY 'Your_password2!';
mysql> GRANT ALL PRIVILEGES ON ghost_db.* TO 'ghostuser'@'localhost';
mysql> FLUSH PRIVILEGES;
mysql> EXIT;
Install Nginx Web Server
- Install Nginx.
console
$ sudo apt install -y nginx - Allow HTTP and HTTPS traffic through the firewall.
console
$ sudo ufw allow 'Nginx Full'
- Verify Nginx is running.
console
$ sudo systemctl status nginx
Install Ghost
- Install the Ghost-CLI package globally.
console
$ sudo npm install ghost-cli@latest -g - Create a directory for the Ghost installation.
console
$ sudo mkdir -p /var/www/html/ghost - Set ownership to the current user.
console
$ sudo chown $USER:$USER /var/www/html/ghost
- Set directory permissions.
console
$ sudo chmod 775 /var/www/html/ghost
- Navigate to the Ghost directory.
console
$ cd /var/www/html/ghost
- Run the Ghost installation process.
console
$ ghost installThe installer prompts for configuration details. Provide the following information:
- Enter your blog URL: Your domain with HTTPS, e.g.,
https://ghost.example.com - Enter your MySQL hostname:
localhost - Enter your MySQL username: The username created earlier (e.g.,
ghostuser) - Enter your MySQL password: The password set earlier (e.g.,
Your_password2!) - Enter your Ghost database name: The database created earlier (e.g.,
ghost_db) - Do you wish to set up Nginx?: Enter
yto configure Nginx automatically - Do you wish to set up SSL?: Enter
yto installacme.shfor SSL certificate management - Enter your email (For SSL Certificates): A valid email address for certificate notifications
- Do you wish to set up Systemd?: Enter
yto create a systemd service for Ghost - Do you want to start Ghost?: Enter
yto start Ghost immediately
- Enter your blog URL: Your domain with HTTPS, e.g.,
Manage Ghost Configuration
- To update any of the parameters, edit the configuration file below..
console
$ nano /var/www/html/ghost/config.production.json - After changing the configuration, restart Ghost.
console
$ cd /var/www/html/ghost
$ ghost restart
- Alternatively, restart and view the status of Ghost using systemd. Replace
ghost-example-comwith your domain name.console$ sudo systemctl restart ghost_ghost-example-com.service $ sudo systemctl status ghost_ghost-example-com.service
From the output, verify that the service is running.
- Alternatively, restart and view the status of Ghost using systemd. Replace
Update Ghost
- Navigate to the Ghost installation directory.
console
$ cd /var/www/html/ghost
- Create a backup before updating. This command prompts for your sudo password and staff access token. You can find the staff access token under Settings > Staff > View Profile.
console
$ ghost backup - Update Ghost to the latest version.
console
$ ghost updateGhost-CLI handles database migrations and applies all required changes, which may result in brief downtime.
- To update to a specific version, replace
VERSIONwith the desired release.console$ ghost update VERSION
- To update to a specific version, replace
The Docker Compose method deploys Ghost in containers, providing better isolation and built-in support for web analytics through Tinybird.
Install Docker
Follow the How to Install Docker on Ubuntu 24.04 article to install Docker Engine and Docker Compose plugin, then add your user to the docker group.
$ sudo usermod -aG docker $USER
$ newgrp docker
Clone the Ghost Docker Repository
- Clone the repository and navigate to it.
console
$ git clone https://github.com/TryGhost/ghost-docker.git ~/ghost
$ cd ~/ghost
Configure Ghost
- Create configuration files from the provided templates.
console
$ cp .env.example .env
$ cp caddy/Caddyfile.example caddy/Caddyfile
- Edit the
.envfile to configure Ghost.console$ nano .env - Update the following variables:
- DOMAIN: Your Ghost domain (e.g.,
ghost.example.com) - DATABASE_ROOT_PASSWORD: A strong password for the MySQL root user
- DATABASE_PASSWORD: A strong password for the Ghost database user
- SMTP Settings: Configure your SMTP credentials for a transactional email provider such as Amazon SES, SendGrid, or Mailgun.
Save and close the file.
- DOMAIN: Your Ghost domain (e.g.,
Deploy Ghost
- Allow HTTP and HTTPS traffic through the firewall.
console
$ sudo ufw allow http
$ sudo ufw allow https
- Pull the Docker images defined in the compose file.
console
$ docker compose pull - Start the Ghost containers in detached mode.
console
$ docker compose up -d - Verify that all containers are running.
console
$ docker compose psConfirm that the STATUS column shows each container as Up and healthy.
Enable Web Analytics
- Create a Tinybird account and set up a workspace.
- Navigate to the Ghost directory.
console
$ cd ~/ghost
- Authenticate with Tinybird using the Docker container.
console
$ docker compose run --rm tinybird-loginSelect your Tinybird workspace region from the list. The command generates a one-time code and a URL. Open the URL in a browser, log in to Tinybird, select your workspace, and enter the provided code to complete authentication.
» No region detected, select one from the list below: [1] europe-west2 (gcp) (https://cloud.tinybird.co/gcp/europe-west2) [2] europe-west3 (gcp) (https://cloud.tinybird.co/gcp/europe-west3) [3] us-east4 (gcp) (https://cloud.tinybird.co/gcp/us-east4) [4] us-east-1 (aws) (https://cloud.tinybird.co/aws/us-east-1) [5] us-west-2 (aws) (https://cloud.tinybird.co/aws/us-west-2) [6] eu-central-1 (aws) (https://cloud.tinybird.co/aws/eu-central-1) [7] eu-west-1 (aws) (https://cloud.tinybird.co/aws/eu-west-1) [8] northamerica-northeast2 (gcp) (https://cloud.tinybird.co/gcp/northamerica-northeast2) [0] Cancel Use region [1]: 1 First, copy your one-time code: YM2L-0Z51 Press [Enter] to continue in the browser... » Opening browser for authentication... If browser does not open, please open the following URL manually: https://cloud.tinybird.co/api/cli-login?apiHost=https%3A%2F%2Fapi.europe-west2.gcp.tinybird.co&code=YM2L0Z51&method=code Workspace: ghosttutorial User: admin@example.com Host: https://api.europe-west2.gcp.tinybird.co ✓ Authentication successful! - Synchronize Tinybird configuration files to the local volume.
console
$ docker compose run --rm tinybird-sync - Deploy the Tinybird configuration, which creates Tinybird datasources, pipes, and API endpoints. This process may take several minutes.
console
$ docker compose run --rm tinybird-deploy - Generate Tinybird API tokens.
console
$ docker compose run --rm tinybird-login get-tokens - Update the
.envfile with Tinybird configuration.console$ nano .envAdd or update the Tinybird section with the values from the previous command:
iniCOMPOSE_PROFILES=analytics TINYBIRD_API_URL=https://api.europe-west2.gcp.tinybird.co TINYBIRD_WORKSPACE_ID=bd3356c1-fb2b-4620-9a62-caa5ccf6c02b TINYBIRD_ADMIN_TOKEN=p.eyJ1IjogImJkMzM1NmMxLWZi... TINYBIRD_TRACKER_TOKEN=p.eyJ1IjogImJkMzM1NmMxLWZi...
Replace the values with your actual tokens.
Save and close the file.
- Pull updated Docker images and restart Ghost with analytics enabled.
console
$ docker compose pull
$ docker compose up -d
Enable ActivityPub Federation
- Edit the
.envfile to enable the ActivityPub profile.console$ nano .envUpdate the
COMPOSE_PROFILESvariable to includeactivitypub.iniCOMPOSE_PROFILES=analytics,activitypub
If you haven’t enabled analytics, use:
iniCOMPOSE_PROFILES=activitypub
Uncomment the
ACTIVITYPUB_TARGETvariable.iniACTIVITYPUB_TARGET=activitypub:8080
Save and close the file.
- Pull the ActivityPub container and recreate Ghost and Caddy.
console
$ docker compose pull
$ docker compose up -d --force-recreate ghost caddy
Update Ghost Using Docker
- Navigate to the Ghost directory.
console
$ cd ~/ghost
- Pull the latest Docker images.
console
$ docker compose pull - Restart containers with the new images.
console
$ docker compose up -d - Remove unused Docker images to free disk space.
console
$ docker image prune -f - If you modified
.envor Caddy configuration, force container recreation.console$ docker compose up -d --force-recreate ghost caddyAccess and Configure Ghost
- Navigate to the Ghost admin panel at
https://ghost.example.com/ghost.
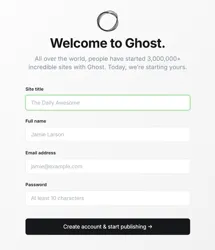
- Complete the initial setup form with the following details:
- Site title: Your blog or publication name
- Full name: Your name (displayed as the author)
- Email address: Admin account email
- Password: A strong password for the admin account
- Click Create account & start publishing to complete setup.
- After setup, access the admin panel at
https://ghost.example.com/ghostto:- Customize site design and branding
- Create content and manage posts
- Configure membership and subscription tiers
- Set up integrations and custom code injection
- Manage team members and permissions
Conclusion
You have successfully installed Ghost on Ubuntu 24.04 using either Ghost-CLI for traditional deployments or Docker Compose for containerized environments. Both methods provide a production-ready Ghost installation with SSL certificates, automated backups (CLI method), and optional web analytics through Tinybird integration. Ghost is now ready for content creation, newsletter distribution, and membership management.
- Navigate to the Ghost admin panel at