How to Manage Users in Vultr Managed Databases for PostgreSQL
Introduction
PostgreSQL is an open-source relational database management system (RDBMS) that lets you create databases and manage records. Vultr Managed Databases for PostgreSQL offer a secure, highly available, and scalable solution you can use in your production applications without managing the database infratsurcture directly.
This guide explains how to manage users in a Vultr Managed Database for PostgreSQL cluster. You will set up new users using the Vultr Customer Portal, the Vultr API, and the Vultr CLI tool to create standard database users. To manage user privileges, you will apply the PostgreSQl psql CLI tool to assign the database users necessary privileges to access your managed database.
Prerequisites
Before you begin:
- Deploy a Vultr Managed Database for PostgreSQL
- Enable the Personal Access Token API key in your Vultr Account Settings and allow your computer’s IP Address to access the key
- Install the PostgreSQL
psqlCLI tool to access your Vultr Managed Database for MySQL - Install the Vultr CLI tool on your computer
- Install the Postman API desktop application
Create a New User using the Vultr Customer Portal
In this section, you are to create a user from the Vultr Customer Portal.
- Open the Vultr Customer Portal.
- Click the Products menu group and navigate to Databases to access your available managed databases

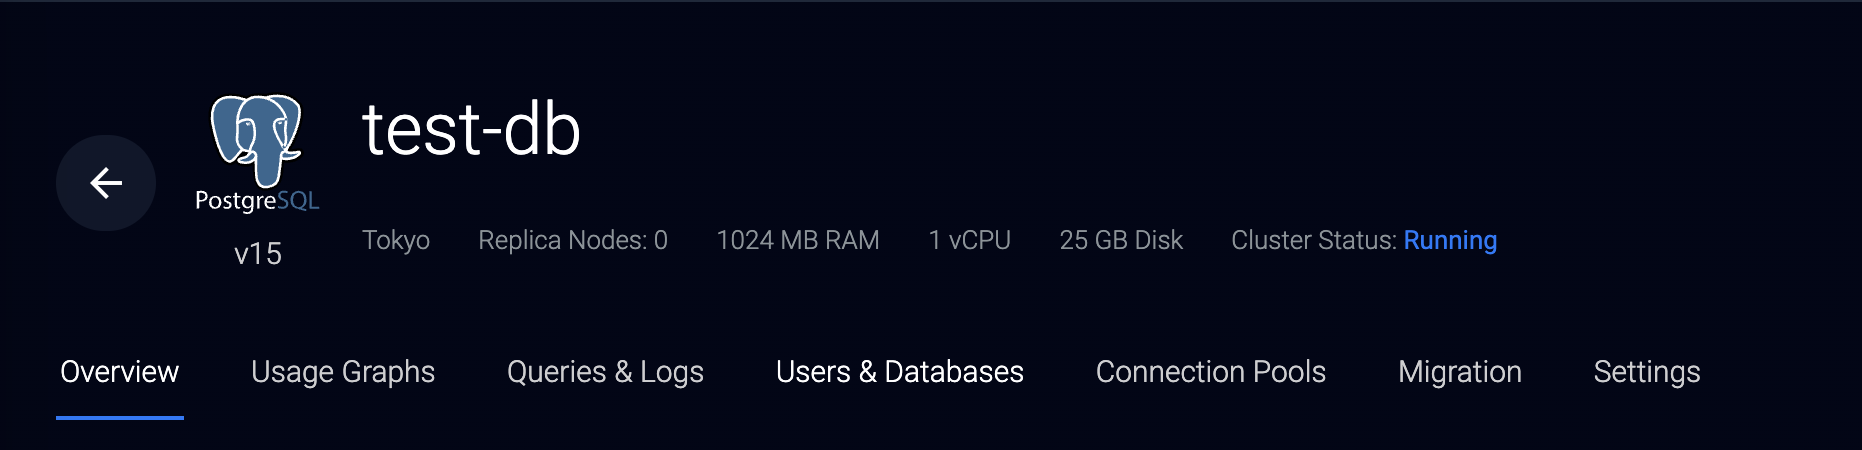
- Click your target Vultr Managed Database for PostgreSQL to open the cluster control panel.
- Navigate to the Users & Databases tab.
- Verify that the default database
vultradminuser is available in the Users section and the default databasedefaultdbin the Databases section.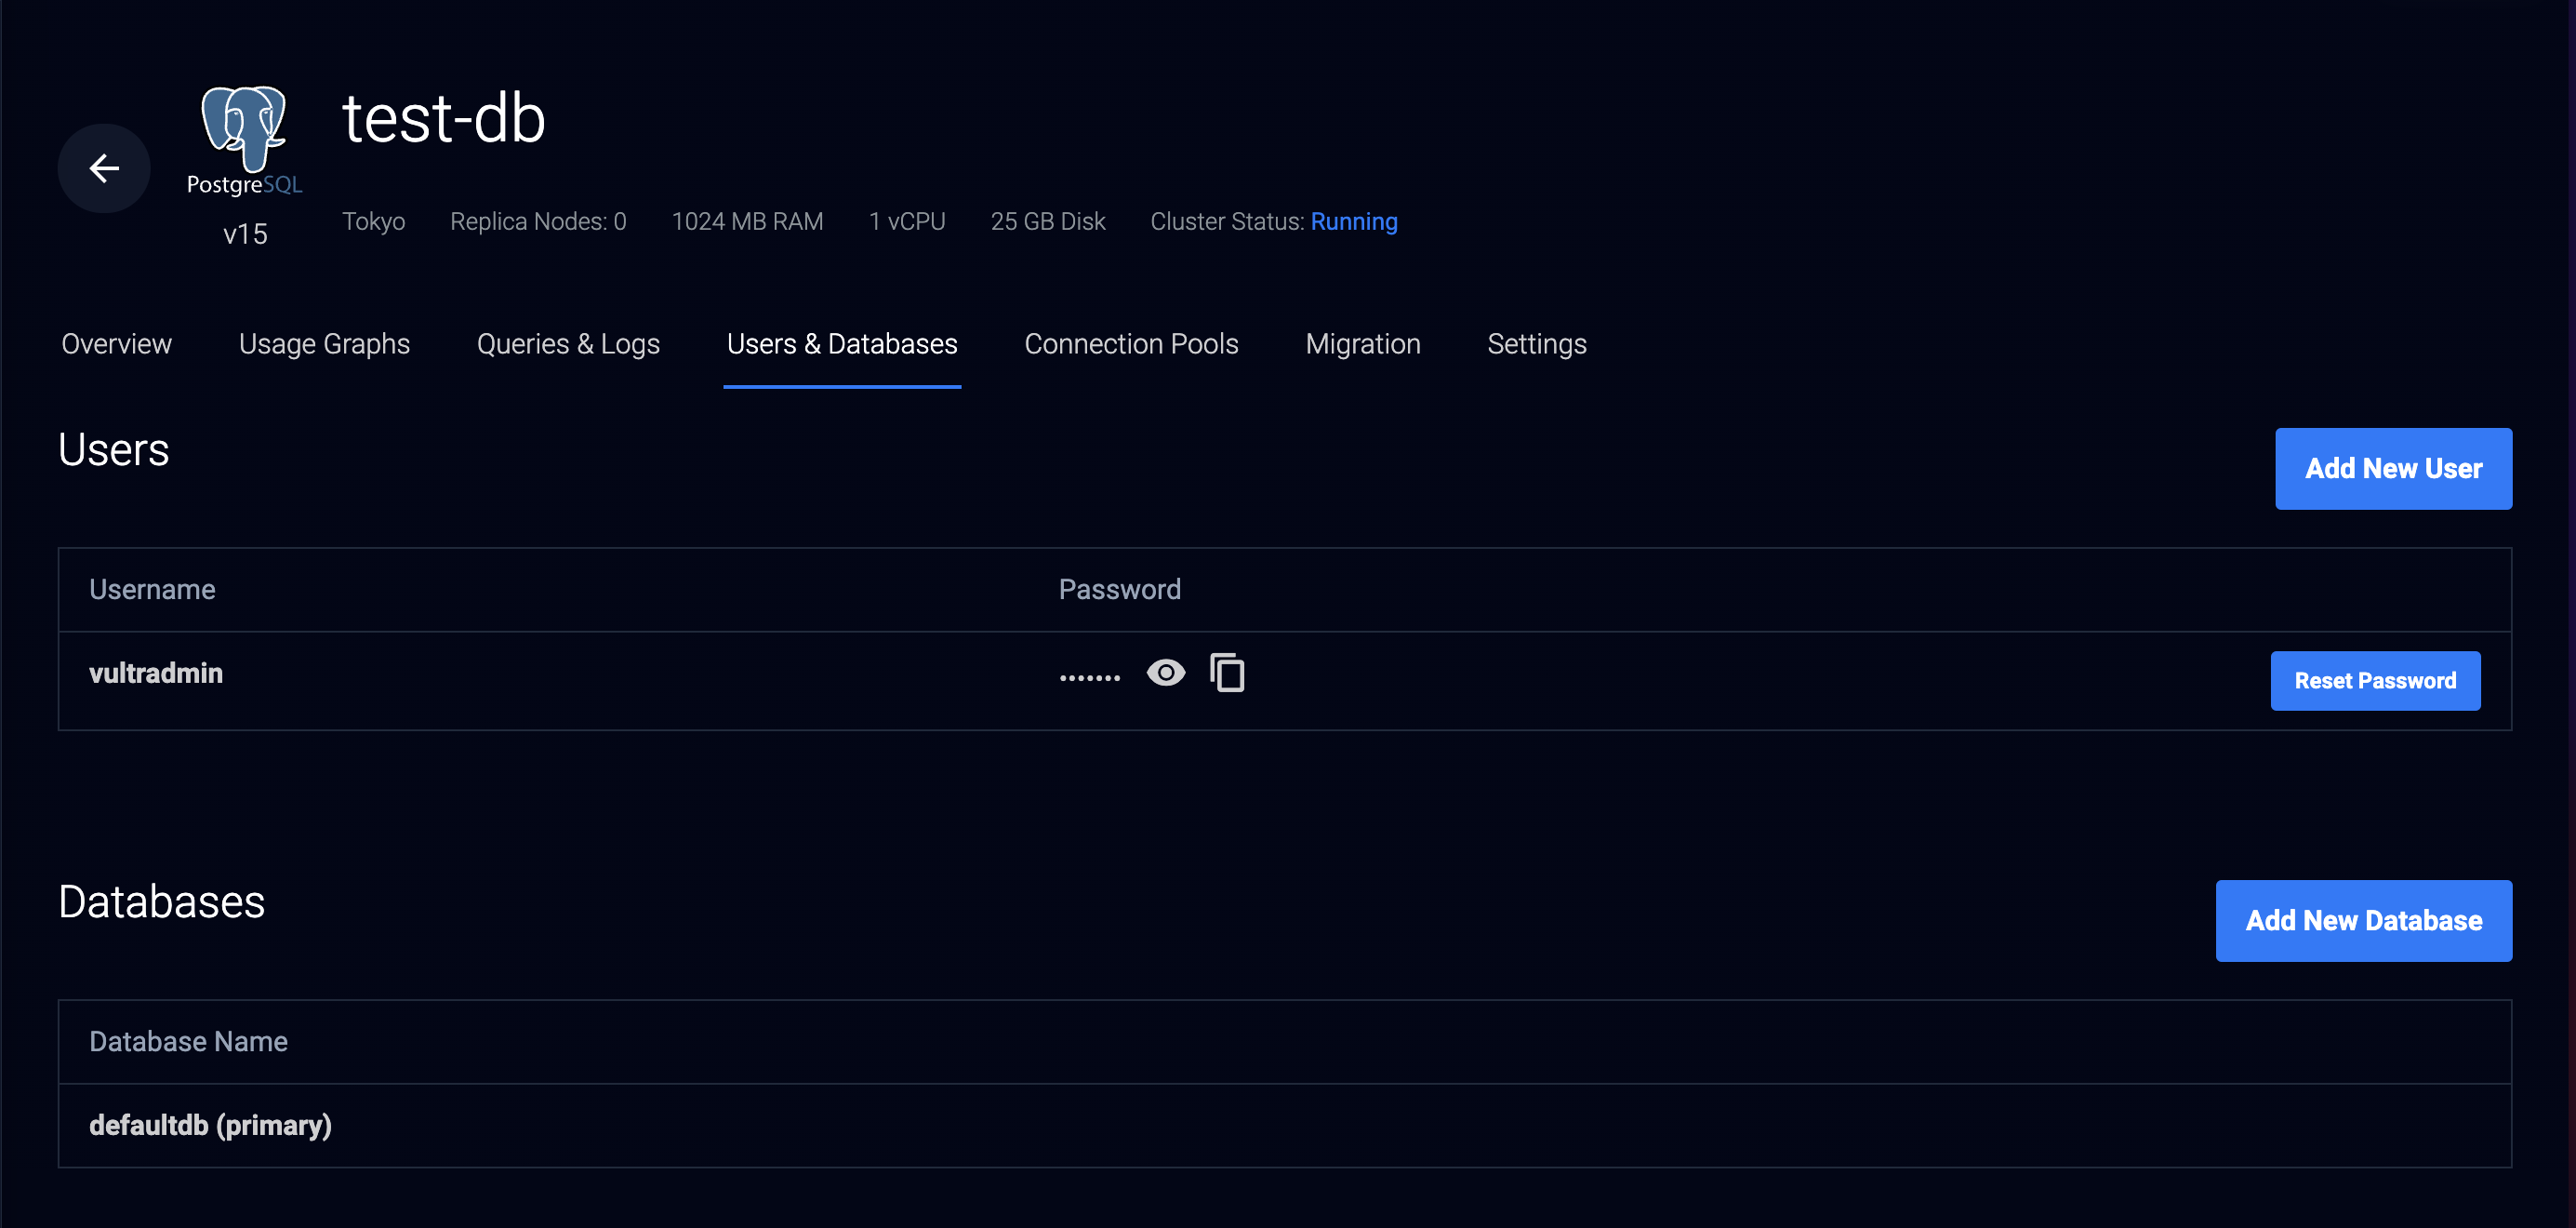
- To create a new user, click Add New User within the Users section.
- Enter your desired database user Username and Password in the respective fields. Leave the Password field empty to assign an auto-generated password to the new user.
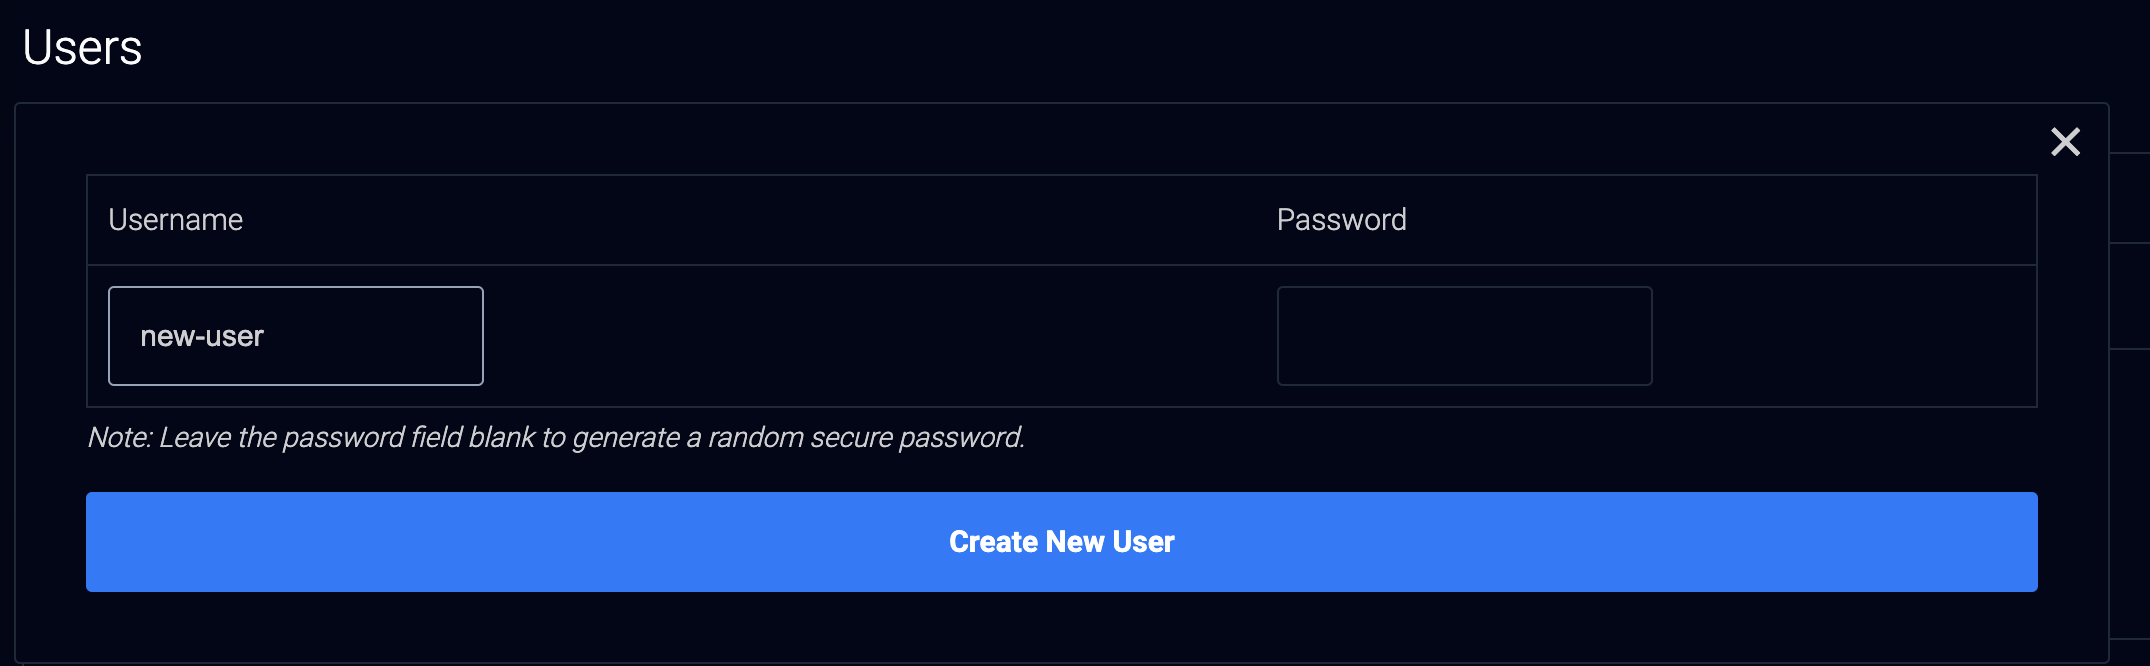
- Click the Create New User button to create the database user
- When successful, verify that the new user is available in your Users section
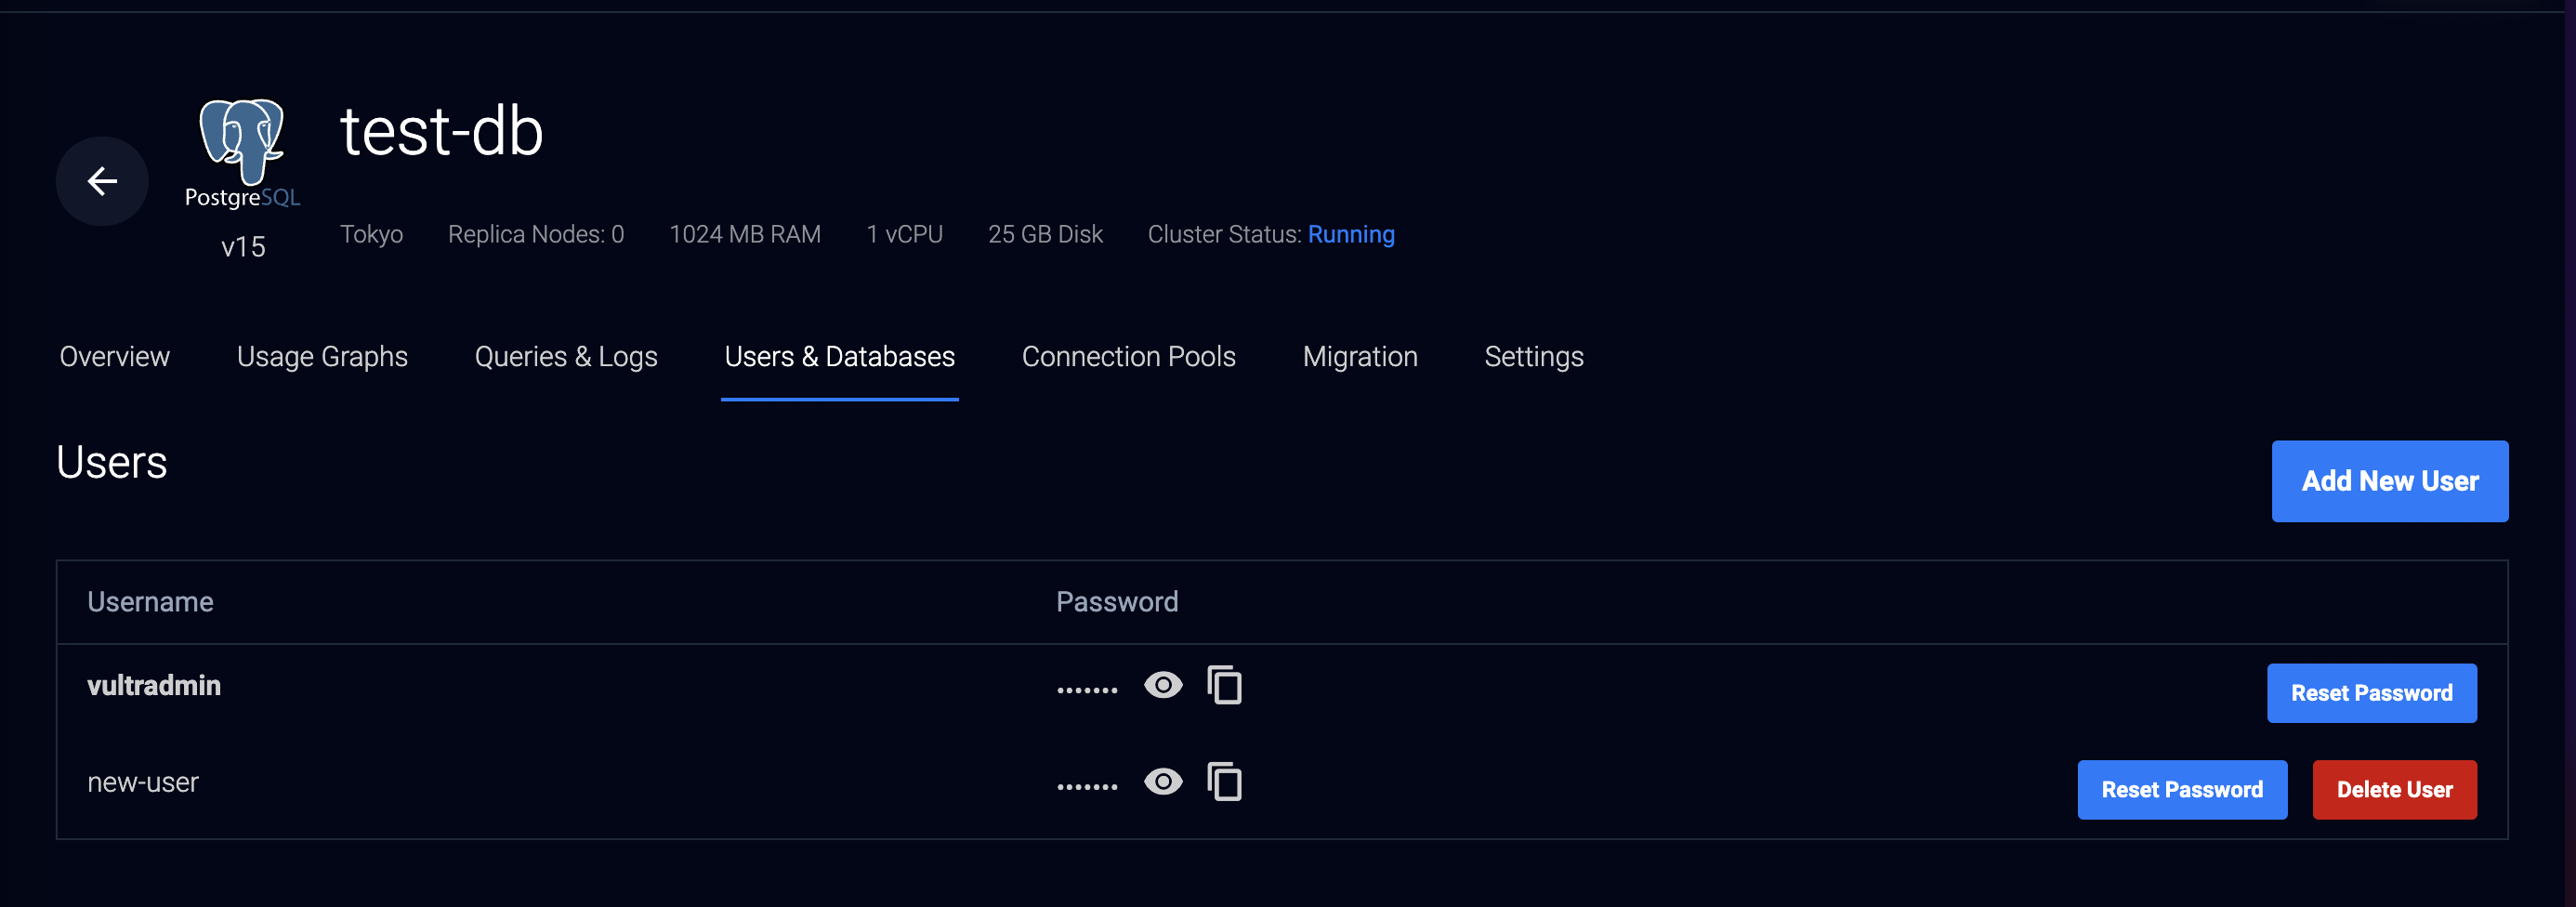
You have created a new Vultr Managed Database for PostgreSQL user using the Vultr Customer Portal. Use the PostgreSQL psql CLI to assign the new user different privileges and access to multiple databases within the cluster.
Create a New PostgreSQL User using the Vultr API
The Vultr API key grants you access to all infrastructure resources assigned to your Vultr account. You can use your Vultr API key to set up a new Vultr Managed Database for PostgreSQL user using the Postman API platform or the Vultr CLI tool.
Depending on your desired API tool, the Vultr API uses your target PostgreSQL database ID to set up new users within the cluster. Follow the optional steps below to create a new Vultr Managed Database for PostgreSQL user with your Vultr API key.
Create a New User using the Postman API Platform
- Access your Postman API Platform interface.
- Within the Collections tab, click the +
New Collectionbutton.
- Select
Blank Collectionfrom the drop-down list to set up a new collection. - Click the
New Collectionname and rename the value toVultr API Connection.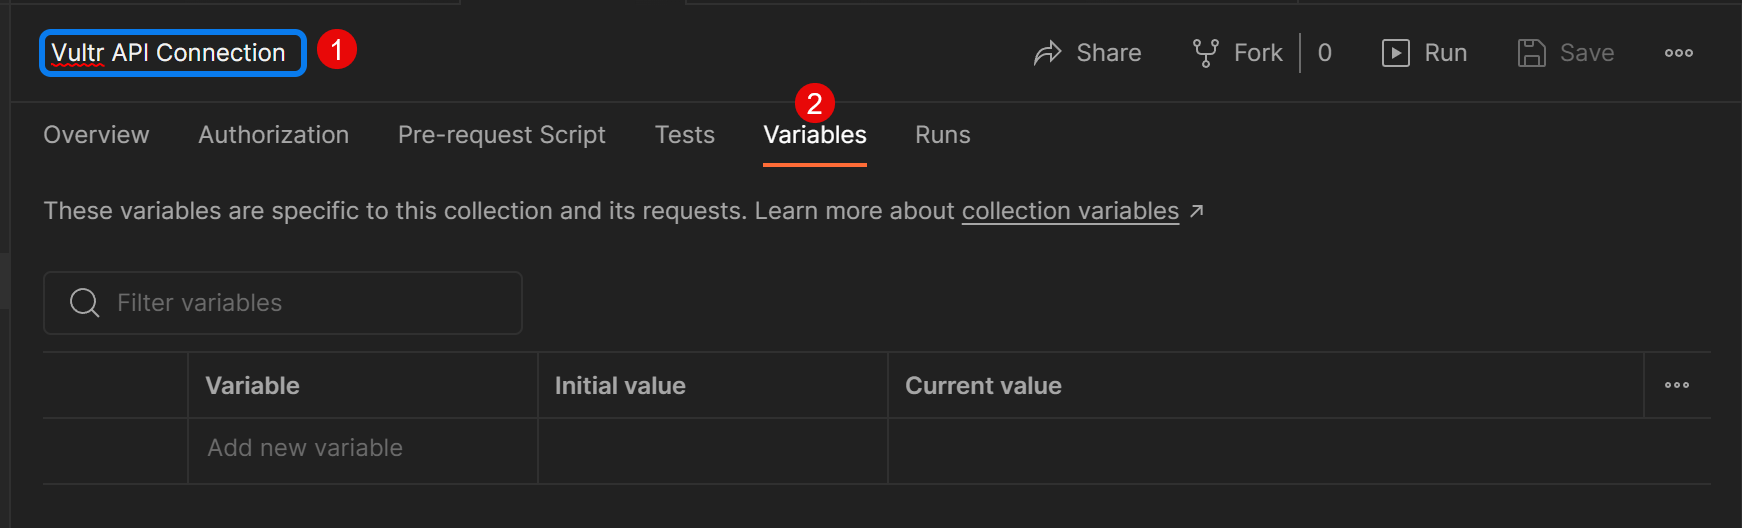
- Within the collection, click the Variables tab.
- Click the
Add new variablefield, and set up the following two variables with the respectiveInitial Value.- VARIABLE:
domainVALUE:https://api.vultr.com/v2 - VARIABLE:
VULTR_API_KEYVALUE:Your-Vultr-API-Key
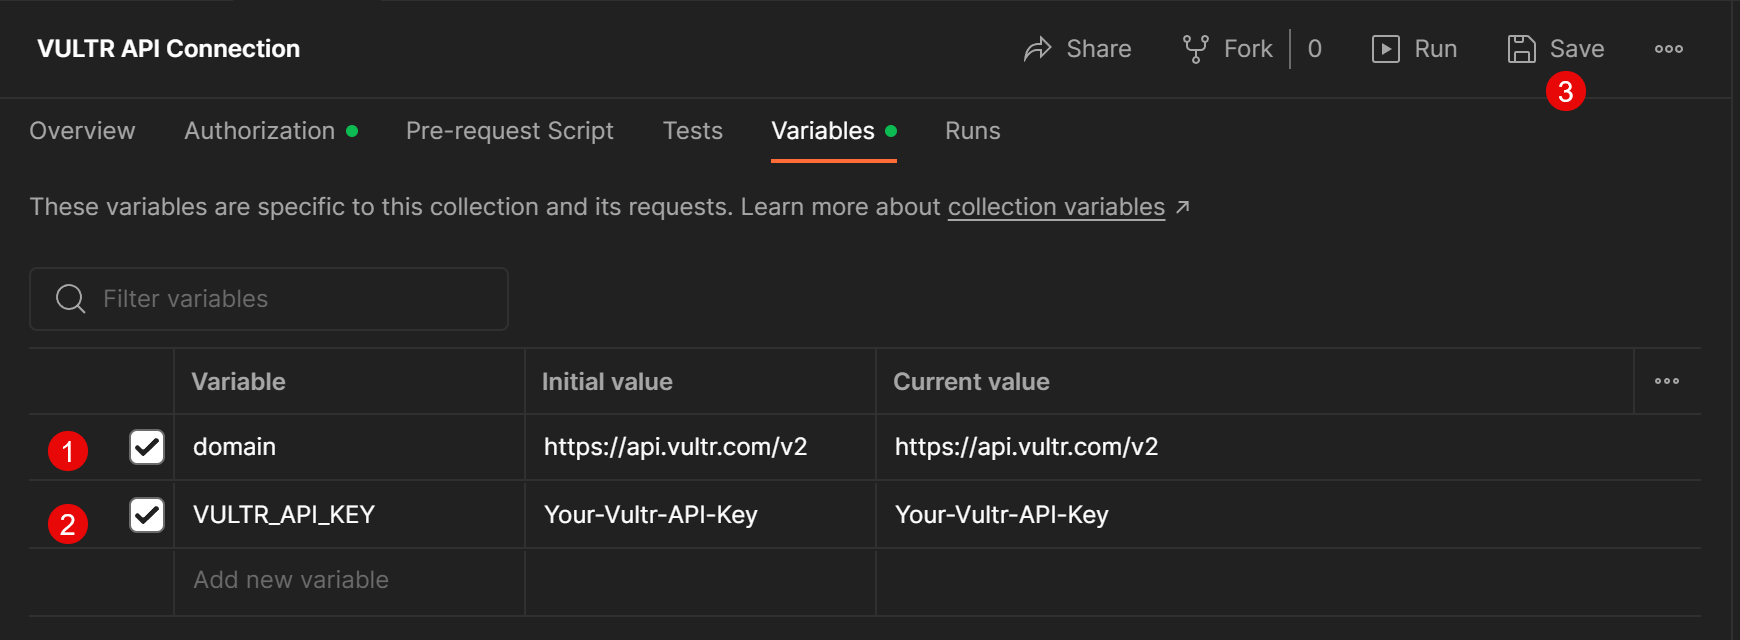
- VARIABLE:
- Click the Save button on the collection top bar to save changes.
- Navigate to the Authorization tab.
- Click the Type drop-down and select
Bearer Tokenfrom the list of options. - In the Token field, call your Vultr API Key variable in the format
{{VULTR_API_KEY}}to apply it to the field and use it within your collection. - Click the Save button to apply changes.
- On the left Collections navigation menu, right-click your collection and select
Add a requestfrom the list.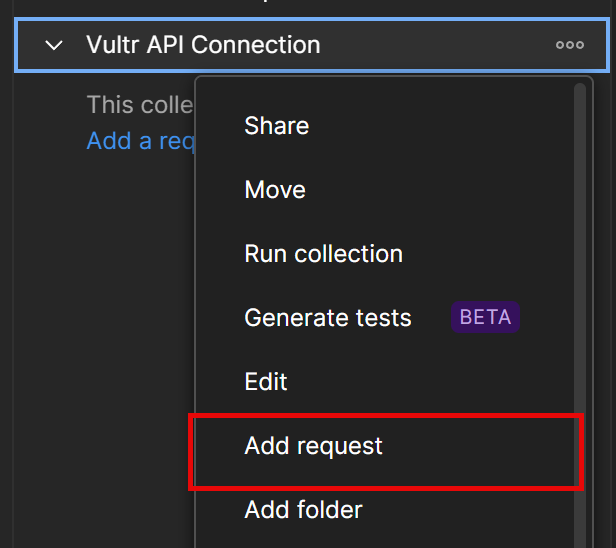
- Get a list of your available Vultr Managed Databases:
- Keep GET as the selected Request type, and call your domain variable
{{domain}}to represent thehttps://api.vultr.com/v2/URL. Then, add/databasesafter the variable to create thehttps://api.vultr.com/v2/databasesAPI endpoint.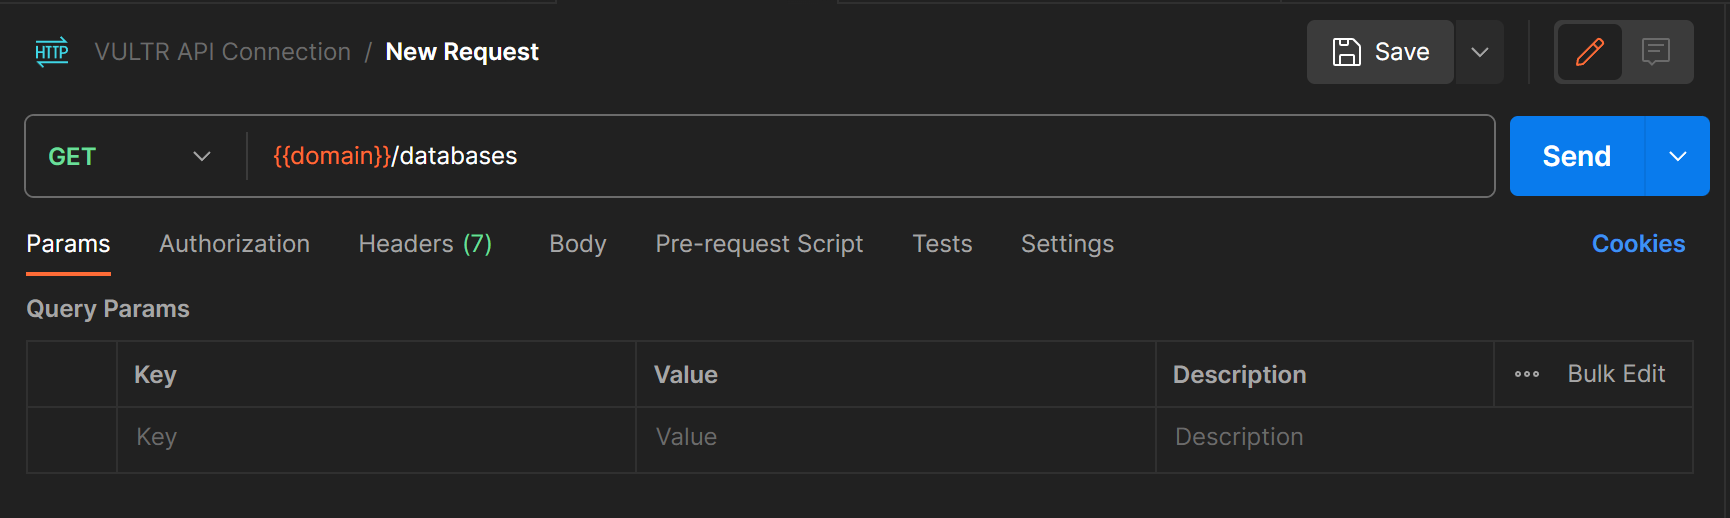
- Click the Send button to generate an array of databases available on your Vultr account in the bottom Body section.
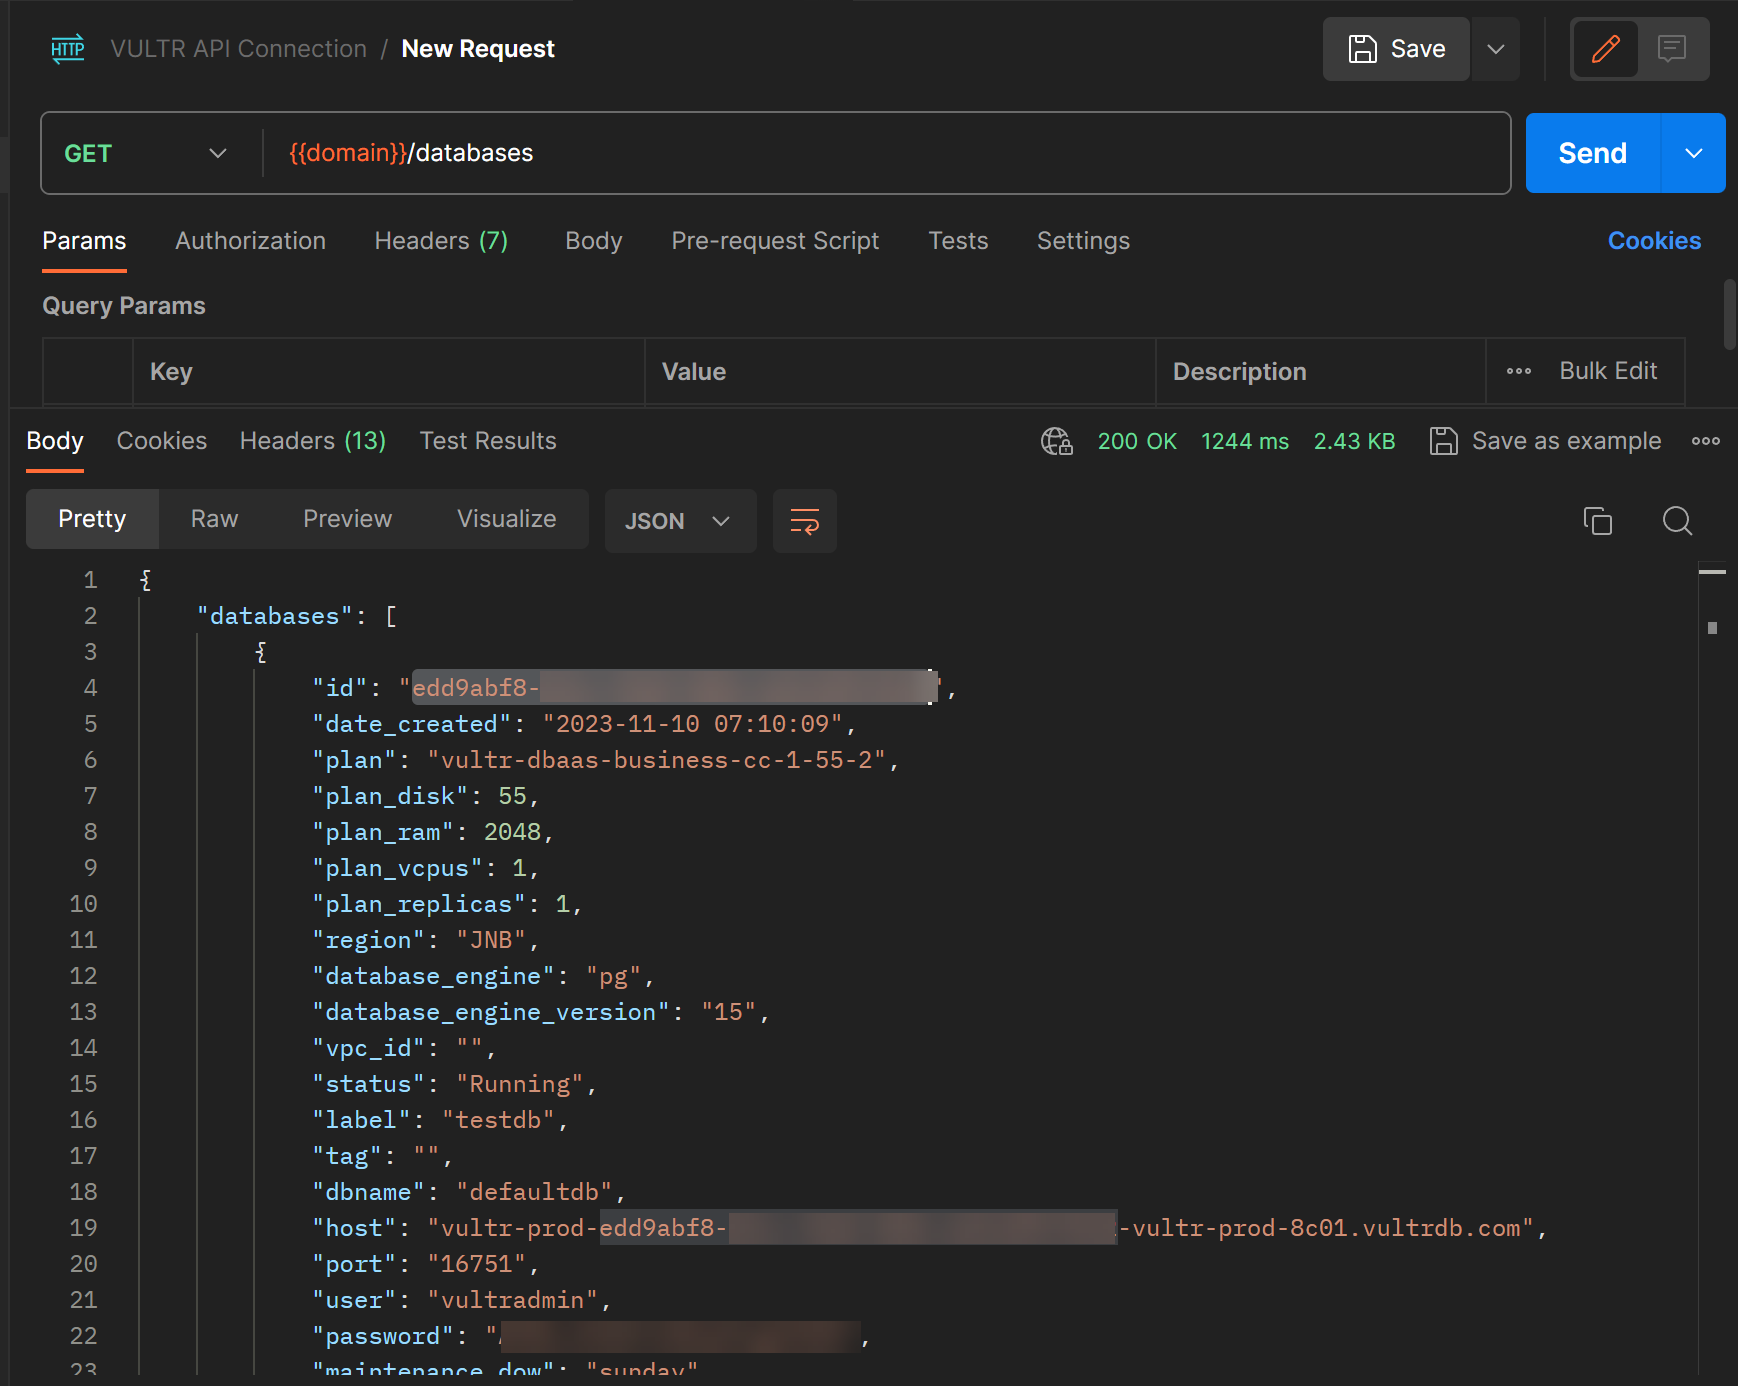
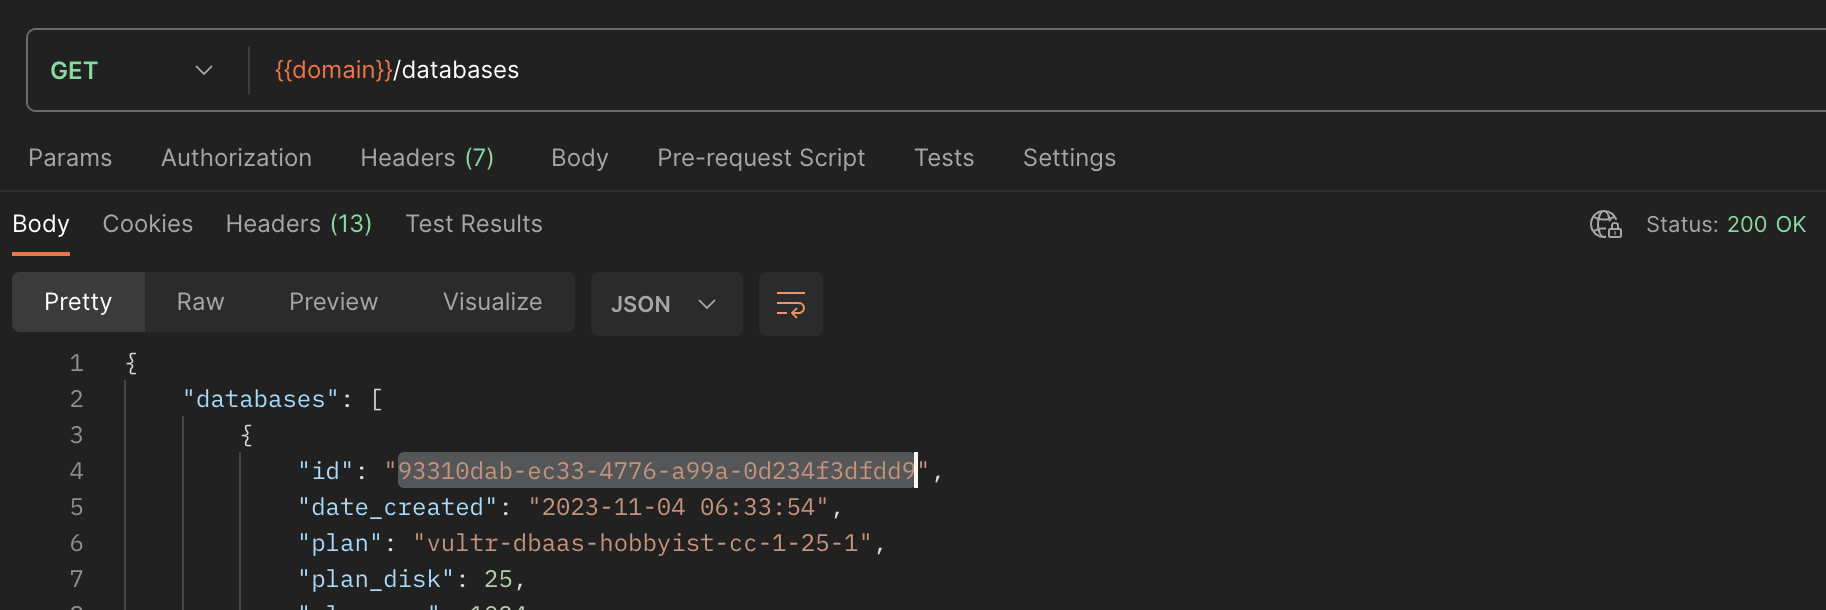
- Find your target PostgreSQL database, select and copy the assigned
idvalue. - Within the upper section of your request, set up a new
KeyandValuein Params tab to use in your user queries with the following values:- Key:
databaseidValue:Your target PostgreSQL database ID
- Key:
- Click the Save button to apply changes and use your new
databaseidparameter value
- Keep GET as the selected Request type, and call your domain variable
- Get the list of available database users:
- Within your GET request field, increment your field with
:databaseId/usersto create the API endpointhttps://api.vultr.com/v2/databases/:databaseId/users. - Click Send to generate an array of available
usersin your Vultr Managed Database for PostgreSQL.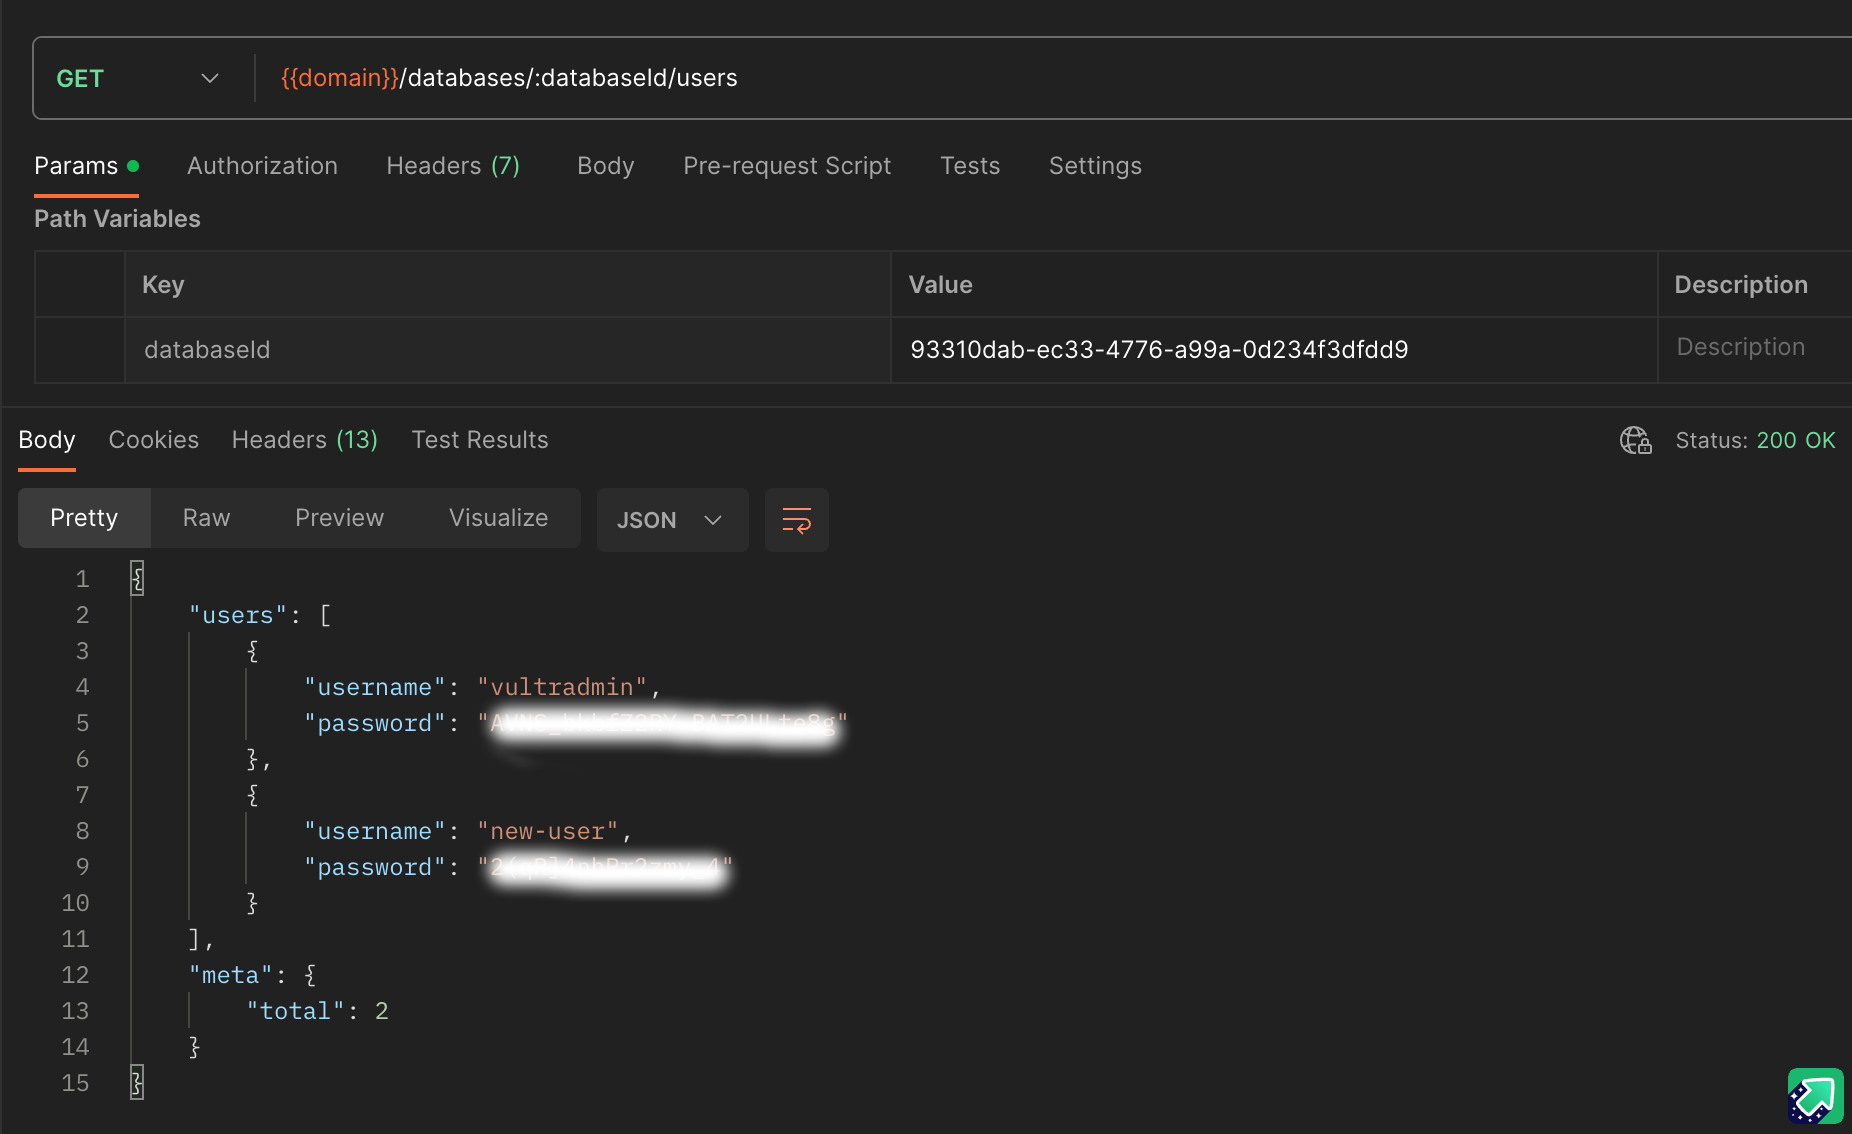
- Verify that the default
vultradminuser details for the selected database are available on the list.
- Within your GET request field, increment your field with
- Create a new database user:
- Click the GET request method type, and select POST from the list of options
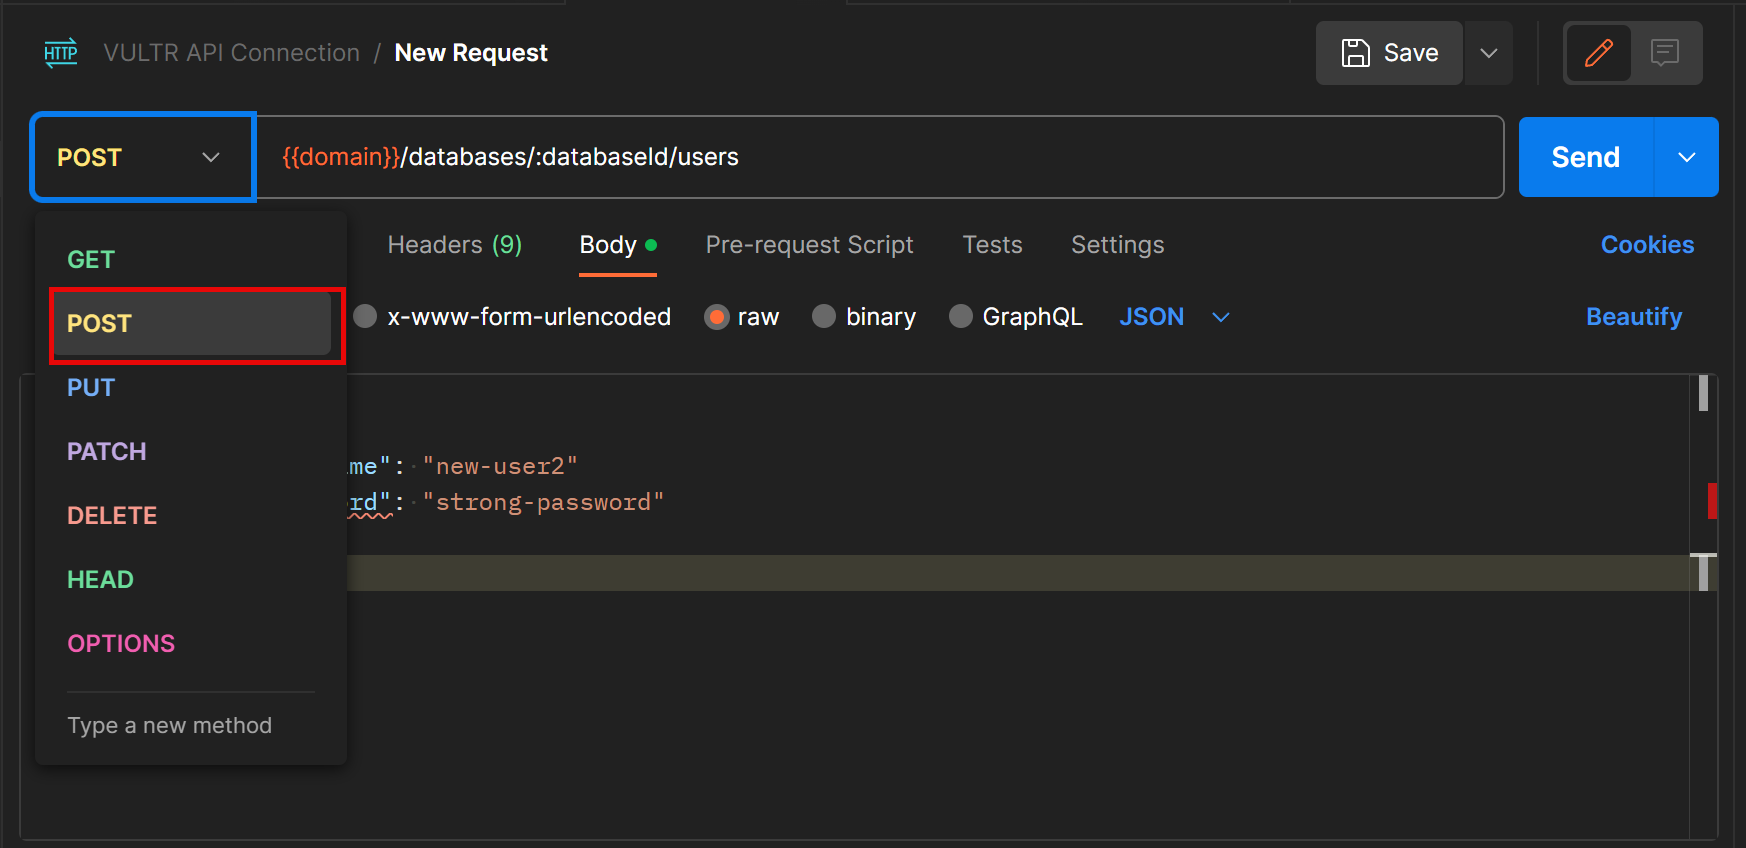
- Navigate to the request Body section, and select the raw radio button
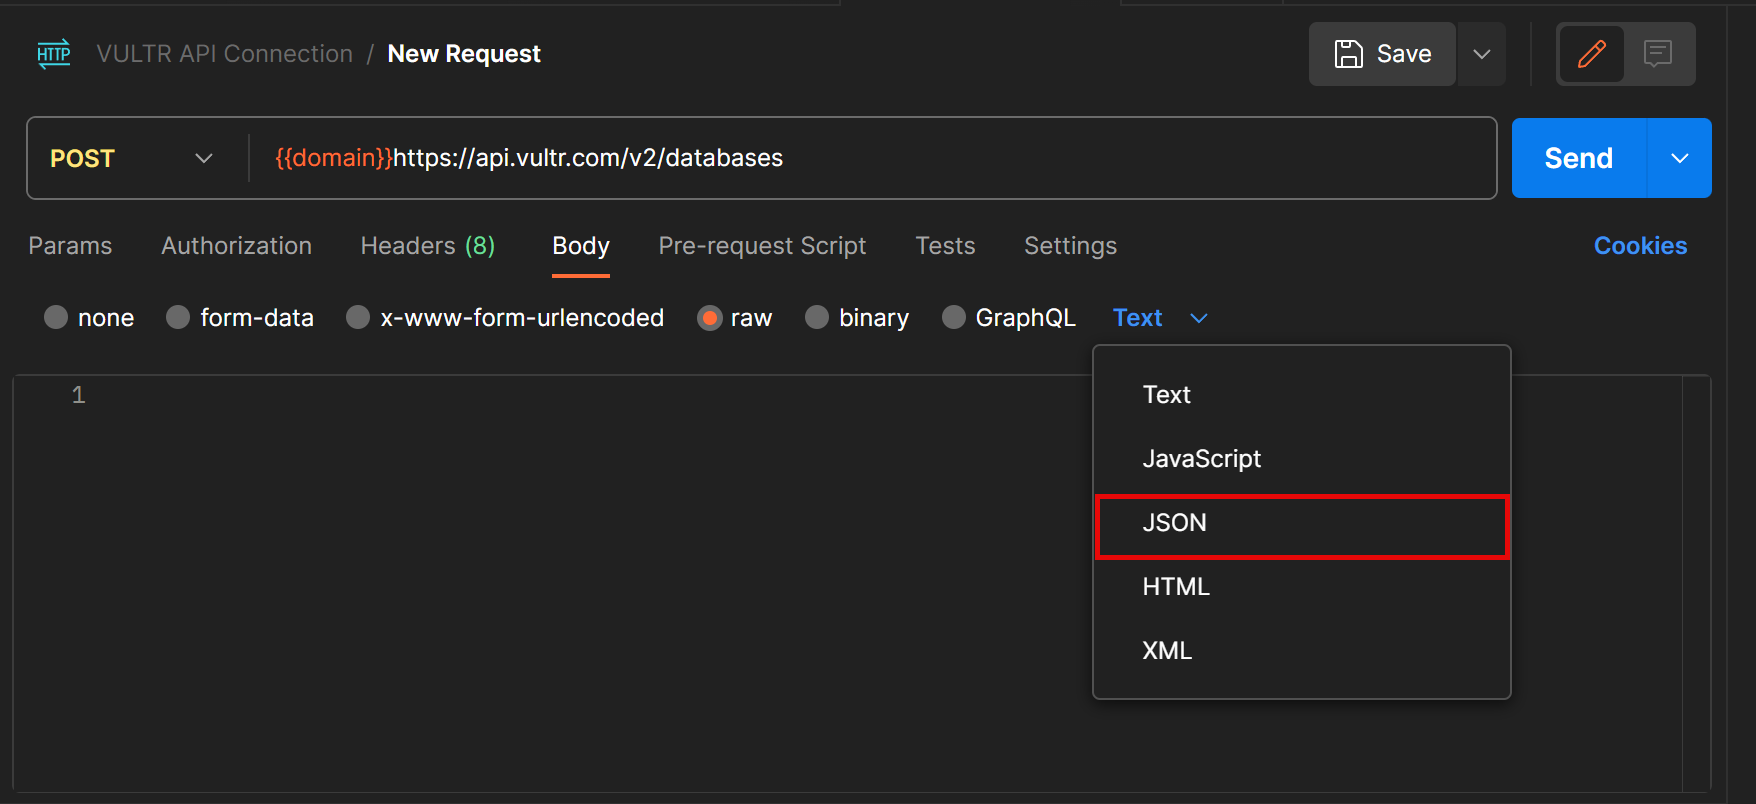
- Find and click the new Text drop-down at the end of the menu list. Select JSON from the list of options to set it as the request body
- Within the Body field, enter the following configurations. Replace
new-user2with your desired username, andstrong-passwordwith your user password:JSONCopy{ “username”: “new_user2”, “password”: “strong-password” }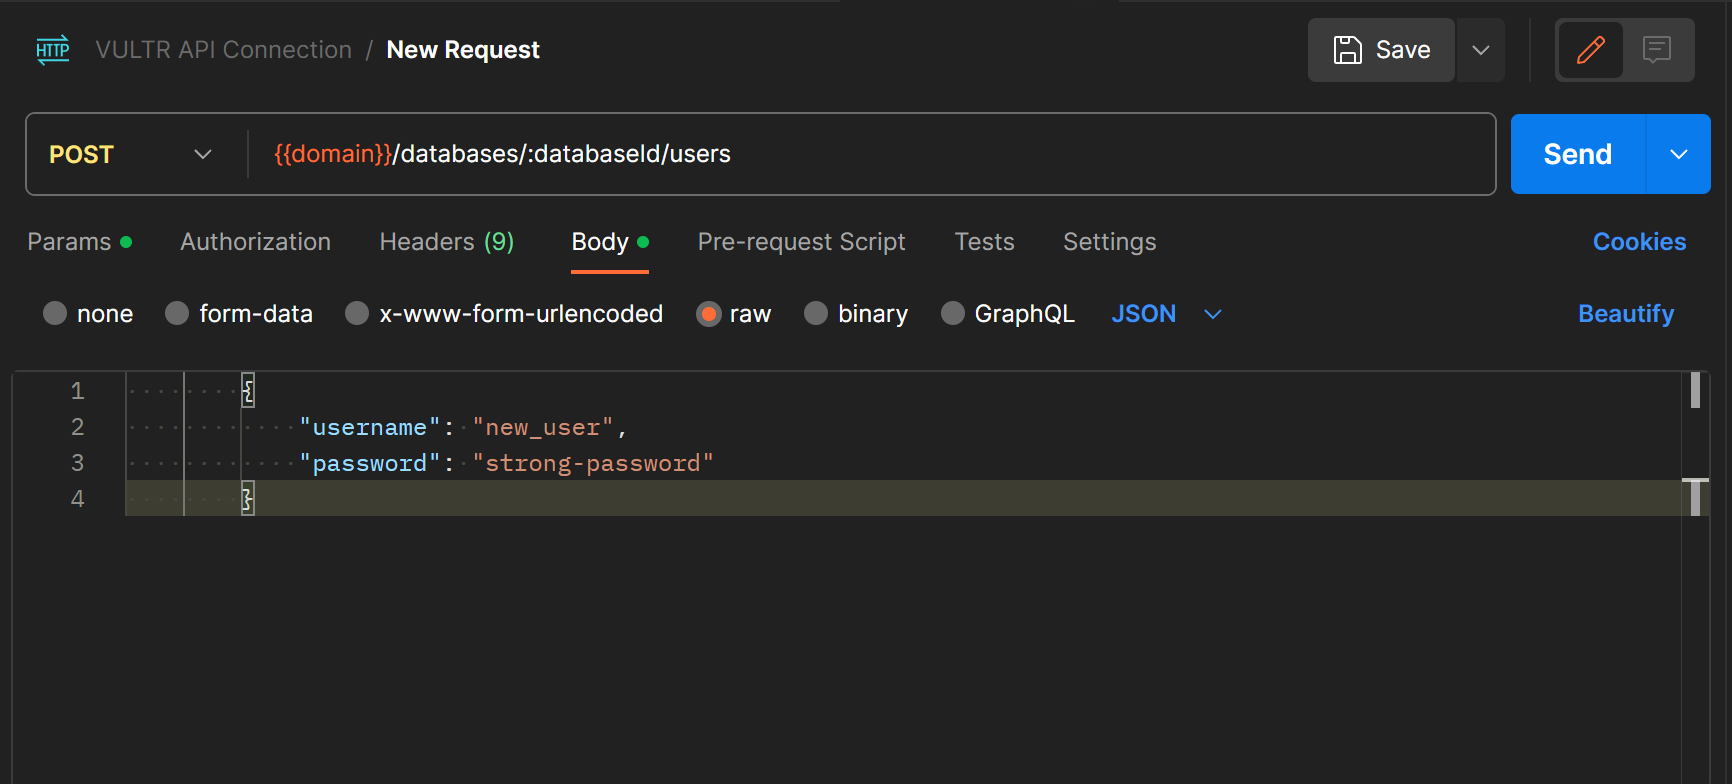
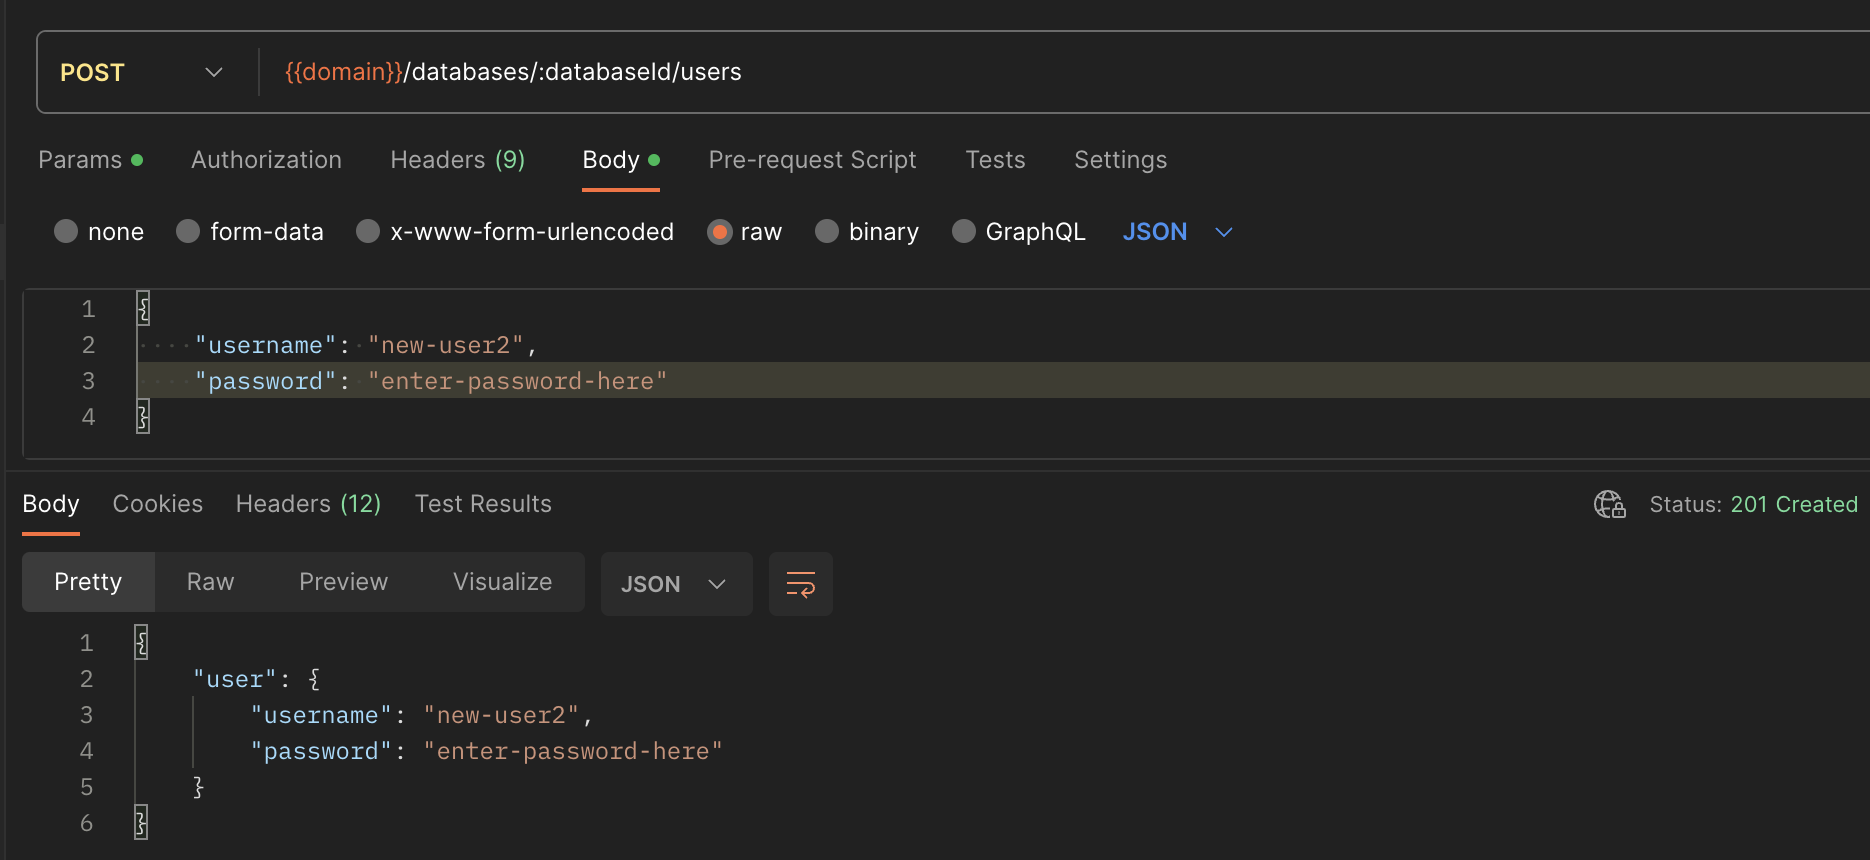
- Click Send to create the new database user.
- Click the GET request method type, and select POST from the list of options
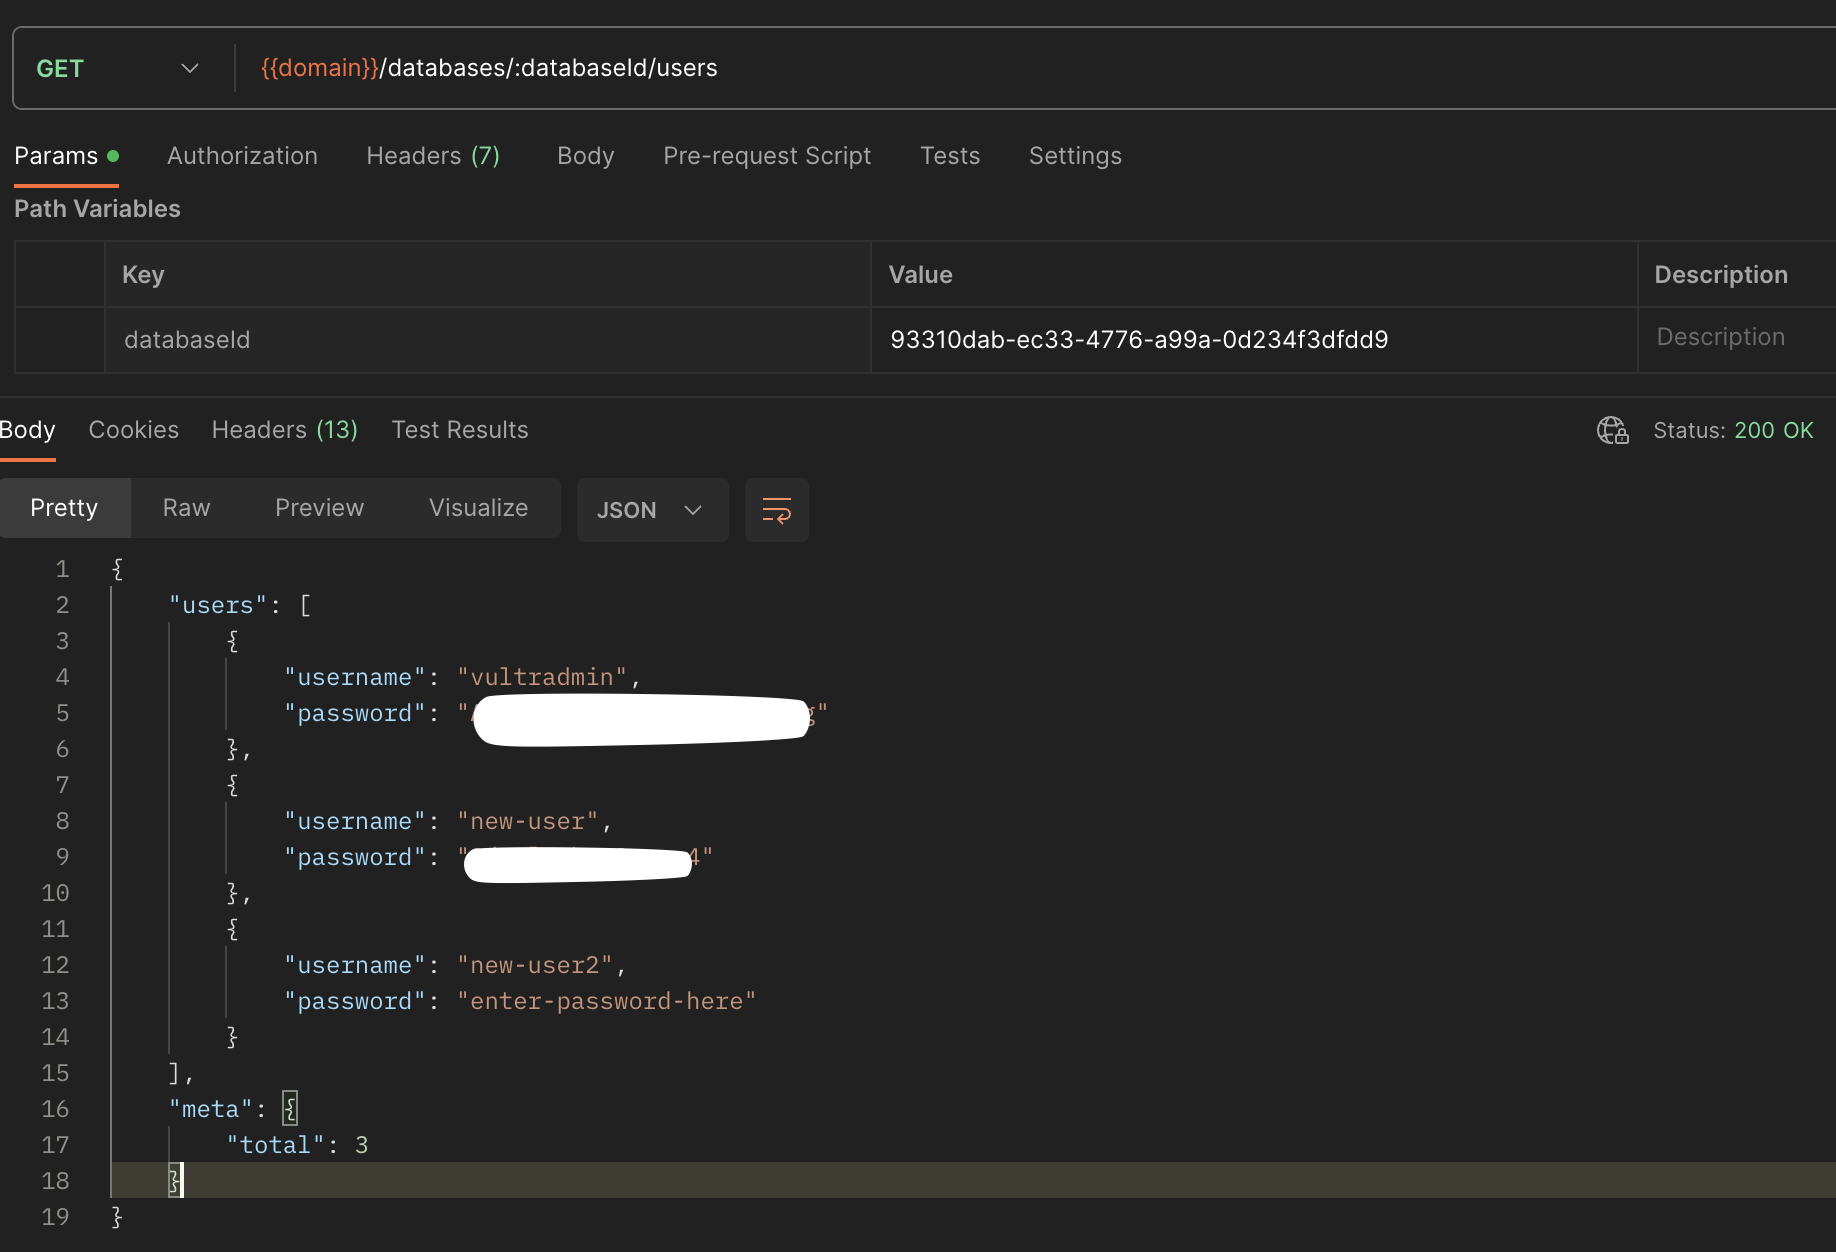
- To verify the new database users list, change the Body type back to none and click the POST dropdown to change the value to GET. Then, click Send to send a new request and verify the list of available database users.
Create a New User using the Vultr CLI
- Open a new terminal session on your computer.
- View the available Vultr CLI help commands list to verify that the tool is available.CONSOLECopy$ vultr-cli -h
- Export your Vultr API Key as a new environment variable.CONSOLECopy$ export VULTR_API_KEY=[Paste-Your-Vultr-API-KEY-Here]
- Using
vultr-cli, get the list of available databases on your Vultr account.CONSOLECopy$ vultr-cli database list Verify and copy your target databaseIDvalue similar to the output below:$ ID 9-ec33-4776-a99a-09 $ DATE CREATED 2023-11-04 06:33:54 $ PLAN vultr-dbaas-hobbyist-cc-1-25-1 $ PLAN DISK 25 $ PLAN RAM 1024 $ PLAN VCPUS 1 $ PLAN REPLICAS 0 $ REGION NRT $ DATABASE ENGINE pg $ DATABASE ENGINE VERSION 15 $ VPC ID $ STATUS Running $ LABEL test-db $ TAG $ DB NAME defaultdb $ HOST vultr-prod-9-vultr-prod-169a.vultrdb.com $ USER vultradmin $ PASSWORD strong-admin-password $ PORT 16751 $ MAINTENANCE DOW saturday $ MAINTENANCE TIME 14:00 $ LATEST BACKUP 2023-11-04 10:40:00 $ TRUSTED IPS [] $ $ PG AVAILABLE EXTENSIONS $ NAME VERSIONS $ address_standardizer [3.2.4] $ - Get the list of users available on your target database. Replace
[databaseid]with theIDvalue generated in your databases output.CONSOLECopy$ vultr-cli database user list [databaseId] Verify that all available database users are listed in your output similar to the one below:$ USERNAME vultradmin $ PASSWORD ************ $ --------------------------- $ USERNAME new_user $ PASSWORD ************ $ --------------------------- $ USERNAME new_user2 $ PASSWORD ************ $ --------------------------- $ ====================================== $ TOTAL $ 3 - To create a new database user, run the following command. Replace
new_user1andstrong-passwordwith your desired user valuesCONSOLECopy$ vultr-cli database user create <databaseId> -u <new_user1> -p <strong-password> Output:$ USERNAME new_user1 $ PASSWORD ************ - Verify the new list of database users.CONSOLECopy$ vultr-cli database user list <databaseId> Output:
$ USERNAME vultradmin $ PASSWORD ************ $ --------------------------- $ USERNAME new_user $ PASSWORD ************ $ --------------------------- $ USERNAME new_user2 $ PASSWORD ************ $ --------------------------- $ USERNAME new_user1 $ PASSWORD ************ $ --------------------------- $ ====================================== $ TOTAL $ 4
You have created a Vultr Managed Database for PostgreSQL user using the Vultr CLI tool. When successful, you can manage the new user privileges using the PostgreSQL psql CLI tool.
Manage the Vultr Managed Database for PostgreSQL User Privileges
To manage user privileges, you must use a PostgreSQL client such as psql to set up the new user privileges. By default, a Vultr Managed Database for PostgreSQL Cluster contains the administrative user vultradmin with super user privileges to every database in the cluster. Follow the steps in this section to assign your new database user the necessary privileges to databases within the cluster.
- To access your database, copy your connection string from your Vultr Managed Database for PostgreSQL control panel.CONSOLECopy$ psql <connection-string> Output:
psql (16.0, server 15.4) SSL connection (protocol: TLSv1.3, cipher: TLS_AES_256_GCM_SHA384, compression: off) Type "help" for help. defaultdb=> - View the list of available database users and roles.SQLCopydefaultdb=> \du; Your output should look like the one below:
defaultdb=> List of roles defaultdb=> Role name | Attributes defaultdb=> -----------+------------------------------------------------------------ defaultdb=> _vultrdb | Superuser, Replication defaultdb=> new_user | defaultdb=> new_user1 | defaultdb=> new_user2 | defaultdb=> postgres | Superuser, Create role, Create DB, Replication, Bypass RLS defaultdb=> vultradmin | Create role, Create DB, Replication, Bypass RLS - To view a specific user’s privileges, for example
vultradmin, run the following command.SQLCopydefaultdb=> SELECT table_catalog, table_schema, table_name, privilege_type FROM information_schema.table_privileges WHERE grantee = ‘vultradmin’; Output:defaultdb=> table_catalog | table_schema | table_name | privilege_type defaultdb=> ---------------+--------------+------------+---------------- defaultdb=> defaultdb | public | posts | INSERT defaultdb=> defaultdb | public | posts | SELECT defaultdb=> defaultdb | public | posts | UPDATE defaultdb=> defaultdb | public | posts | DELETE defaultdb=> defaultdb | public | posts | TRUNCATE defaultdb=> defaultdb | public | posts | REFERENCES defaultdb=> defaultdb | public | posts | TRIGGER defaultdb=> (7 rows)
Grant Database User Privileges
- To grant all privileges for a specific database to a user, use the
GRANT ALL ON DATABASEcommand with your target PostgreSQL database. For example, grant the usernew_userfull privileges to thetestdbdatabaseSQLCopydefaultdb=> GRANT ALL ON DATABASE testdb TO new_user; - To grant privileges on a particular table to the user, switch to a database, and apply privileges to the target table. For example, test user privileges on the table
posts:- Grant all privileges on an existing table within the working database.SQLCopydefaultdb=> GRANT ALL ON posts TO new_user1;
- Grant only READ privileges to the user using the
GRANT SELECTcommandSQLCopydefaultdb=> GRANT SELECT ON posts TO new_user1; - Grant only INSERT privileges to the userSQLCopydefaultdb=> GRANT INSERT ON posts TO new_user1;
new_user1the necessary privileges to thepoststable.
Revoke Database User Privileges
- To revoke all permissions on a database from a user, for example
defaultdb, run the following command.SQLCopydefaultdb=> REVOKE ALL ON DATABASE defaultdb FROM new_user; The above SQL statement revokes all thenew_userdatabase user privileges on thedefaultdbdatabase. - Revoke the user’s permissions to a specific table. For example
posts.SQLCopydefaultdb=> REVOKE ALL ON posts FROM new_user2; - To revoke INSERT and DELETE privileges, use the
REVOKE INSERT, DELETEcommand and specify the target database table.SQLCopydefaultdb=> REVOKE INSERT, DELETE ON posts FROM new_user1; The above SQL command removes INSERT and DELETE privileges for the database usernew_user_1user on thepoststable. - To only allow READ privileges on a particular table, use the
REVOKE ALLcommand andGRANT SELECTcommand to remove all privileges, but assign the userREADaccess to the table- Revoke all user privileges on a particular table.SQLCopydefaultdb=> REVOKE ALL ON posts FROM new_user;
- Grant table
READprivileges to the userSQLCopydefaultdb=> GRANT SELECT ON posts TO new_user;
Conclusion
In this guide, you have created new Vultr Managed Database for PostgreSQL users using the Vultr Customer Portal, Vultr API, and the Vultr CLI tool. In addition, you managed new user permissions using the PostgreSQL psql client tool to assign different privileges on database resources. Depending on your desired database tools, you can set up multiple users, and assign different privileges to each user to structure your database access hierachy.