How to Style Contact Form 7 Forms in WordPress
-
by cobra_admin
- 66
Do you want to customize your Contact Form 7 forms and change their style?
Contact Form 7 is one of the most popular contact form plugins for WordPress. However, the biggest downside is that the out-of-the-box forms you add are very plain-looking.
In this article, we will show you how to style contact form 7 forms in WordPress.
Why Style Your Contact Form 7 Forms?
Contact Form 7 is one of the most popular contact form plugins for WordPress. It’s free to use and lets you add a WordPress form using shortcode.
However, Contact Form 7 is very limited in features. One of the problems with Contact Form 7 is that the forms are styled plainly. Plus, the plugin doesn’t offer any built-in options to change the style of your forms.
This makes it difficult to match the contact form’s design with your website theme or if you want to edit the font and background color to make your form stand out.
If you want more customizable forms with advanced features, then we recommend WPForms, which is the most beginner-friendly contact form plugin. It comes with a drag and drop form builder, 700+ pre-built templates, and numerous customization options.
That said, let’s take a look at how to style a Contact Form 7 form in WordPress.
Getting Started with Contact Form 7
First, you’ll need to install and activate the Contact Form 7 plugin on your website. If you need help, then please see our guide on how to install a WordPress plugin.
Upon activation, you can head over to Contact » Add New from your WordPress dashboard.
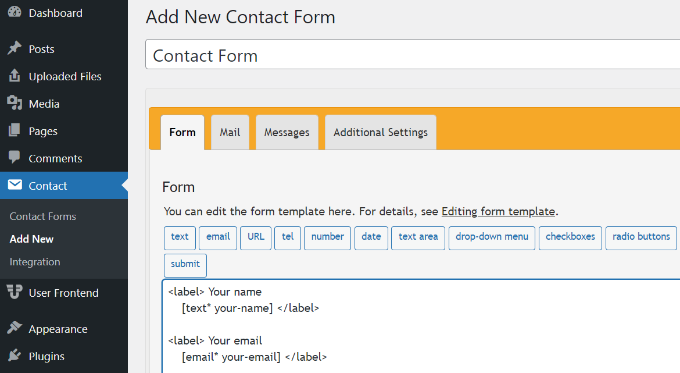
You can now edit the form for your website and start by entering a title for your form.
The plugin will automatically add the form’s default name, email, subject, and message fields. However, you can also add more fields by simply dragging and dropping them where you want.
When you’re done, don’t forget to click the ‘Save’ button and copy the shortcode.
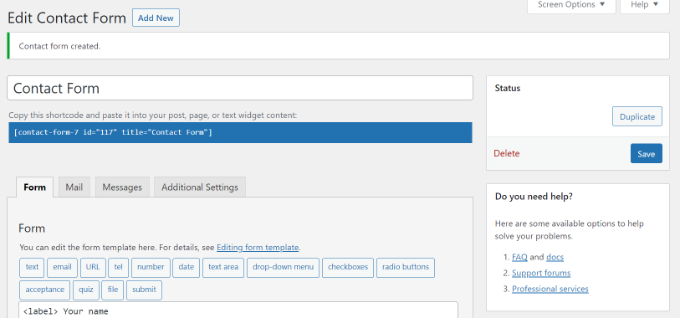
The next thing to do is add it to your blog post or page.
To do that, simply edit a post or add a new one. Once you’re in the WordPress editor, go ahead and click the ‘+’ sign at the top and then add a Shortcode block.
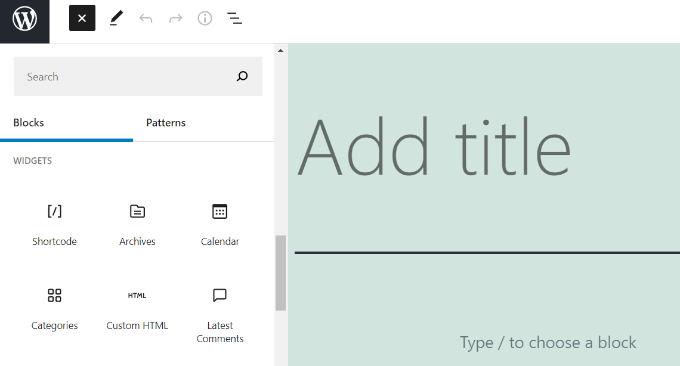
After that, simply enter the shortcode for your Contact Form 7 form in the shortcode block. It will look something like this:
| 1 | [contact-form-7 id="117"title="Contact Form"] |
Hosted with ❤️ by WPCode
Now, go ahead and publish your WordPress blog post to see the contact form in action. For the sake of this article, we have used the default contact form and added it to a WordPress page. This is how the contact form looked on our test site.
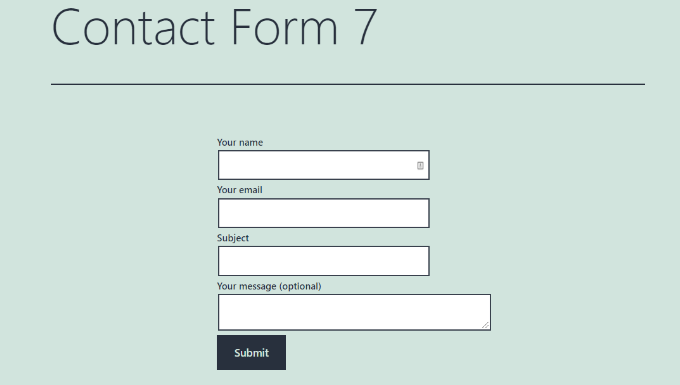
Now, are you ready to customize your Contact Form 7 form in WordPress?
Styling Contact Form 7 Forms in WordPress Using Custom CSS
Since Contact Form 7 doesn’t have built-in style options, you’ll need to use CSS to style your forms.
Contact Form 7 generates standard-compliant code for forms. Each element in the form has a proper ID and CSS class associated with it, making it easy to customize if you know CSS.
Each Contact Form 7 form uses the CSS class .wpcf7 that you can use to style your form.
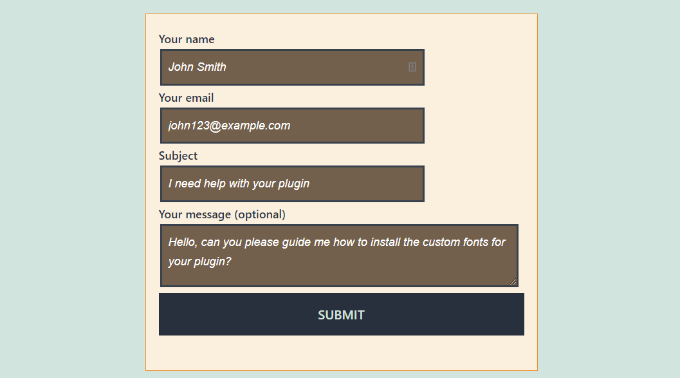
In this example, we will use the custom font called Lora in our input fields and change the background color of the form.
| 1234567891011121314151617181920 | div.wpcf7 { background-color: #fbefde;border: 1px solid #f28f27;padding:20px;}.wpcf7 input[type="text"],.wpcf7 input[type="email"],.wpcf7 textarea {background:#725f4c;color:#FFF;font-family:lora, sans-serif; font-style:italic; }.wpcf7 input[type="submit"],.wpcf7 input[type="button"] { background-color:#725f4c;width:100%;text-align:center;text-transform:uppercase;} |
Hosted with ❤️ by WPCode
If you need help adding the custom CSS, then please refer to our guide on how to easily add custom CSS to a WordPress site.
This is how our contact form looked after applying this CSS.
Styling Multiple Contact Form 7 Forms
If you are using multiple contact forms and want to style them differently, then you will need to use the ID generated by contact form 7 for each form. The problem with the CSS we used above is that it will be applied to all Contact Form 7 forms on your website.
To start, simply open a page containing the form you want to modify. Next, take your mouse to the first field in the form, right-click and select Inspect.
The browser screen will split, and you will see the page’s source code. In the source code, you need to locate the starting line of the form code.
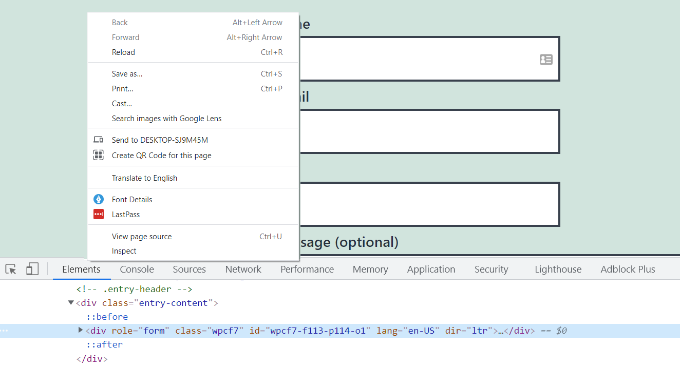
As you can see in the screenshot above, our contact form code starts with the line:
| 1 | <div role="form"class="wpcf7"id="wpcf7-f113-p114-o1"lang="en-US"dir="ltr"> |
Hosted with ❤️ by WPCode
The id attribute is a unique identifier generated by Contact Form 7 for this particular form. It is a combination of the form id and the post id where this form is added.
We will use this ID in our CSS to style our contact form and replace .wpcf7 in our first CSS snippet with #wpcf7-f113-p114-o1.
| 1234567891011121314151617181920 | div#wpcf7-f113-p114-o1{background-color: #fbefde;border: 1px solid #f28f27;padding:20px;}#wpcf7-f113-p114-o1 input[type="text"],#wpcf7-f113-p114-o1 input[type="email"],#wpcf7-f113-p114-o1 textarea {background:#725f4c;color:#FFF;font-family:lora, "Open Sans", sans-serif;font-style:italic;}#wpcf7-f113-p114-o1 input[type="submit"],#wpcf7-f113-p114-o1 input[type="button"] {background-color:#725f4c;width:100%;text-align:center;text-transform:uppercase;} |
Hosted with ❤️ by WPCode
You can now repeat the step for all your forms and replace the form ID for each Contact Form 7 form you want to customize.
Styling Contact Form 7 Forms with CSS Hero
An easier way you can change the style of Contact Form 7 forms is by using CSS Hero. It lets you edit your forms without the need to write CSS.
Simply install and activate the CSS Hero plugin on your website. You can follow our guide on how to install a WordPress plugin.
Next, go to the page containing your form and click on the ‘Customize with CSS Hero’ option in the toolbar at the top.

CSS Hero will provide you with an easy user interface to edit the CSS without writing any code.
Using the plugin, you can click on any field, heading, and other elements on your form and edit the background color, font, borders, spacing, and much more.
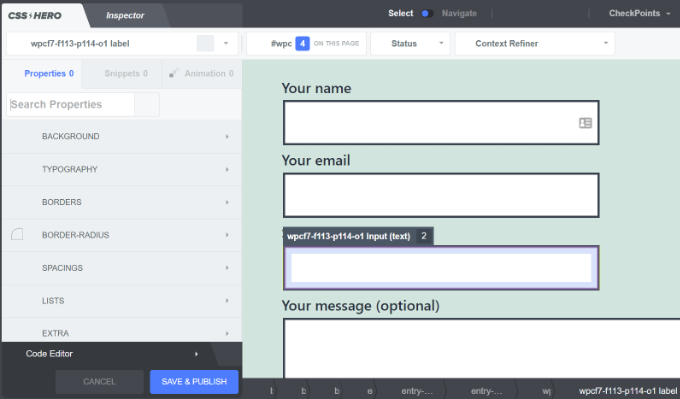
After you’ve customized your form, simply click the ‘Save & Publish’ button at the bottom.
We hope this article helped you learn how to style Contact Form 7 forms in WordPress. You may also want to see our guide on how to create an email newsletter and the best live chat software for small businesses.
Do you want to customize your Contact Form 7 forms and change their style? Contact Form 7 is one of the most popular contact form plugins for WordPress. However, the biggest downside is that the out-of-the-box forms you add are very plain-looking. In this article, we will show you how…
Do you want to customize your Contact Form 7 forms and change their style? Contact Form 7 is one of the most popular contact form plugins for WordPress. However, the biggest downside is that the out-of-the-box forms you add are very plain-looking. In this article, we will show you how…