How to Switch from JetPack Subscription to MailChimp, AWeber, etc
-
- 70
Do you want to switch your Jetpack subscribers to another email provider?
When starting a blog, most beginners use the Jetpack email subscription feature. However, as the blog grows, you will need a more powerful email marketing platform to manage email lists and send automated email campaigns to subscribers.
In this article, we will show you how to easily switch from a Jetpack subscription to other email services, such as Constant Contact, AWeber, Drip, and Mailchimp.
Why Switch From Jetpack to Other Email Services?
Email marketing is one of the most cost-effective marketing strategies, and it allows you to establish direct contact with your customers.
It is important to start building an email list from day one to steadily grow your subscribers and, as a result, your business.
With Jetpack, you can easily add subscriptions to your WordPress website. This allows your subscribers to be notified when you publish new content on your site.
However, if you want to send exclusive newsletter-only content, add an auto-responder, or send targeted email campaigns, then you will need something more powerful.
You will need a real email marketing service provider to build your email list on your WordPress blog.
We recommend switching to popular email marketing platforms like Constant Contact, AWeber, Drip, or any of these top email marketing services.
These are some of the most powerful email marketing platforms that offer a wide range of tools to automate marketing, create sales funnels, and use personalization.
That being said, let’s see how you can easily switch from Jetpack to other email services.
- How to Move Jetpack Subscribers to Other Email Services
- Method 1: Switch From Jetpack to Constant Contact (Recommended)
- Method 2: Switch From Jetpack to AWeber
- Method 3: Switch From Jetpack to Drip
- Method 4: Switch From Jetpack to Mailchimp
How to Move Jetpack Subscribers to Other Email Services
To start, you will need a list of your email subscribers to switch from Jetpack subscriptions to another email marketing platform.
First, head over to the Jetpack » Settings page from the WordPress admin dashboard.
From here, switch to the ‘Discussion’ tab at the top.
After that, scroll down to the ‘Subscriptions’ section and click on the ‘View your Email Subscribers’ link.

This will take you to the ‘Users’ page, where you need to switch to the ‘Subscribers’ tab.
Once your list of subscribers opens up, click on the three-dotted menu in the right corner and select ‘Download email subscribers as CSV’ from the dropdown menu.
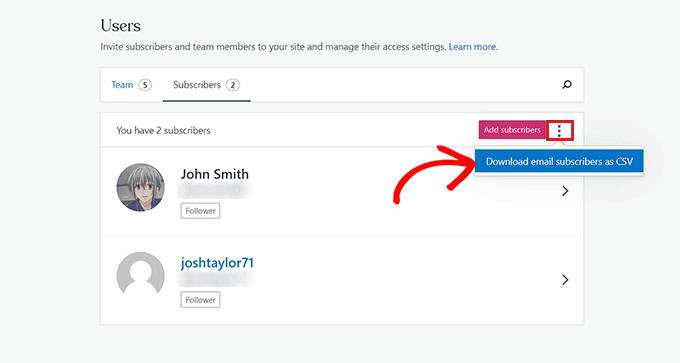
Jetpack will now prepare the list of your subscribers, and your browser will download it as a CSV file.
Now that you have your email subscribers, you can import them into any email marketing service you want.
Method 1: Switch From Jetpack to Constant Contact (Recommended)
If you want to switch to the Constant Contact email service, then this method is for you.
We recommend Constant Contact because it is super beginner-friendly and specializes in sending mass emails to customers, managing email lists, and running effective email marketing campaigns.
Constant Contact is a premium service, and their pricing starts as low as $9.99 /month. However, WPBeginner users can use our Constant Contact coupon code to get an additional 20% off!
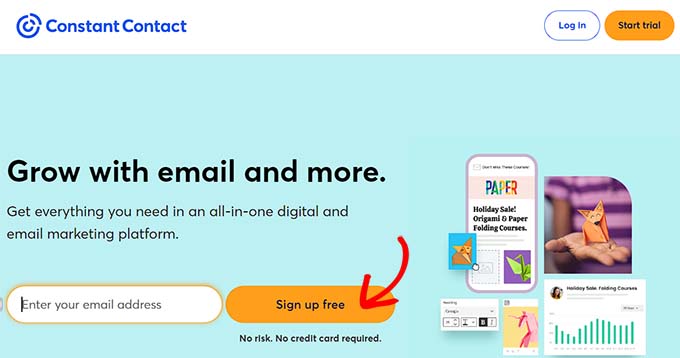
First, you will need to visit the Constant Contact website and sign up for an account.
For more details, you may want to see our guide on how to connect Constant Contact to WordPress.
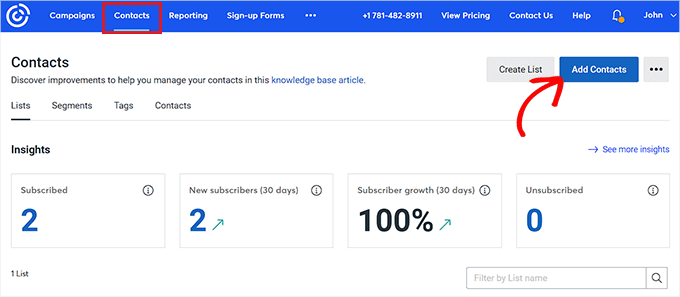
Once you have created an account, you will land on your account dashboard.
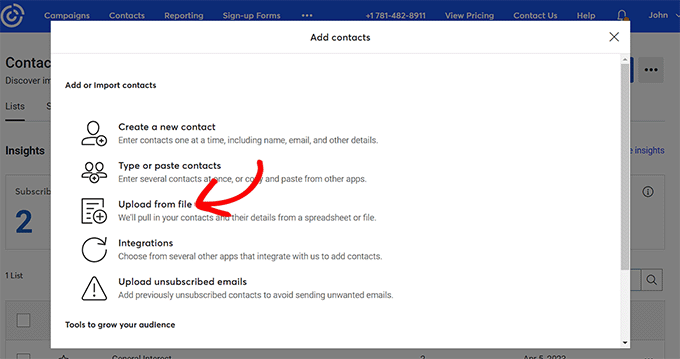
From here, switch to the ‘Contacts’ tab at the top and then click on the ‘Add Contacts’ button.
This will open up a popup on the screen, which will display a list of methods that can be used to import a contact list.
Simply click on the ‘Upload from file’ option.
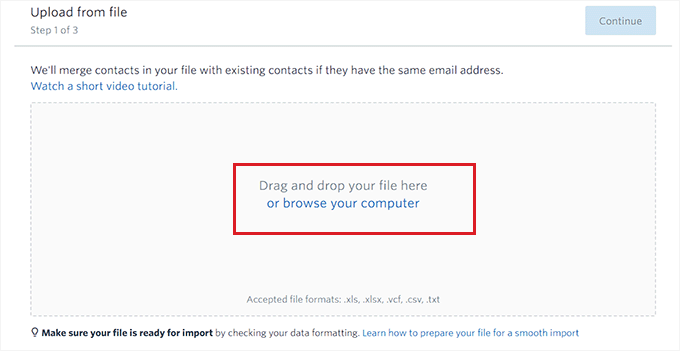
Next, you will be asked to upload a file from your computer. Just select the Jetpack email subscribers CSV file you downloaded earlier.
After that, click on the ‘Continue’ button to move forward through the process.
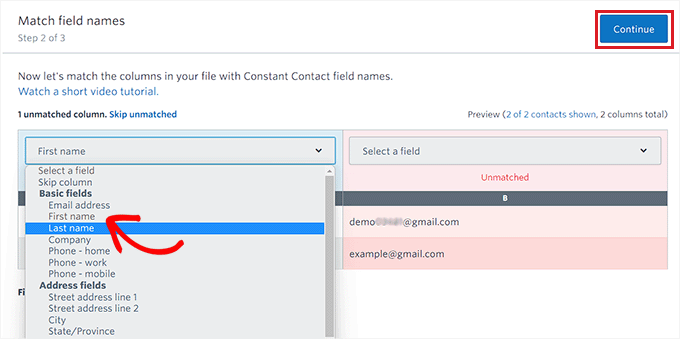
In the next step, you will have to select headings for the CSV file columns.
For instance, if you have a column in the CSV file containing the names of your email subscribers, you need to choose the ‘First Name’ field from the dropdown menu.
Once you are done, click the ‘Continue’ button at the top.
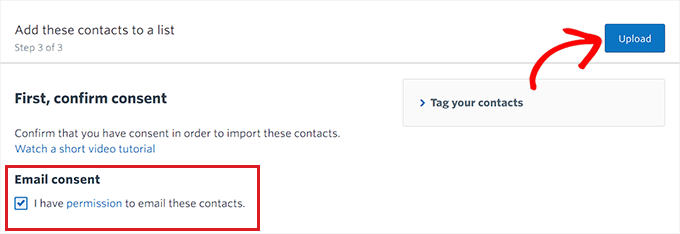
You will now be taken to the last step, where you must check the box under the ‘Email Consent’ option.
Finally, click the ‘Upload’ button to import your email subscribers CSV file.
You have successfully switched from Jetpack to the Constant Contact email marketing platform.
To learn more about how to use this platform to send emails, you can read our article on how to start an email newsletter.
Method 2: Switch From Jetpack to AWeber
This method is for you if you want to switch from Jetpack to AWeber.
AWeber is one of the oldest and most popular email marketing service providers. They offer a wide array of tools, including AMP emails, automatic RSS-to-email for bloggers, and tag-based subscriber segmentation.
AWeber also offers a limited free plan for up to 500 subscribers. After that, the pricing starts from $12.50/month.
First, you will need to visit the AWeber website and sign up for an account. For more details, please see our guide on how to connect AWeber to WordPress.
Upon activating your account, you will be taken to your AWeber dashboard.
Go ahead and visit the Subscribers » Add Subscribers page from the left column. After that, click on the ‘Import Multiple’ button.
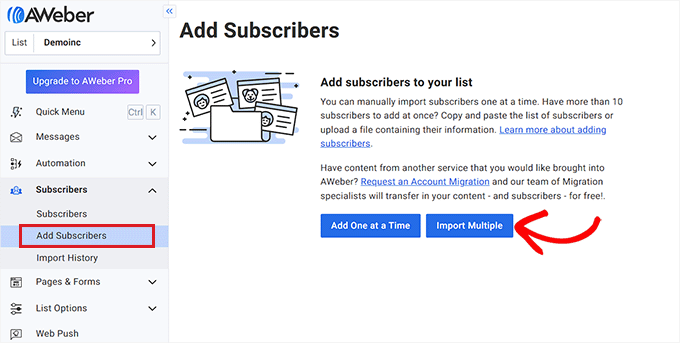
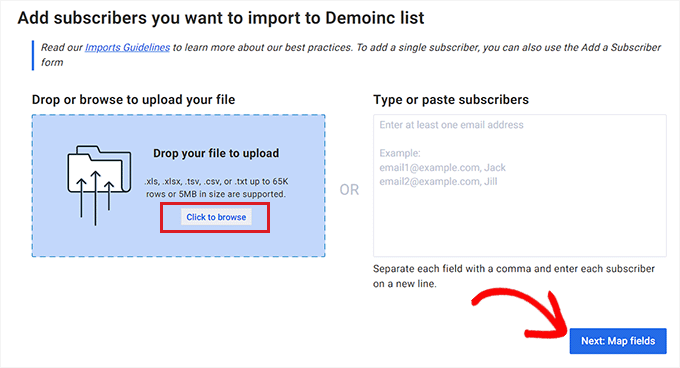
You will now see the ‘Import Subscribers’ screen.
From here, you must click on the ‘Click to browse’ button to upload a file from your computer. Go ahead and upload the Jetpack CSV file you downloaded earlier.
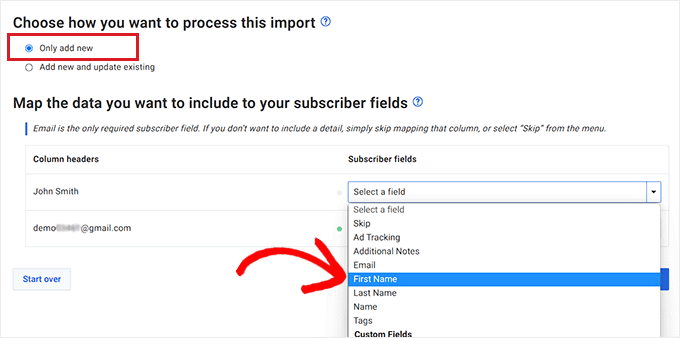
After that, you’ll be asked how to process the import. Simply check the ‘Only add new’ option.
Once you have done that, you will need to select subscriber fields for the column headers.
For example, if the CSV file had a column with subscriber names, then you must choose the ‘First Name’ option as the header for that column.
Once you are done, click on the ‘Next: Map fields’ button to continue.
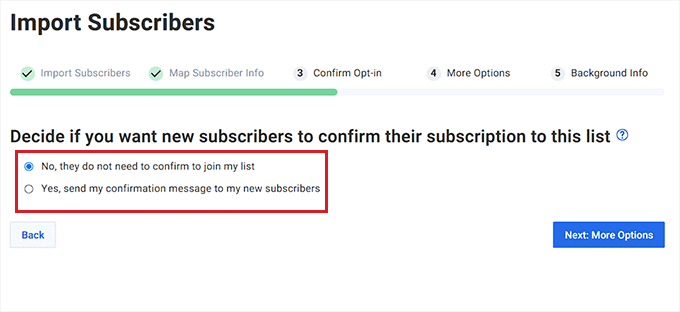
In the next step, you must decide if you want users to confirm their subscription to the list or not.
For instance, if you choose the ‘Yes’ option, all subscribers in your CSV file will be emailed upon import completion. The users will then have to click on the confirmation link in the email to become active subscribers on your list.
However, if you check the ‘No’ box, users won’t receive confirmation emails.
Once you have made your choice, click the ‘Next: More Options’ button.
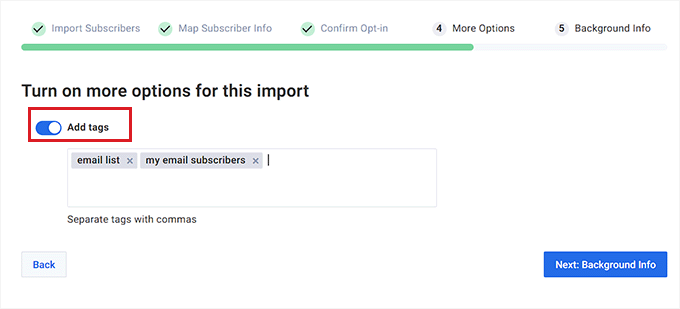
After that, you will be taken to step three. From here, you can toggle the ‘Add Tags’ switch to add separate tags to your email list.
You can also skip to the next step if you don’t want to add any tags. Just click the ‘Next: Background Info’ button to continue.
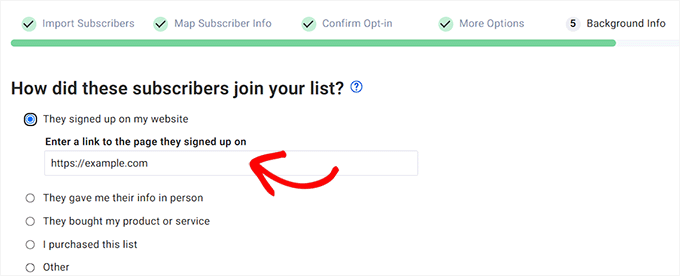
On the next page, you will be asked to specify how the subscribers signed up for your list. Simply choose from one of the options and provide more details as required.
For instance, if you select the ‘They signed up on my website’ option, you will also need to provide your website URL.
Next, you will be asked if you are importing the subscribers from another email provider. Simply check the ‘Yes, they are coming from another provider’ option and then type Jetpack as the email service.
Finally, click the ‘Submit Your Import’ button to upload your CSV file.

You have now successfully imported your email subscribers to AWeber from Jetpack.
Method 3: Switch From Jetpack to Drip
Drip is a powerful email marketing platform for eCommerce, bloggers, and digital marketers. If you have an online store, we recommend switching to Drip because it offers the best eCommerce email marketing features.
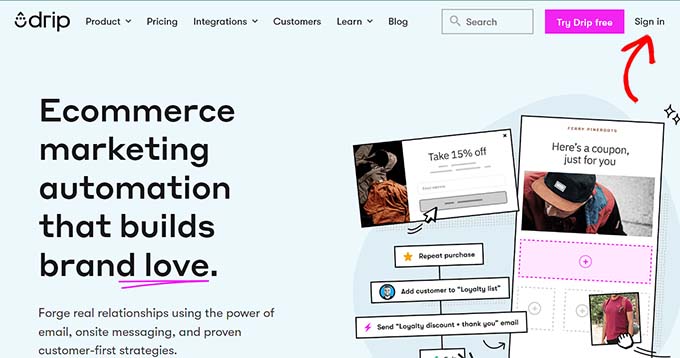
First, you need to visit the Drip website and click on the ‘Sign in’ button to create an account.
Follow the steps to sign up for an account. Once your account has been activated, you will be taken to your Drip dashboard.
Once there, head over to the People » Active page from the left sidebar.
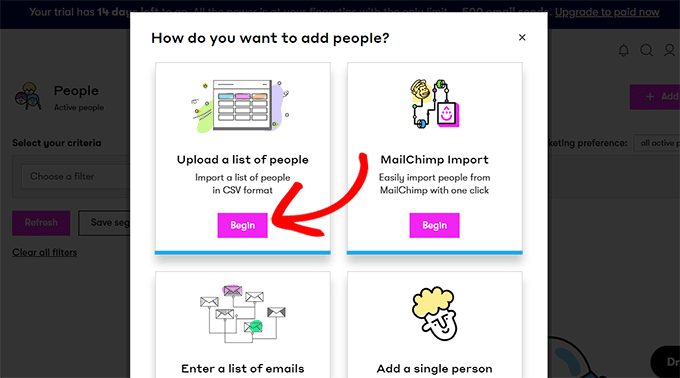
Next, click the ‘+ Add People’ button in the top-right corner of the page.

A new prompt will now show up on your screen.
Click the ‘Begin’ button under the ‘Upload a list of people’ option.
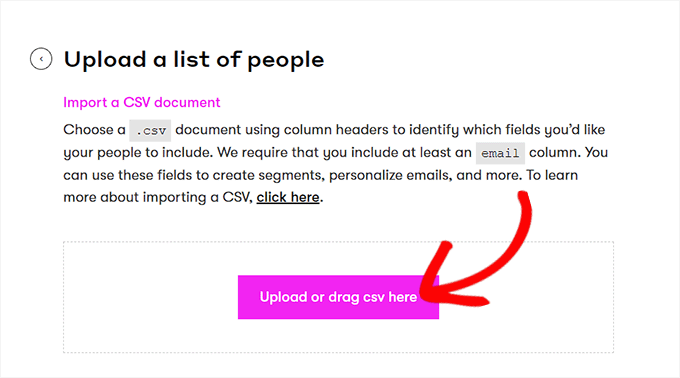
This will take you to a new page where you can drag or upload the CSV file.
Simply click on the ‘Upload or drag csv here’ button and import the Jetpack CSV file.
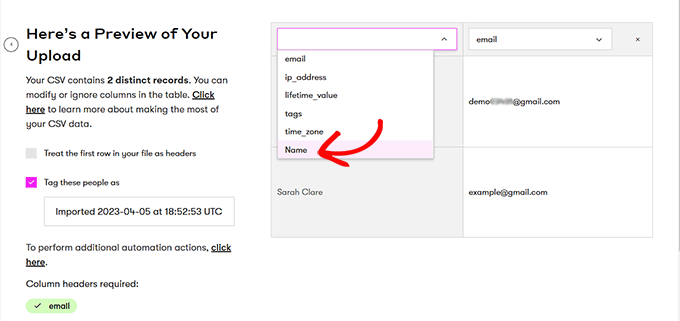
Now, you will be automatically taken to the next step.
Here you need to choose CSV files column names from the dropdown menu. Then, click the ‘Next’ button to continue.
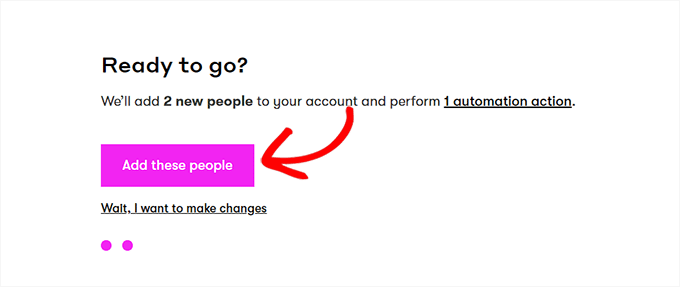
This will take you to the ‘Ready to go?’ page, where you have to click on the ‘Add these people’ button.
Your email subscribers will now be imported from Jetpack to Drip.
Method 4: Switch From Jetpack to Mailchimp
This method is for you if you want to switch from Jetpack to Mailchimp.
Note: We recommend using the other three email marketing providers because Mailchimp has declined in quality over the years while becoming more expensive. For more details, you may want to see our showcase of the best Mailchimp alternatives.
First, you need to visit the Mailchimp website and create an account.
For more instructions, please see our ultimate guide to using Mailchimp in WordPress.

Upon account activation, you will be taken to your Mailchimp dashboard.
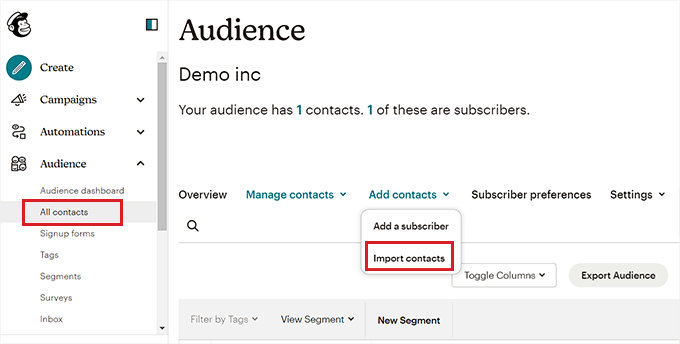
Once there, go to the Audience » All Contacts page from the left column.
Next, select the ‘Import Contacts’ option from the ‘Add Contacts’ dropdown menu.
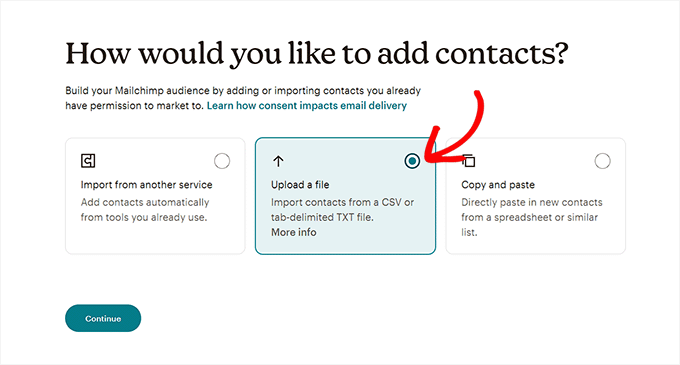
This will take you to a new page, where you will be shown a list of import methods.
Simply choose the ‘Upload a file’ option and click the ‘Continue’ button.
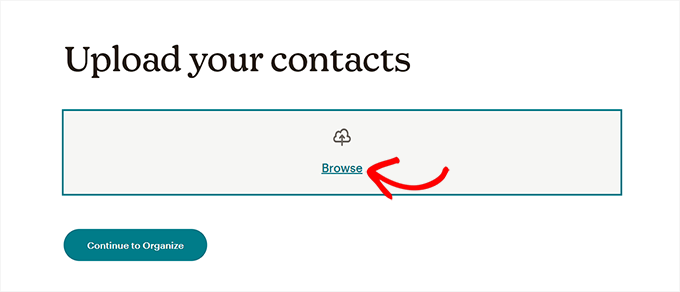
You should then see the ‘Upload your contacts’ page. Simply click the ‘Browse’ button to upload the Jetpack CSV file.
Next, go ahead and click the ‘Continue to Organize’ button.
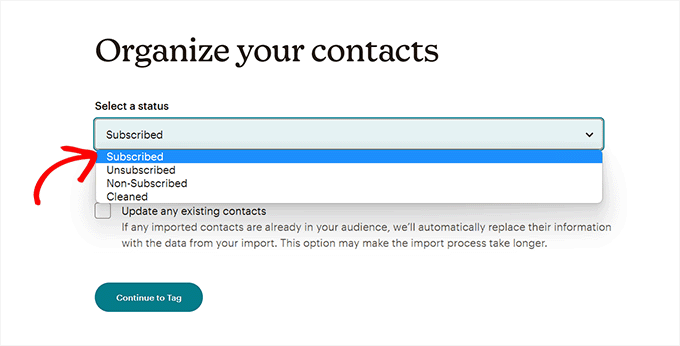
You will now be asked to choose a status for the contacts that you are importing. Since you will be importing a list of email subscribers, you need to select the ‘Subscribed’ option from the dropdown menu.
Once you are done, click the ‘Continue to Tag’ button.
On the ‘Tag Your Contacts’ page, you can choose from some of the popular tags or create your own.
After that, click the ‘Continue to Match’ button to move forward.

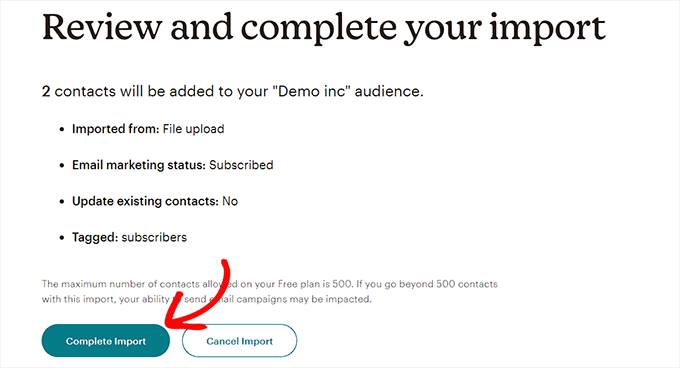
This will take you to the ‘Review and complete your import’ page.
Finally, click the ‘Complete Import’ button to import your subscribers from Jetpack to Mailchimp.
We hope this article helped you learn how to switch from Jetpack subscriptions to Mailchimp and other email services. You may also want to see our tutorial on how to build an email list in WordPress, and our comparison of best web push notification software to increase your traffic.
Do you want to switch your Jetpack subscribers to another email provider? When starting a blog, most beginners use the Jetpack email subscription feature. However, as the blog grows, you will need a more powerful email marketing platform to manage email lists and send automated email campaigns to subscribers. In this article,…
Do you want to switch your Jetpack subscribers to another email provider? When starting a blog, most beginners use the Jetpack email subscription feature. However, as the blog grows, you will need a more powerful email marketing platform to manage email lists and send automated email campaigns to subscribers. In this article,…